• Home
  • About

julia chews the fat

julia chews the fat

Category Archives: Sweet Tooth

Olive Oil Carrot Cake

19 Sunday Apr 2015

Posted by julia chews the fat in Breakfast & Brunch, Snacking, Sweet Tooth

≈ 1 Comment

Today, dear friends, I’m offering you cake.

Does it matter that it came from the (very boring) utilitarian impulse to rid my fridge of a 5lb bag of carrots? Or that it burnt a little along the edges because I forgot to set the timer? Or that the carrots strewn decoratively over the top came out a bit crisper than expected? No, none of the this matters. Because, it is, after all, still cake.

Glorious, glorious cake.

Olive Oil Carrot Bread

Or at least that’s what I’m calling it, even if it’s worlds apart from the butter-and-frosting YOLO carrot cake I made a few weeks ago (if that thing were a person, it’d be the first one to finish the keg at the party and do a cannonball in the deep end of the pool.)

No, this cake, this loaf, marches to the beat of a different drum.

The original recipe refers to it a “bread”, but I think it feels and tastes a lot closer to a pound cake, the only real difference being that you swap the pound of butter (hence, POUND cake) for one cup of olive oil. (cardiologists, rejoice.) To be clear, though, this isn’t exactly health-cake either. At least not in the strictest sense of the word. It’s still got white flour and sugar (one and a quarter cups to be precise!) and all that good stuff. Which brings me back to the reason I’m calling it “cake”. It’s got a very moist crumb – thanks to the olive oil – and crisp edges, making it perfect for dunking into coffee or tea. The fact that it’s jam-packed with strands of fresh carrot leads me to believe that it’s also perfectly acceptable to call it breakfast cake.  (If you’re not convinced, just leave half a loaf in the copy room at work. By 9:30am, that thing will be demolished. Ta da! Breakfast for all!)

Olive Oil Carrot Cake – slightly adapted from Brooklyn Supper

  • 2 cups all-purpose flour
  • 1 tsp baking powder
  • ½ tsp baking soda
  • 1 tsp sea salt
  • ½ tsp freshly grated nutmeg
  • ½ tsp ground ginger
  • 3 eggs
  • 1 ¼ cups sugar
  • 2 cups grated carrots
  • 1 Tbsp lemon zest
  • 1 tsp vanilla extract
  • 1 cup extra virgin olive oil

1) Preheat oven to 350°F. Liberally butter a 9 x 5 inch loaf pan.

2) In a small bowl, combine the flour, baking powder and soda, salt, and spices.

3) In a large bowl, beat eggs and sugar on low speed (or with a whisk). Add grated carrots, zest, and vanilla. Fold in half the flour, all of the olive oil, and then the remaining flour. Mix just until everything is well combined.

4) Spoon into prepared loaf pan and bake for 40 minutes. Pull bread from oven and carefully lay 3 or 4 candied carrot halves across the top; spoon 2 tablespoons of the syrup over the top. Put back into the oven, and bake 20 – 30 minutes more or until a toothpick inserted in the center comes out with just a few crumbs attached.

5) Cool for 20 minutes, and then flip out onto a platter or rack to cool completely.

For the Candied Carrots (optional)

  • 4 small carrots
  • 1 cup sugar
  • 1 cup water

1) Trim the tops of the carrots, then peel and halve them. (if you’re using pretty, market-fresh carrots for this, you can leave a little spray of greens at the top.)

2) In a wide saucepan, heat the sugar and water over medium heat. When sugar has dissolved, add the carrots and turn heat down so that mixture bubbles ever so gently. Cook, swirling pan occasionally, for 20 minutes or until thinnest part of carrot is translucent.

Note: the carrot bread will keep for a few days, well-wrapped at room temperature.

Olive Oil Carrot Bread, section

Share this:

  • Tweet
  • Share on Tumblr
Like Loading...

A Cake for Non-Bakers

13 Friday Feb 2015

Posted by julia chews the fat in Cooking For Your Peeps, Sweet Tooth, The Basics

≈ Leave a comment

Sometimes there’s the assumption that, because you know how to cook, it naturally follows that you know how to bake; that for the food-obsessed home cook, the realm of savoury and sweet are completely interchangeable. Allow me to put that assumption to bed. Cooking and baking are two different beasts – not mutually exclusive, but not close bedfellows either. Slipping a pot roast in the oven is not the same as, say, slipping a pan of brioche dough into the oven. Not at ALL the same. While I’m a decent home cook, I wouldn’t go as far to call myself a baker. I’ve certainly baked things before – lots of things – but I’ve never really done it with the same confident ease that flows through the veins of seasoned bakers. There are people who whip around the kitchen like they were born with a whisk in one hand and a battered spatula in the other. These people are forces of nature.

In contrast, baking for me usually involves a lot of lip-biting, heavy sighing, cursing and finger-crossing. I’ve had my fair share of lumpy, jiggly, over-baked, under-baked, quivering specimens come out of the oven, which means that each time I step into the kitchen to bake something new, there’s a little bit of PTSD that creeps in. I gnaw at my cuticles. I get cold sweats. I pray a little harder to the gods of sugar and spice and everything nice. Sometimes things work out (almond meringues, whipped to perfection!), sometimes they don’t (cherry clafouti that looks and tastes like punishment!). It’s a game of baking Russian roulette, really. Except that when things start to go downhill (why isn’t the cream setting? why are there nubs in the frosting? why is the centre still uncooked, but the bottom nearly burnt?), I remember that, in my case, there are several bullets in the barrel…not just one.

Strangely, these failures haven’t stopped me trying to be a better baker. They’ve actually had the opposite effect – I still bookmark the sweets sections of my cookbooks and turn baking magazines into fringed monsters with Post-Its; I continue to fatten up my Pinterest board with baking ideas that may or may not materialise (I’m looking at you, cannelés…). It’s a habit that’s equal parts romanticism, masochism and obstinance, but it’s part of a larger goal of not letting fear dictate what I make (or don’t make) in the kitchen, even if it means burning a few things in the process.

That said…

I do have a pretty bad Valentine’s Day track record. So this year I’ve decided to cool it with the overly-complicated, thematic baked goods. Instead, I’m proposing something for the non-bakers in all of us. Something easy and ultra-delicious that can be thrown together quicker than you can say Thank god I didn’t burn another batch of stupid, flipping cupcakes.

May I present your new favourite back-pocket recipe, for:

CARROT CAKE WITH CREAM CHEESE FROSTING

You’ve had a version of this cake before, I’m sure. But the one I’ve got here is 100% foolproof, straight from the ever-dependable, Canadian Living Test Kitchen. It’s been one of my mom’s go-to cake recipes for years and it’s always perfect. It isn’t French pâtisserie; it doesn’t require chilling or resting or parbaking or leavening or whipping egg whites into stiff peaks. In other words, it’s a very forgiving cake. Which is a good thing when you’re not preternaturally skilled in the baking department. I’m certain your Valentine will appreciate the gesture. (Especially because it means they won’t have to eat another batch of punishment cupcakes.)

Happy Love Day to all of you. x

—–

A note on decorating: as it turns out, my cake-decorating skills are about as limited as my baking skills, which explains why the final result looks a little like a confederate flag from a usurped Dutch republic. But, no matter. The important thing is that your cake is delicious. You’re not Martha Stewart and this isn’t a beauty contest. So if your candied orange rosettes look more like something off a cheap sushi platter, it’s no big deal. Own it. Because you did, after all, make a wicked cake. Rosettes or no rosettes.

iced cake

Carrot Cake with Cream Cheese Frosting and Candied Carrots – cake and icing from Canadian Living/candied carrots from Ricardo Cuisine Makes two (2) 8-inch square cakes (can be layered, or served separately) – serves 12-14

Ingredients

  • 2 cups all-purpose flour
  • 2 tsp baking powder
  • 2 tsp cinnamon
  • 1 tsp baking soda
  • 3/4 tsp salt
  • 1/2 tsp nutmeg
  • 3/4 cup granulated sugar
  • 3/4 cup packed brown sugar
  • 3 eggs
  • 3/4 cup vegetable oil
  • 1 tsp vanilla
  • 2 cups grated carrots
  • 1 cup drained crushed canned pineapple
  • 1/2 cup chopped pecans

Icing:

  • 1 (8 oz) package cream cheese, softened
  • 1/4 cup butter, softened
  • 1/2 tsp vanilla
  • 1 cup icing sugar

Directions:

1) Grease and flour two 8″ square cake pans ; set aside.

2) In large bowl, whisk together flour, baking powder, cinnamon, baking soda, salt and nutmeg.

3) In separate bowl, beat together granulated and brown sugars, eggs, oil and vanilla until smooth; pour over flour mixture and stir just until moistened. Stir in carrots, pineapple and pecans. Spread in prepared pan.

4) Bake in centre of 350°F oven for 40 minutes or until cake tester inserted in centre comes out clean. Let cool in pan on rack. (Make-ahead: Cover with plastic wrap and store at room temperature for up to 2 days.)

Icing: In bowl, beat cream cheese with butter until smooth. Beat in vanilla. Beat in icing sugar, one-third at a time, until smooth. Spread over top of cake. (Make-ahead: Cover loosely and refrigerate for up to I day.)

Candied carrots (optional):

  • 1/2 cup (125 ml) orange juice
  • 1/2 cup (125 ml) sugar
  • 2 small, thick carrots, thinly sliced lengthwise (on a mandolin or with a vegetable peeler)

In a saucepan, bring the orange juice and sugar to a boil. Add the sliced carrots. Simmer until tender and translucent, about 8 minutes depending on thickness. Let cool completely. Drain. Arrange on cake as desired. candied carrots icing cake -1 icing cake - 2 icing cake - 3 cake layers cake slice

Share this:

  • Tweet
  • Share on Tumblr
Like Loading...

Chocolate Cake for Cheat Days

19 Wednesday Nov 2014

Posted by julia chews the fat in Cooking For Your Peeps, Sweet Tooth

≈ Leave a comment

I’ve always had a strained relationship with self-imposed dietary restrictions. I’m not the girl who’s likely to order the salad without a side, or the guest who’ll forgo the birthday cake. That said, I do think how and what each of us eats is a deeply personal choice. (It should go without saying that having that choice is a veritable luxury, considering how many people don’t have a choice when it comes to how and what they eat. But that’s another topic all together.) Ultimately, I don’t think there is a right way, or a wrong way of eating. Culture, upbringing, ethics, genetics, economics and personal preferences will in large part dictate our predilections for certain foods. The things I choose might not be the same as you, but as far as I’m concerned, that is A-ok.

Except, it seems, if you happen to be my boyfriend. And it’s pie season.

Roughly a month ago, the man in my life announced that he was adopting a diet – one based on a set of principles derived from this book. It’s essentially a high-protein, slow-carb regimen, where gluten is eliminated and sugars are kept to a bare minimum, replaced in large part by vegetables, meat, eggs, lentils and beans. Any grains (bread, flour, pasta, rice, corn, quinoa, farro, oats), fruit, alcohol, dairy, juice, sugars, and vegetables with a high glycemic index (potatoes, squash, beets, turnips) are not invited to the kitchen table. There’s certainly a lot more to it, but that’s the gist.

For someone who spends a lot of her free time reading, researching and talking about food, this announcement aroused the kind of visceral reaction you might expect.

10367607_10152767445700351_5293473938993278157_n

Despite the fact that this wasn’t something he was imposing on me, it still put me in a bit of a tailspin. What will we eat? How will we eat? Will our meals be separate? What if I want to put a drizzle of honey in the salad dressing? And so on and so forth. Something that had always represented sustenance, creativity, sharing and fun was suddenly reduced to its most basic parts – fuel and abstention, caloric intake and glycemic rates, “good” foods and “bad” foods. Given that I’ve never dreamed of using “food” and “metabolic absorption rate” in the same sentence, it was clear there was an immediate philosophical disconnect between me and this diet, something that manifested itself in quiet resistance from the sidelines as he measured his beans and popped his potassium pills. While I tried to see things in perspective and mitigate my apprehensions, it quickly came to my attention that I was, in fact, a card-carrying member of the Diet Debbie Downer Society, a shitty place to be when you want to be supportive of your partner who, for his part, is just trying to do something positive.

That was four weeks ago. From where I stand now, I can tell you this: it’s been an eye-opening process, one that, you’ll be happy to know, has been devoid of any of the catastrophic repercussions I’d initially imagined. It’s made me reflect on dietary choices and values, and the interconnectedness of the two. It’s forced me to confront and take stock of my own prejudices and approaches to food, and – perhaps not surprisingly – it’s also solidified some of my core beliefs. While I’m still working out some of the kinks – balancing my own beliefs and being supportive of his – I’ve begun to see things in a different light. I’m proud of his efforts and for taking on a challenge he believes in. We might not always be on the same page when it comes to this diet, but we’ve reached a rhythm.

To maintain our respective sanities, part of that rhythm includes something called CHEAT DAY, the one day a week when the diet is put on pause and he gets to eat whatever the hell he wants – the bread, the cheese, the sugar, the beer…any and all of it. He, very wisely, designated Saturday as “cheat day”, which means, amongst other things, Saturday can be chocolate cake day. Dense, boosy, debaucherous, chocolate cake day.

Hallelujah.

cake slice

Chocolate Bourbon Cake (makes one 9×5-inch loaf + smaller one) – adapted from Nigella Lawson’s How to Be a Domestic Goddess

Note: the recipe here uses dark chocolate instead of cocoa powder, creating a cake that is moist and dense at the centre, gently petering out to a lighter crumb on the outside. It might not be the prettiest confection on the block, but it’s a good back-pocket recipe to have in your repertoire. It’s rich, but not heavy; sweet, but not overly so. The coffee and booze hum along nicely in the background – barely perceptible, but still there, taking things from PG to PG-13. The cake is great on its own (and a perfect companion to tea or coffee), but would also be nice with a glaze or frosting, should you feel so inclined.

Ingredients
1 cup soft unsalted butter
1 2/3 cup dark brown sugar
1 1/3 cup all-purpose flour
1 teaspoon baking soda
1 teaspoon sea salt (such as Maldon or Fleur de sel)
2 large eggs
1 tablespoon vanilla extract
4 ounces bittersweet chocolate, melted using a bain marie
2 tablespoons bourbon
1 cup freshly brewed coffee

cake ingredients

Directions

Note: The key to that lovely, fudgey interior is baking time – take care not to overbake.

1) Preheat the oven at 375°F. Line a 9×5-inch loaf pan with parchment paper (no need to cut it to make it fit – the excess paper can spill over the sides). Do the same thing with a smaller loaf pan (or butter a muffin tin).

2) Cream the butter and sugar with electric hand-held mixer (a wooden spoon works too).

3) Meanwhile, whisk together the flour, baking soda and salt. Set aside.
Add the eggs and vanilla to the butter-sugar mixture and beat until combined.
Next, fold in the melted and slightly cooled chocolate, taking care to blend well but being careful not to overbeat. Add the bourbon and mix to combine.

4) Next, gently add the flour mixture alternately spoon by spoon with the coffee until you have a smooth and fairly liquid batter.

cake batter

5) Pour into the lined loaf pan, being sure to leave about an inch from the rim, so that the batter doesn’t overflow as it bakes. Pour the excess into the smaller prepared pan. Bake 30 minutes. (at this point, the smaller pan can be removed). Turn the oven down to 325 degrees and continue to cook for another 10-15 minutes. The cake will still be a bit moist inside, so an inserted cake tester or skewer won’t come out completely clean. Allow to cool completely before turning it out onto a cooling rack. (The texture gets even better if the cake has had a day to rest.)

cake slice cut

Share this:

  • Tweet
  • Share on Tumblr
Like Loading...

Peach Upside Down Cake

06 Saturday Sep 2014

Posted by julia chews the fat in Cooking For Your Peeps, Sweet Tooth, Vegetarian

≈ 3 Comments

It starts to get dark before dinner time; the outdoor pools are officially closed; the local ice cream parlour is readying its “See You Next Year!” sign. These are the annual harbingers that make us want to close our eyes, stick our fingers in our ears and go “la la la la la…I can’t heaaar you”. But, as we know, resistance is futile; whether we like it or not, we just have to suck it up, accept that summer’s days are numbered and put away the tan shorts.

Instead of hyperventilating at the prospect of losing the days of warm sunshine, late sunsets and Bo-bec’s mint chocolate chip, I’ve decided to focus on the last few gems of summer. After working my way through many pints of tiny, sweet blueberries and strawberries from Saint-Jean-sur-Richelieu over the last couple of weeks, I’ve been putting in some time with Ontario peaches, which are not only still available, but also still fragrant and lusciously sweet.

Last weekend, after an afternoon of prepping food for a family barbecue, I noticed that there were a few peaches hanging out in the fruit bowl, verging on overripeness. Figuring that a family barbecue would be a good occasion for cake, I pulled one together with the help of Ina Garten (not the person, but the recipe), with the sole purpose of using up the peaches slowly expiring on my countertop. What emerged was something that far surpassed my expectations – a tender, fluffy upside down cake, crowned with a layer of syrupy peaches. It was delectable. So much much so, that it had my grandmother, brother, and sister-in-law were raving about it for days later. (which, let’s be honest, is supremely gratifying to the home baker.)

Happy end of summer, lovely readers. Be sure to make it a sweet one.

Peach Upside Down Cake

Peach Upside Down Cake – adapted from Ina Garten

  • 3/4 stick unsalted butter, room temperature (plus extra for greasing the dish)
  • 5-6 ripe peaches cut in half, pitted and sliced
  • 1 cup granulated sugar (for the caramel)
  • 3/4 cup granulated sugar (for the cake)
  • 2 large eggs, room temperature
  • 1/3 cup sour cream
  • 1/2 teaspoon grated lemon zest
  • 1 teaspoon pure vanilla extract
  • 1 cup plus 2 tablespoons all-purpose flour
  • 1/2 teaspoon baking powder
  • 1/4 teaspoon kosher salt
  • Confectioners’ sugar

Directions

Preheat the oven to 350 degrees F. Generously butter a 9-inch glass or ceramic pie dish and arrange the peach slices in a circular pattern at the bottom of the dish.

050

Combine 1 cup of the granulated sugar and 1/3 cup water in a small saucepan and cook over medium-high heat until it turns a warm amber colour, about 360 degrees F on a candy thermometer. Swirl the pan but don’t stir. Pour evenly over the peaches. (Be careful not to burn the sugar – or yourself – while doing this. Caramel tends to quick more quickly near the end, so keep a close eye on things.). As it sets, the caramel will stiffen, like candy – don’t worry, it will become syrupy again as the cake bakes in the oven.

062

065

Meanwhile, cream the 6 tablespoons of butter and the remaining 3/4 cup of granulated sugar in the bowl of an electric mixer fitted with the paddle attachment, until light and fluffy. Lower the speed and beat in the eggs one at a time. Add the sour cream, zest, and vanilla and mix until combined. Sift together the flour, baking powder, and salt and, with the mixer on low speed, add it to the butter mixture. Mix only until combined. Pour the cake batter evenly over the peaches.

Batter

Batter

Batter

Bake for 30 to 40 minutes, until a cake tester comes out clean. Cool for 15 minutes, then invert the cake onto a flat plate. If a peach clings to the baking dish, ease it out and place it back in its spot on the top of the cake. Serve warm or at room temperature, dusted with confectioners’ sugar.

Peach Upside Down Cake

Share this:

  • Tweet
  • Share on Tumblr
Like Loading...

Life envy and madeleines

03 Sunday Aug 2014

Posted by julia chews the fat in Breakfast & Brunch, Sweet Tooth, The Basics

≈ 8 Comments

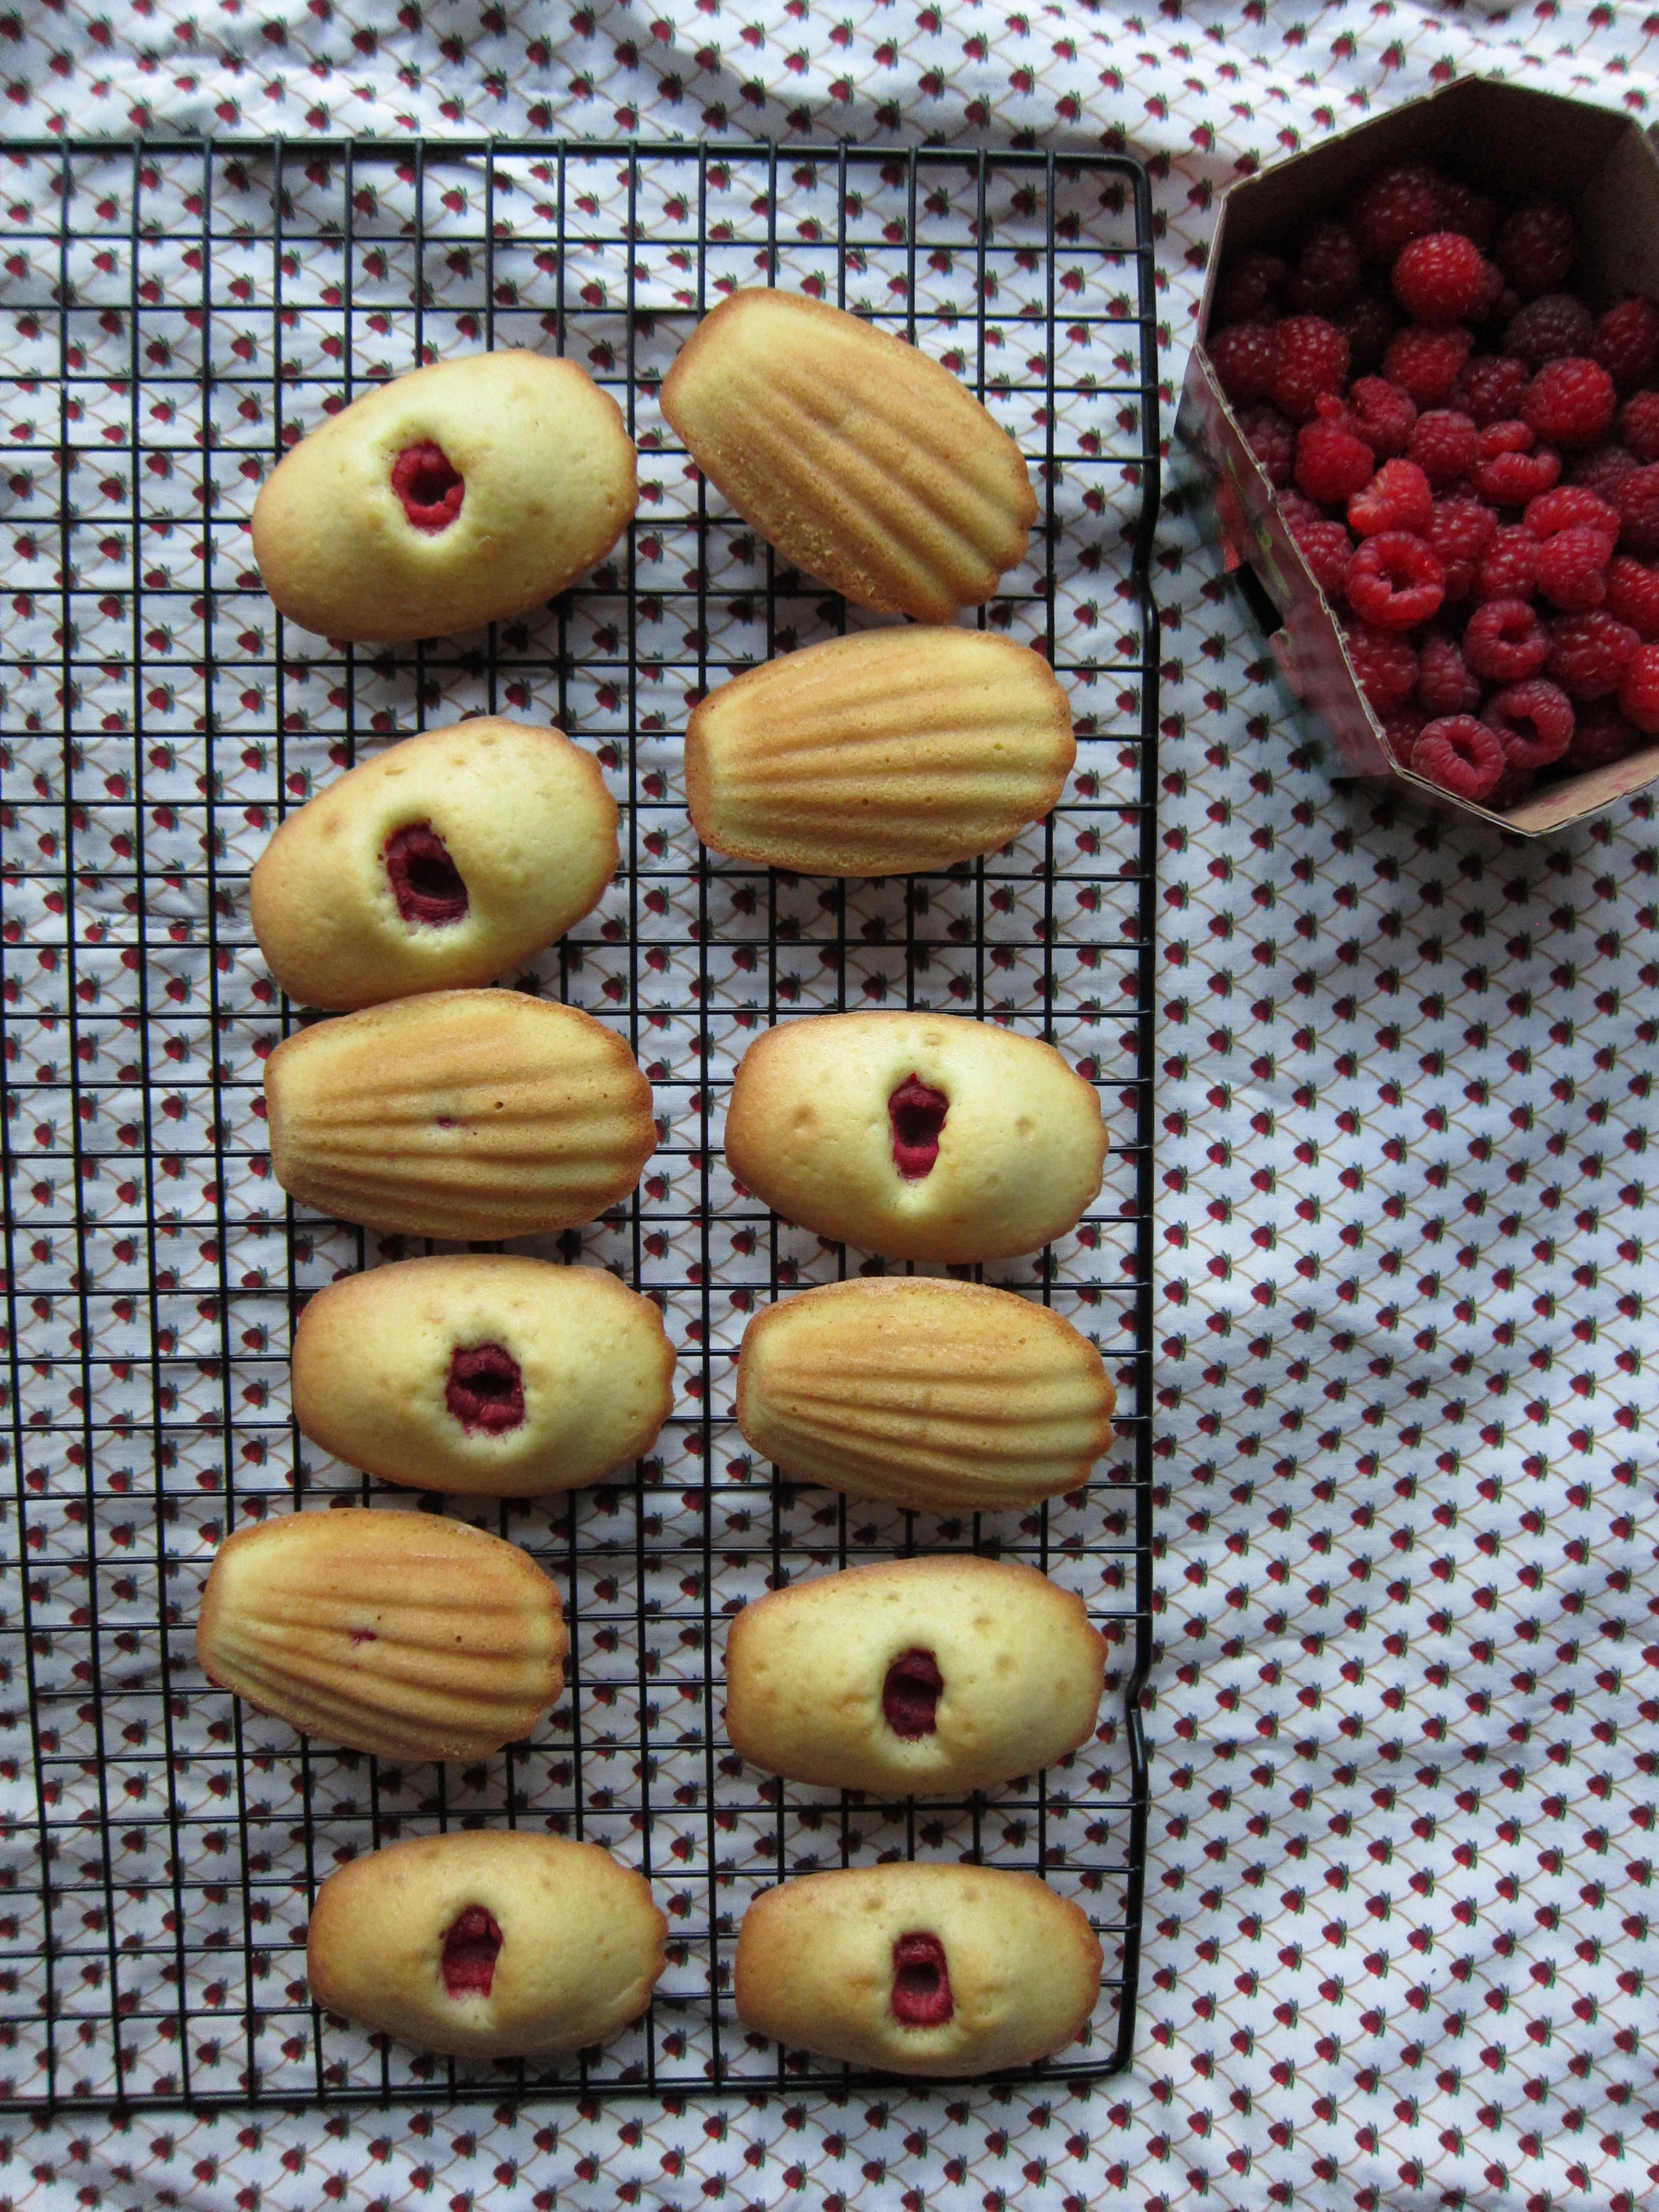
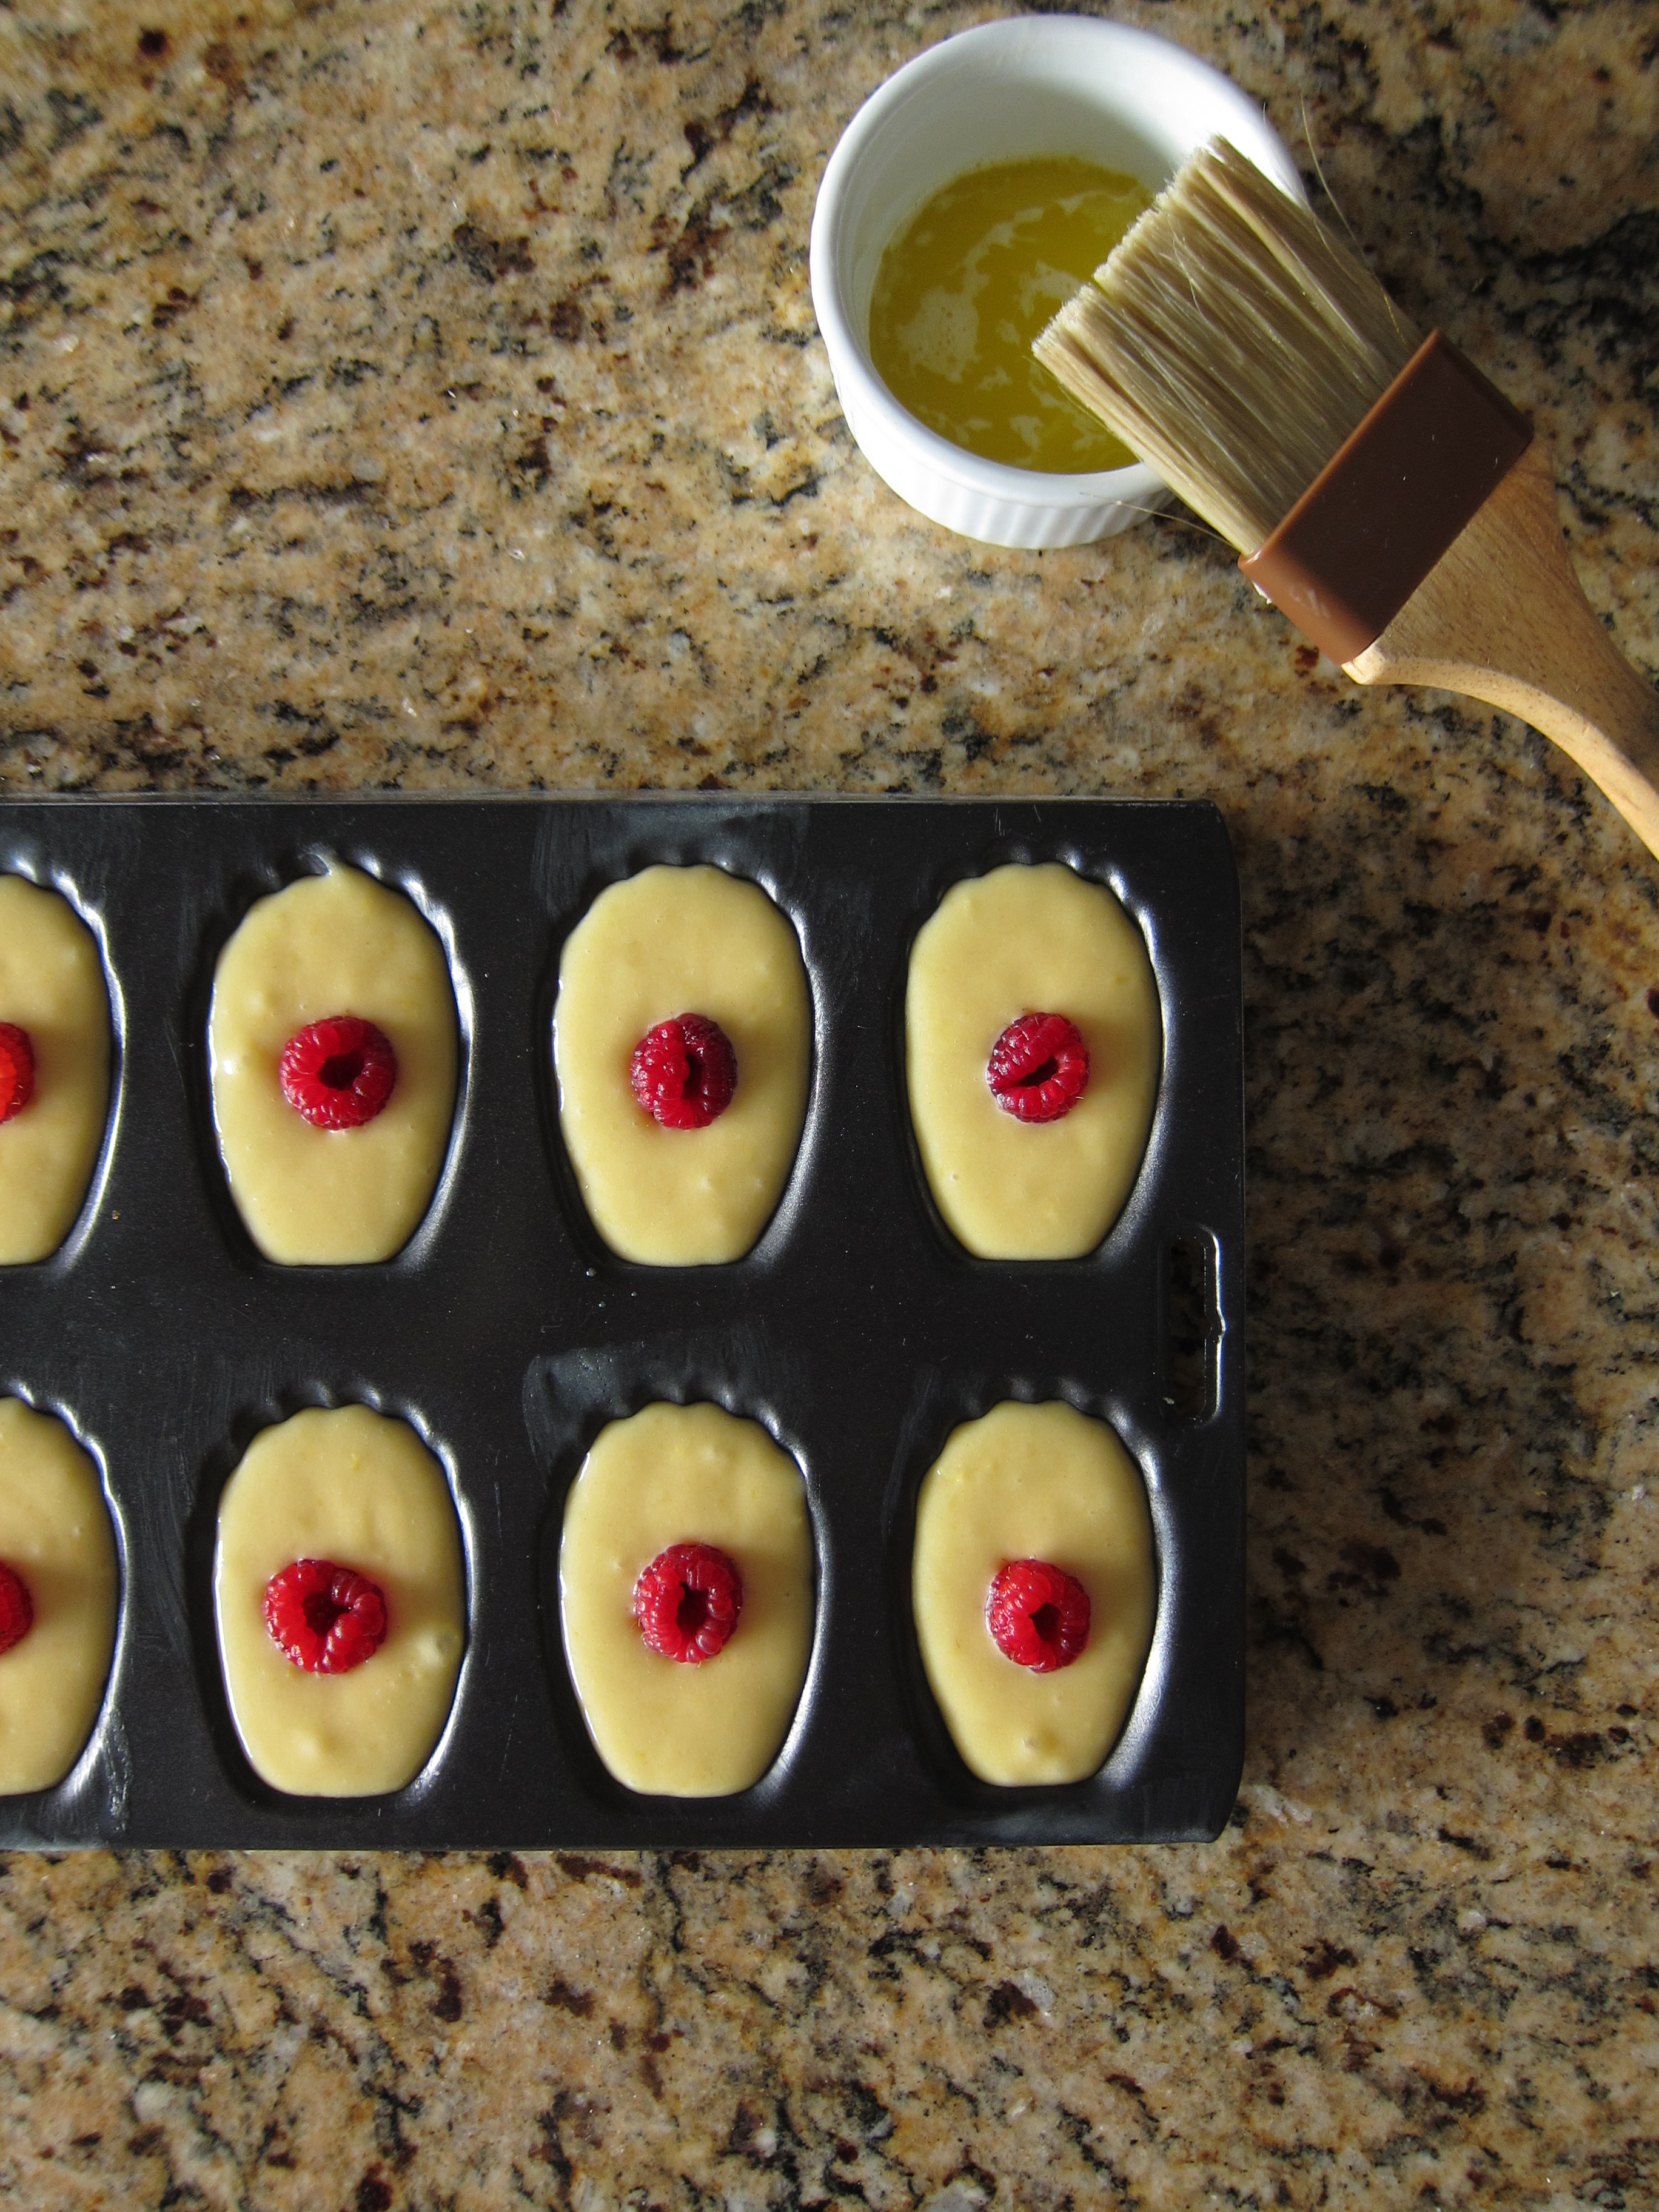
I’d like to start this post by outing my mother, who, upon seeing this batter in the baking tin, turned and said, unflinchingly, “those look like breasts”. It was very matter-of-fact, and not the least bit sophomoric, but now all I see when I look at this photo are pairs of ample breasts with shockingly red nipples.

Thanks, mom.

uncooked madeleineWhat you might also see in this photo – if your mind is far enough out of the gutter – are French madeleines, right before they were slid into the oven.

I took great care to make sure these turned out the way they were supposed to. It was my first attempt at madeleines, and since 1 out of 4 every baked goods I make either ends up soggy, or stodgy, or hard as a rock, I was determined not to screw it up. After all, I was dealing with a French classic. Its reputation was on the line.

To avoid any mishaps, I needed to eliminate the one thing that couldn’t be counted on, the bane of my homemade baking: my oven. It’s a relatively new, second-hand Frigidaire that came with my rental and which I have been living with (and swearing at) for the past three years. Our relationship is a complicated one. I can’t exactly get rid of it, but that hefty, white hunk of metal has done things to me that should qualify as grounds for divorce. (Our legal papers would read “irreconcilable differences”.) Cooking and roasting savoury stuff is fine. I manage. But sweets? It’s like playing Russian roulette. Sometimes it works out, sometimes you end up with burnt bottoms and wobbly insides. And a puddle of tears. So in moments when I’m suddenly inspired to make something like, say, madeleines, I sometimes don’t bother with my oven. Instead, I’ll call up my mom and ask if I can use hers – a convection masterpiece with electric touch-screen buttons and an extensive range of settings, like “roast” and “bread proof” and “self-clean”. It’s even got a warming drawer. Most importantly, though, it’s an intelligent piece of equipment that yields perfect results every. single. time.

—–

It’s a Saturday morning when I ask if I can come over to bake, batting my eyelashes as loudly as I can through the receiver. It’s just madeleines. I promise I won’t make a mess. I’ll even bring my own butter. She should be weary because she knows full well that my plans usually devolve as soon as I have free reign of the kitchen, turning everything upside down to concoct improvised soups and sauces and casseroles – oh, you have parsnips? what can I make with parsnips? – and just generally wreaking havoc. It’s my way of making the most of the time I have in her kitchen. Dad sometimes walks in, unaware of the cooking hurricane underway, and after scanning the piles of chopped vegetables and dirty dishes, asks with a voice that is half-concerned, half-curious, “whatcha makin’…Jules?”. Beating me to the punch, mom replies, “oh, LOTS of things”. She smiles with a grin that is equal parts amusement and eye-roll.

But because she’s preternaturally patient, generous and lovely all-round (and because dad usually rolls up his sleeves and helps with dish duty), she lets me come over and toss things around her kitchen and use all her implements without ever complaining. She doesn’t even flinch when I climb onto a footstool and start installing my tripod on her countertop, that gorgeous slab of granite which, in case you’re wondering, bares no resemblance to my dinky, melamine one. Baking at my folks’ place is like baking in a showroom kitchen. Except better, because they they don’t kick you out when you start laying out pots and pans and batter-covered spoons all over the counter.

They’re especially patient when they know that you’re going to share a freshly-baked batch of sweets with them. Like, say, a dozen madeleines.

I don’t know about you, but where I live, madeleines aren’t as ubiquitous as their French counterparts, the croissant, the brioche and the macaron. Most of the madeleines I’ve come across have been of the pre-packaged variety, sharing the shelf with the more popular May Wests and Passion Flakies in that phantasmagorical aisle of the supermarket that make children go all googly-eyed. The madeleines, for their part, always look as though they’d been there since World War II, so despite their sweetness and cake-like texture, even as a kid I was never really interested in them. (I might’ve poked at them a bit through the plastic – as one would inquisitively poke a toad in a glass jar – but that was the extent of our relationship.) Even now, it’s rare that I come across them in bakeries and cafés, and even if I do, I’m usually too distracted by the pains au chocolat.

But that was before I discovered raspberry and lemon curd madeleines.

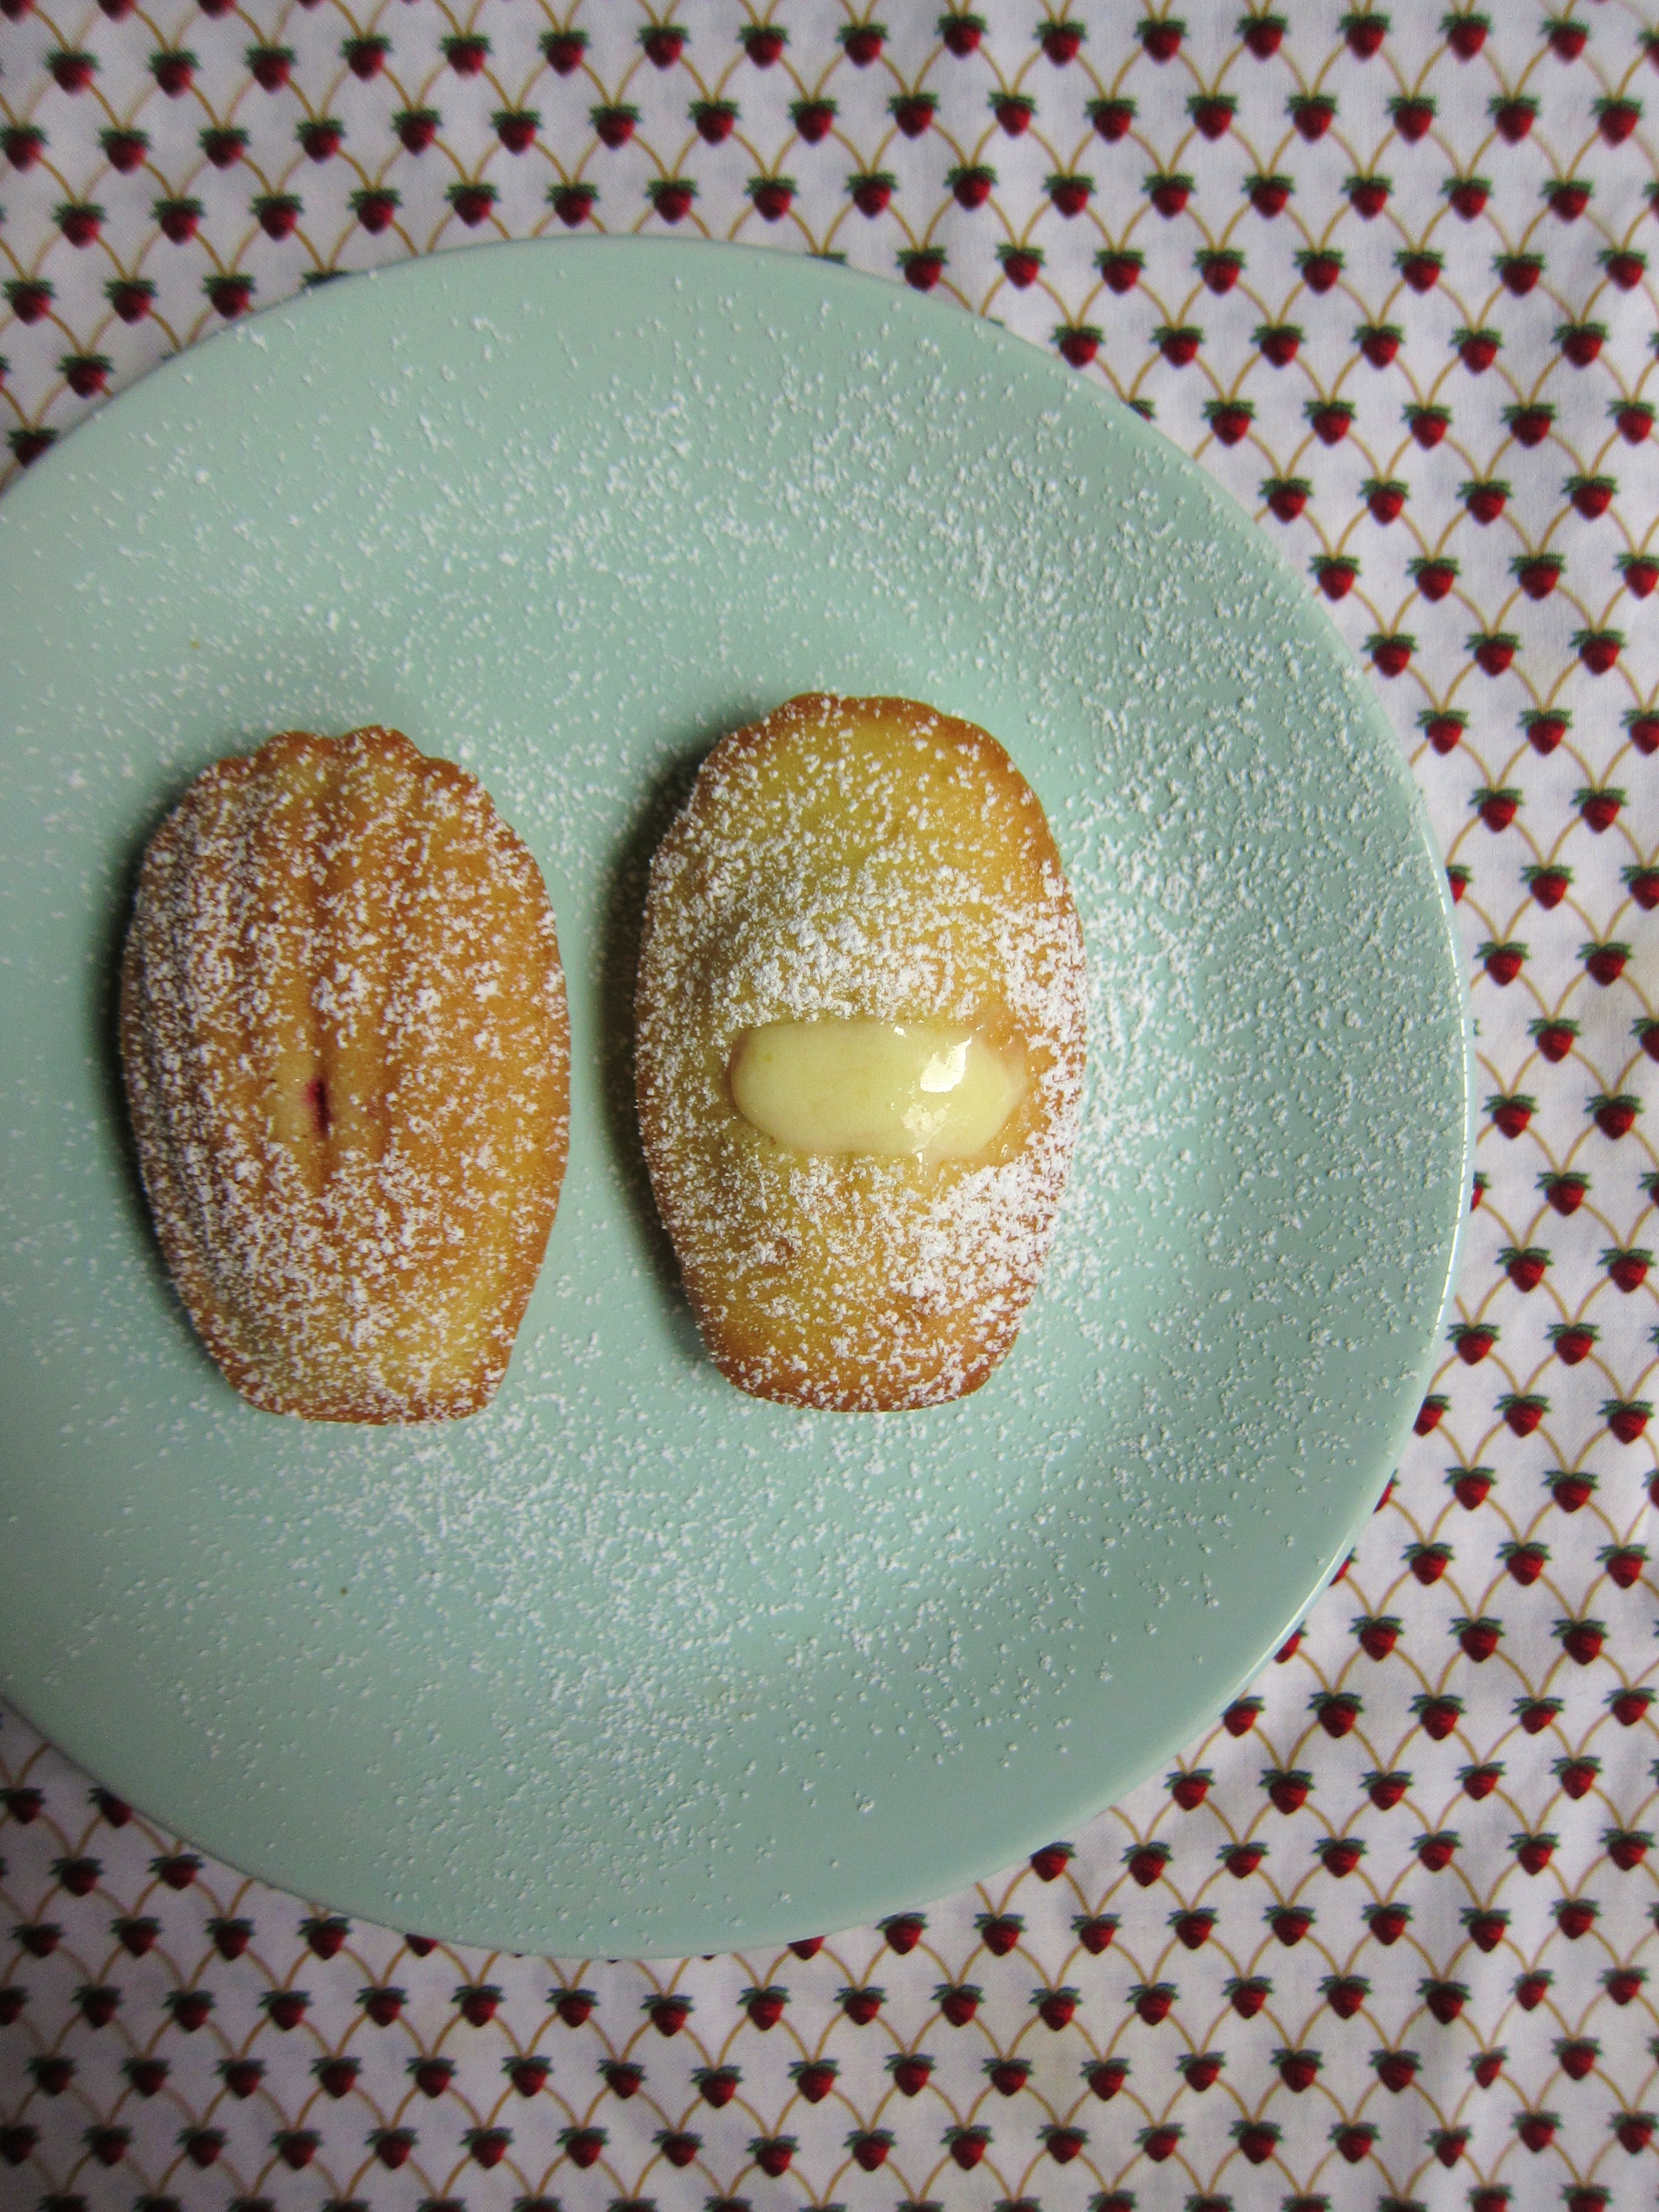
It happened about two weeks ago, when, while searching for some tarte tatin recipes, I came across these nifty BBC videos of Rachel Khoo – a charming, impeccably dressed, British francophile who left her job in the fashion industry to move to Paris and bake cakes. (I know, it’s like out of a movie. Have your life-envy buttons been pushed yet?) I’ll let you work your way around the Internet and discover her on your own, but I’m bringing her up here because of the aforementioned raspberry and lemon curd madeleines. In one of the BBC videos, she demonstrates her take on these mini sponge cakes, using the traditional recipe of butter, eggs, sugar and flour, but then dotting each one with a fresh raspberry, followed by a squeeze of lemon curd into the raspberry’s “crater” once they’re removed from the oven. It’s a small flourish, but it’s genius.

It also proved that madeleines and I had just gotten off to the wrong start. Unlike the ones I’d seen languishing on grocery store shelves, these were soft and tender, lightly sweet and scented with threads of lemon peel. When you bite into it, the burst of raspberry meets the sweet and sour lemon curd and magical things happen. Particularly if they’re still warm from the oven.

One last thing: to achieve the traditional shell-shape, you’ll need to get your hands on a madeleine tin if you don’t already have one. They go for about $20 in kitchen supply stores. It might seem a lot to spend on a tin, but they do make a pretty little sponge cake. Besides, I’m sure you’ve spent twenty bucks on sillier things in your lifetime and now you’ll get to make sponge cookies that start out resembling breasts, but then end up looking like red-eyed cyclopses!

Fun times await you.

Madeleines on cooling rackRaspberry and Lemon Madeleines with Lemon Curd (makes 24) – inspired by Rachel Khoo; madeleine recipe from The Encyclopedia of French Cooking, 1982

  • 1 cup all purpose flour
  • 1/8 teaspoon baking soda (2pinches)
  • 3 large eggs
  • 1/2 cup sugar
  • 1/3 cup melted butter
  • pinch of salt
  • zest of one lemon*

*you’ll be using the juice of this lemon to make the lemon curd
**given that the lemon curd takes a few hours to chill, you’re best to start by making the curd (see recipe below)

Directions

Preheat the oven to 350º F.

In a medium-sized mixing bowl, beat the eggs, sugar and pinch of salt until light and fluffy. Sift the flour and baking soda; fold into the wet ingredients. Fold in the melted butter and lemon zest. With a piping bag, squeeze batter into prepared fluted tins, making sure not to overfill (you can also spoon in the mixture if you don’t have a piping bag). Place one raspberry in the middle of each madeleine. Pop in the oven and bake for 12-15 minutes or until golden.081Madeleine - detail

Lemon Curd (makes about 2 cups) – from Canadian Living

Note: you’ll likely have leftover curd after filling your madeleines, but you can use it as a sponge cake filling. Use within 2-3 days.

  • 1 cup granulated sugar
  • 1/4 cup of butter
  • 1 Tbsp lemon rind
  • 2/3 cup lemon juice
  • 4 egg yolks (you can freeze the whites for another use)
  • 1/2 cup whipping cream (35%)

1) In a saucepan on medium heat, combine sugar, butter, lemon rind and juice. Stir until butter has melted and sugar has dissolved. Remove from heat.

2) Beat the egg yolks in a medium bowl and and slowly whisk in the lemon mixture in a thin stream to temper the mixture.

3) Return mixture to saucepan and stir constantly until it reaches a boil, then reduce the heat and keep stirring until thickened (about 10 minutes).

4) Pour into a glass bowl and once cooled, place plastic wrap on the surface and chill in the fridge (about 3 hours).

5) Whip the cream until you reach soft peaks and fold gently into the chilled lemon mixture.

6) Fill a piping bag with the lemon curd. While the madeleines are still warm, pipe the curd into each raspberry’s “crater”.

Madeleines with lemon curdMadeleines with lemon curd

Share this:

  • Tweet
  • Share on Tumblr
Like Loading...

Rhubarb Fever

28 Saturday Jun 2014

Posted by julia chews the fat in Breakfast & Brunch, Cooking For Your Peeps, Sweet Tooth, The Basics

≈ Leave a comment

I was supposed to be sharing a cashew dipping sauce with you today. A really good one, at that. But rhubarb stole the limelight this week, showing up all over the place with its shockingly pink stems and massive, lush leaves fanning out like the feathers on a cabaret dancer. You can’t possibly say no to a vegetable that reminds you of a cabaret dancer, can you? I certainly can’t. Pretty rhubarb makes me go weak in the knees.

Rhubarb - naked

Like most things that only appear seasonally, rhubarb is one of those precious items you need to swipe up when you can, for however long you can. It’s appearance is sudden and ephemeral, only lasting a few weeks at the market in early summer. Then, the show’s over. The cabaret dancer goes home to rest until next year. It’s a fleeting affair, but all that more rewarding because of it. Knowing that you only have a small window of opportunity to enjoy rhubarb makes it a special, if not coveted, ingredient. This summer, I’ve been able to lay my hands on a considerable amount of home-grown rhubarb – some from the garden of my mom’s friend (hellooo, Lynn!) and some extracted from the little courtyard that sits between my building and the next one over. None of my neighbours seemed interested in it, so I helped myself to a few stalks. We’ll call it minimal urban landscaping.

Rhubarb plant I did the first thing we all do with fresh rhubarb and made a crisp, one complete with the requisite strawberries, oats, walnuts and brown sugar. Nothing spectacular or exciting, but the fruit got nice and jammy after a long slow bake in the oven, blistering at the edges and spilling out at the sides. Crisps aren’t generally the most interesting of desserts, but I still make them from time to time. And when I get that first, still-warm mouthful of sweet-tart fruit with those crunchy, buttery oats, I’m reminded of how good crisps really are. Good in that wholesome, familiar, tuck-you-into-bed kind of way.

Rhubarb crisp

But because you’ve likely made a million crisps in your lifetime, and because I ate all of mine and forgot the measurements, there won’t be a crisp recipe here. Sorry. You’ll have to wing that one. There are, however, two other rhubarb recipes I can share with you, simply for the fact that I took notes and didn’t shove the whole thing in my face before taking photos. The first is a riff on a free-form crostata, where a quick rhubarb compote is topped with fresh strawberries, then wrapped in several layers of phyllo dough that have been sprinkled with crushed almonds and brushed with melted butter. There’s a bit of cinnamon, nutmeg and orange zest in there too, giving it both a bit of warmth (from the spices) and brightness (from the zest). And just when you start to think the whole thing is going taste like Christmas, there are those glorious, lightly cooked strawberries that crown the top, reminding you it’s summer. While there’s nothing groundbreaking about putting together strawberry and rhubarb, they do hum along quite nicely together and kick into peak season around the same time, making them a solid pair for balmy summer days. The use of phyllo here is nice too – it’s light and crispy and helps you avoid getting your hands mangled in a big wad of dough on a hot summer night.

The second is a savoury dish, where rhubarb is stewed on the stove top, then used as a braising base for chicken pieces. When the whole thing’s cooked, the stewed rhubarb mixture becomes the serving sauce. It’s from a New York Times recipe that I bookmarked and went digging for once I realized I’d barely made a dent in that stockpile of fresh rhubarb in my fridge. It’s a surprising recipe and one that hits the right notes – the tartness of rhubarb works well with the neutral flavours of the chicken and the addition of shallots, thyme and white wine give the sauce a very French-countryside vibe, which is always lovely. It’s definitely worth trying, especially if you’re bored with the idea of using rhubarb for something sweet. Remember, though, that since stewed rhubarb loses its pinkish hue and turns a colour closer to beige, it’s a good idea to sprinkle some vibrant garnishes (fresh thyme, sliced scallions) over top. Dress up the cabaret dancer, so to speak. Whatever you end up doing, go get yourself some rhubarb already! GO! Do it before it’s all gone and you find yourself on the kitchen floor crying big fat tears of regret. (Ok, I’m exaggerating. But still, go!)

Note to rhubarb virgins: here’s a nifty site I found covering all aspects of rhubarb, including rhubarb poison information (don’t eat the leaves!):

http://www.rhubarbinfo.com/

062

Strawberry Rhubarb Phyllo Crostata (serves 8-10) – adapted from Canadian Living

Ingredients:

  • 1/2 cup finely chopped toasted almonds
  • 1/3 cup dry breadcrumbs (panko works well too)
  • 2 tbsp granulated sugar
  • 14 sheets phyllo pastry
  • 3/4 cup butter, melted

For the Filling:

  • 6 cups chopped rhubarb
  • 1 tsp vanilla extract
  • 1/2 tsp grated orange rind
  • 1/2 tsp cinnamon
  • 1/4 tsp ground nutmeg
  • 1/4 tsp ground cloves
  • 1/2 cup granulated sugar
  • 2 tbsp all-purpose flour
  • 2 cups quartered (or halved) strawberries

Rhubarb and strawberries Strawberries - detail Chopped rhubarb - detail Chopped rhubarb and strawberries Directions: To prepare the filling: Place rhubarb, vanilla, orange rind, cinnamon, nutmeg and cloves in a pot to simmer over medium heat. Stir sugar with flour; stir into rhubarb mixture and cook, stirring often, until thickened (about 5 minutes). Let cool completely. (Can be made ahead and refrigerated for up to 3 days.)

Stewing rhubarb and spices

In small bowl, combine almonds, bread crumbs and sugar; set aside. Keeping remainder covered with damp towel to prevent drying out, lay 1 sheet of phyllo on greased 12-inch (30 cm) pizza pan, aligning 1 short end with inside edge of pan and letting other short end extend over opposite side. Brush entire sheet with some of the butter; sprinkle with 1 tbsp (15 mL) of the almond mixture. Lay second sheet at angle on top of first, overlapping by about 3 inches (8 cm); brush with butter and sprinkle with 1 tbsp (15 mL) more almond mixture. Repeat with remaining phyllo, overlapping and sprinkling with almond mixture between each and leaving equal overhang all around pan.

phyllo 1 phyllo 2 phyllo 3

Spoon filling onto centre of phyllo; sprinkle with strawberries.

rhubarb in phyllo strawberries in phyllo

Starting with last sheet, fold phyllo sheets over, 1 at a time, folding ends back to create 4-inch (10 cm) gap in centre. Crumple ends into loose cluster around gap, brushing tops of each lightly with butter and sprinkling with almond mixture.

phyllo wrapping phyllo wrapped phyllo wrapped - detail

Bake in centre of 375°F. oven until phyllo is crisp and golden, about 35 minutes. Let cool on rack. Cut into wedges with a serrated knife.

Baked crostata Baked crostata Baked crostata - detail

Rhubarb-Braised Chicken (serves 4) – adapted from The New York Times

  • 8 pieces of chicken, mixture of thighs and drumsticks
  • 5 sprigs thyme
  • 2 tablespoons olive oil
  • 1 bunch spring onions or scallions, white and light green stalks thinly sliced (slice and reserve greens for garnish)
  • 2 garlic cloves, minced
  • 1/2 cup dry white wine
  • 3/4 pound fresh rhubarb, diced (3 cups*)
  • 1 tablespoon honey
  • 2 tablespoons unsalted butter
  • salt and freshly ground pepper

*I tried a 2 cup rhubarb/1 cup celery ratio, which also works really well.

Chicken with rhubarb sauce

Directions:

1) Pat chicken dry and season with salt and pepper. Place in a bowl with the thyme sprigs and cover. Refrigerate at least 1 hour or overnight.

2) Heat olive oil in a large skillet (or Dutch oven) over medium-high heat. Remove thyme from bowl with chicken and reserve the thyme. Add chicken pieces to skillet and sear, turning occasionally, until golden brown all over (about 10 minutes). Transfer pieces to a platter.

3) Reduce heat to medium. Stir in onion (white and light green parts) and cook until softened, about 5 minutes. Add garlic and reserved thyme; cook 1 minute more. Stir in wine and bring to a simmer, scraping up any browned bits in the bottom of pan. Add rhubarb, honey, 1/2 teaspoon salt and a few grinds of pepper. Return chicken pieces to pot in a single layer. Cover and reduce heat to medium-low. Simmer until chicken is cooked through (about 25 minutes) transferring chicken pieces to a platter as they finish cooking (the juices should run clear to indicate cooked chicken).

4) Whisk butter into rhubarb sauce. Taste and adjust seasoning if necessary. Spoon sauce over chicken and garnish with sliced onion greens and thyme sprigs.

…and why not serve some roasted purple potatoes on the side!

  • 1/2 pound small, purple potatoes (skin on), washed and halved
  • 3 cloves garlic, crushed
  • a few sprigs of rosemary
  • olive oil
  • salt and freshly ground pepper

Preheat the oven to 400°F. Parboil the potatoes on the stove top unitl they’re almost cooked through. Drain and transfer to a baking tray. Add crushed garlic, rosemary and oil; toss until combined. Roast for about 10-15 minutes, or until the edges of the potatoes are crispy.

Purple potatoes uncooked Purple potatoes cooked

Share this:

  • Tweet
  • Share on Tumblr
Like Loading...

Dream Waffles, Come Rescue Me

11 Wednesday Jun 2014

Posted by julia chews the fat in Breakfast & Brunch, Cooking For Your Peeps, Sweet Tooth, The Basics, Vegetarian

≈ Leave a comment

Of all the things I could have predicted about my young adult life, having recurring dreams about waffles would not have been one of the things on my radar. And yet, this is where I find myself, at 32, dreaming (literally, not figuratively) about breakfast food.

I guess things could be worse.

It all began about three months ago, when I had a dream I was making waffles on a beach. Then, a week later, there was another about waffles at my old high school; a few days after that, I dreamt I was eating them in Paris, curbside, with friends (because apparently I have Parisian friends now?). I woke up from that last one bleary-eyed, thinking why can’t dreams be real life??, then rolled over, closed my eyes and hoped that I could somehow lucid-dream myself into eating more waffles by the Seine.

According to the Interweb (where, of course, all accurate, reliable, trustworthy information resides) having recurring dreams about waffles is not exactly a good thing. But because I believe that dreams have a more visceral connection to what’s going on in our minds and bodies (because not only do I have imaginary Parisian friends, I’m also a hippie now?), I came to the conclusion that I probably just really wanted waffles – stacked high, with a generous slick of maple syrup across the top. So, the next available weekend, I made a point of honouring my demented breakfast dreams by scouring the neighbourhood for the perfect waffle.

After looking through the menus of a few places, I soon discovered that finding some standard, no frills waffles in this town is capital H Hard. Today’s brunch venues (complete with the requisite distressed-wood tables, exposed light bulbs and waiters with perfectly groomed handlebar moustaches) serve waffles that tend to be a bit too, er, hip…including varieties that are egg-less (oh boy this should be fun), Red Velvet-flavoured (ick), or lacquered in a weird, lavender-infused syrup (double ick).

It seems that the basic, trad waffle has been comically adulterated by the bourgeois bohemian crowd well-intentioned entrepreneurs of this city. All I wanted was a simple, straight-forward waffle. No fancy distractions. Just a really good, crispy, golden syrup-receptacle. After coming up empty, I spent the next couple of weeks asking myself – and anyone who would listen – where are all the freaking real-deal waffles at? 

All that whining turned out to be beneficial, because on my birthday – lo and behold – I was gifted a WAFFLE MAKER. Yes – a machine with which I can make waffles WHENEVER I WANT. It seems like an insane prospect. And I will, without a doubt, become a hazard to myself in the process. But HOLY MACKEREL. WAFFLES. SORRY, BUT I FEEL THAT CAPS LOCKS ARE THE ONLY WAY TO FULLY CONVEY MY EXCITEMENT. That, and exclamation marks. Because…WAFFLES !!!!!!

Without an ounce of shame, I willl proudly admit that I’ve had waffles every single weekend since. The novelty having not fully worn off, I still get stupid-excited about pouring the batter onto the iron, closing down the top and waiting for the indicator light to turn green. It’s totally magical, even if they’re super easy to make. It’s the kind of food that makes you want to wear a feathered boa to breakfast and sing this Mariah classic at the top of your lungs, replacing the lyric “lover” with “waffle”.

Or, that just might be me.

waffle - detail

A quick note: These are not to be mistaken for belgian-style gaufres. These are decidedly US of A-style waffles – reminiscent of the thin, crispy, golden waffles of your Eggo youth. Only better, because they didn’t come out of a sad box from the freezer.

Epic Buttermilk Waffles (makes 6) – recipe from the Aretha Frankensteins restaurant in Chattanooga, TN

3/4 cup all-purpose flour
1/4 cup cornstarch
1/2 teaspoon baking powder
1/4 teaspoon baking soda
1/2 teaspoon salt
1 cup buttermilk*
1/3 cup vegetable oil
1 egg
1 1/2 teaspoons sugar
3/4 teaspoon pure (natural) vanilla extract
Maple syrup, for serving

* genius trick for making quick buttermilk (courtesy of my mom): add about 1 tsp of white vinegar to nearly 1 cup of milk. Ta da!

Directions

In a medium bowl, combine the flour, cornstarch, baking powder, baking soda, and salt; mix well. Add the milk, vegetable oil, egg, sugar and vanilla and mix well. Let the batter sit for about 30 minutes.

Preheat a waffle iron. No need to grease it – the oil in the batter will allow the waffle to release easily. Follow the machine’s cooking directions. Serve immediately with syrup and any other accompaniments you see fit.

waffle - pure
waffle - berries

Share this:

  • Tweet
  • Share on Tumblr
Like Loading...

Weather Loops and Chocolate Chip Cookies

14 Friday Mar 2014

Posted by julia chews the fat in Snacking, Sweet Tooth, The Basics

≈ Leave a comment

I don’t know about you, but from where I’m sitting, this is the current state of affairs:

050

Not very reassuring, is it? We’re two weeks shy of April and I’m beginning to feel like Bill Murray in Groundhog Day – except that instead of a time loop, we’re stuck in a purgatorial weather loop. Happy spring, Quebec.

But, things are going to be okay. Because despite what’s happening outdoors (or in the metaphorical blizzard of your life), there’ll always be chocolate chip cookies. Big, honking chocolate chip cookies with chewy centres and crispy edges.

I fully encourage you to get inside, draw the curtains and slip a pan of these into the oven.

Baked cookie

A note on the recipe: Chocolate chip cookies always seem more straight-forward than they actually are. It’s surprising how difficult it can be to get them just right. This recipe is the result of one man’s quest to achieve the perfect chocolate chip cookie – one that strikes the perfect balance between chewy and crisp, light and rich. Like any good food nerd, he addresses the important issues of butter temperature, oven temperature, chilling, salting, kneading, as well as the the ratio of brown sugar to white sugar and the use of chocolate chips vs hand-chopped chocolate. But I think that the ace up this recipe’s sleeve is the addition of brown butter (beurre noisette) which gives these cookies a much-welcomed pinch on the butt.

Brown Butter Chocolate Chip Cookies (makes about 28) – J. Kenji López-Alt’s recipe via Serious Eats

  • 8 oz (2 sticks) unsalted butter
  • 1 standard ice cube (about 2 tablespoons frozen water)
  • 10 oz (about 2 cups) all-purpose flour
  • 3/4 tsp baking soda
  • 1 tsp table salt
  • 5 oz (about 3/4 cup) granulated sugar
  • 2 large eggs
  • 2 tsp vanilla extract
  • 5 oz (about 1/2 tightly packed cup plus 2 tablespoons) dark brown sugar
  • 10 oz mix of bitter-sweet, semi-sweet and white chocolate, roughly chopped into 1/2- to 1/4-inch chunks (for the sake of experimentation, I used a mix of chocolate chips and hand-chopped)
  • Coarse sea salt for garnish

076

Melt butter in a medium saucepan over medium-high heat. Cook, gently swirling pan constantly, until particles begin to turn golden brown and butter smells nutty, about 5 minutes. Remove from heat and continue swirling the pan until the butter is a rich brown, about 15 seconds longer. Transfer to a medium bowl and whisk over an ice bath. Transfer to refrigerator and allow to cool completely (about 10 minutes).

Chilled brown butter

Meanwhile, whisk together flour, baking soda, and salt in a large bowl. Place granulated sugar, eggs, and vanilla extract in a large bowl and mix with a hand beater on medium high speed until mixture is pale brownish-yellow and falls off the whisk in thick ribbons when lifted (about 5 minutes).

Batter

When brown butter mixture has cooled (it should be just starting to turn opaque again and firm around the edges), add brown sugar and cooled brown butter to egg mixture. Beat on medium speed to combine, about 15 seconds. Add flour mixture and mix on low speed until just barely combined but some dry flour still remains, about 15 seconds. Add chocolate and mix on low until dough comes together, about 15 seconds longer.

Dough

Turn out onto counter-top and form into a ball (without kneading/handling too much).

Forming dough

Forming doughWrap in cellophane and refrigerate dough at least overnight and up to three days.

Dough in cellophane

When ready to bake, adjust oven racks to upper and lower middle positions and preheat oven to 325°F. Measure out 1oz pieces of dough (with an ice cream scoop or spoon) and place on a parchment-lined baking sheet. Each ball should measure approximately 3 tablespoons in volume and you should be able to fit 6 to 8 balls on each sheet. Transfer to oven and bake until golden brown around edges but still soft, 13 to 16 minutes, rotating pans back to front and top and bottom half way through baking.

Baked cookies

Remove baking sheets from oven. While cookies are still hot, sprinkle very lightly with coarse salt and gently press it down to embed. Let cool for 2 minutes, then transfer cookies to a wire rack to cool completely.

Repeat steps 3 and 4 for remaining cookie dough. Allow cookies to cool completely before storing in an airtight container, plastic bag, or cookie jar at room temperature for up to 5 days.

Baked cookie

Share this:

  • Tweet
  • Share on Tumblr
Like Loading...

Red Velvet Valentine

11 Tuesday Feb 2014

Posted by julia chews the fat in Cooking For Your Peeps, Holidays, Sweet Tooth, Vegetarian

≈ 2 Comments

Valentine’s is those days on the calendar when it’s socially acceptable to be a loopy, romantic nutbar; the one day of the year when you can crank up the cheeseball dial and no one will fault you for it. You can send love notes, litter your desk with bowls of cinnamon-candy hearts and promise your office mates bright red, fluffy cupcakes with hand-whipped frosting…

…or so you thought.

I was so excited to make these cupcakes. Excited about trying the old technique of using beets make the batter electric pink. Excited about using a pastry bag to add an artful slick of cream cheese frosting on top. Excited about the beautiful Swedish paper cups that I’d found months prior and that I’d purposely saved for this day (yes, yes I did). But most of all, I was excited about finally redeeming myself since the last Valentine’s cupcake failure.

Expectations were high, people. Valentine-in-a-bow-tie high.

Despite my well-laid plan (I was rested! I had plenty of time! I had prepped all the ingredients!), lady fortune had a different one in store – one involving me forgetting to add the butter, then having to scrape the batter out of the pretty paper cups and back into the bowl…only to remove from the oven, 18 minutes later, twelve flat, dense cylinders in greasy-bottomed paper cups. The icing flipped me the bird too, as it initially resisted its extrusion from the pastry bag, then shifted in consistency to seep out in a nondescript, gooey mass.

While the icing improved after a bit of chilling in the fridge, there was no saving the cake. Dense, chewy, beety (undercooked?), they hovered somewhere between expired vegan health cake and a 4th grade science experiment. These were not lovely, fluffy, cherubs-singing-from-the-heavens cupcakes. These were fists-shaking-at-the-heavens cupcakes. These were “I hate you” cupcakes.

As it so happens, this was also the day my friend Matthew was showing me how to use a DSLR. And thank GOD for that, because without him, I’m not sure I could’ve made these things look half as edible. With his keen eye, he managed to help me make these cupcakes look delicious and elegant and lovely – everything they most definitely were not.

Here’s to faking it! Happy Valentine’s xx

4 cupcakes

cupcake with bite

cupcake with bite - detail

(IF YOU DARE, HERE’S THE RECIPE)

All Natural Red Velvet Cupcakes (makes approx 12) – adapted from this recipe

3/4 cup beet purée (directions follow)
1 tablespoon freshly squeezed lemon juice
1 1/2 teaspoons rice vinegar
1 cup sugar
1 stick butter (8 tablespoons), at room temperature
3/4 teaspoon pure vanilla extract
3/4 teaspoon kosher salt
3/4 teaspoon baking powder
1 1/4 cups unbleached all-purpose flour (not bleached flour)
2 eggs
1/2 cup buttermilk
1 tablespoon natural cocoa powder (not Dutch Process, or dark cocoa powder)

Beet purée: 2 medium beets, or 1 large beet, scrubbed and rinsed

Fill a saucepan with water, add the beets and bring to a boil. Allow the beets to cook until very tender (approx. 30 mins).

When beets are cooled completely, peel, and cut into large chunks. Place in a food processor fitted with the steel blade. Process for 2 minutes, or until extremely smooth. Empty the food processor of the beet purée. Measure out 3/4 cup and set aside (save any extra purée for another use).

Preheat oven to 350ºF. In a large bowl, sift the dry ingredients. In a separate bowl, cream the butter and sugar, then add the eggs, vanilla, buttermilk, vinegar and lemon juice. Beat or whisk until combined. Add the beet purée. Mix some more until the mixture is uniform.

Line a standard muffin tin with paper cupcake liners. Scoop mixture evenly into cupcake liners.

Bake for 18 minutes, or until the cupcakes in the center spring back up when touched. Remove cupcakes from the pan and place on a wire rack to cool completely.

Cream Cheese Frosting

1 8oz package cream cheese, at room temperature
1 stick (8 tablespoons) unsalted butter, at room temperature
2 cups confectioner’s (powdered) sugar
1-2 tablespoons heavy cream
1/2 teaspoon pure vanilla extract

Beat all ingredients together with an electric mixer until smooth and fluffy. Frost cooled cupcakes.

Share this:

  • Tweet
  • Share on Tumblr
Like Loading...

A Better Kind of Fruitcake

31 Tuesday Dec 2013

Posted by julia chews the fat in Breakfast & Brunch, Cooking For Your Peeps, Holidays, Sweet Tooth, The Basics, Vegetarian

≈ 4 Comments

Almost twenty years ago, at Christmastime, my dad bought a loaf of stollen for the first time. He brought it home, cut it up and plated it. We were eager to try something so foreign and – for kids growing up in the burbs in the 90s – so exotic-sounding. But, one bite in, our excitement quickly unravelled, being replaced with the uneasy feeling of being duped. Not unlike a lot of the holiday fruitcakes I’ve reluctantly tasted over the years, this store-bought stollen was dry and lacklustre – a pasty-coloured loaf studded with nondescript dried fruit that rolled out off the sides with each bite.

It was miserable.

Unlike the rest of us, my dad saw the potential of this German-style fruitcake and shortly thereafter, set out to make his own. He sourced different recipes, even quizzing our German neighbour, Mrs. Nack, for secret stollen-making tips. And then, nearly every year since, he’s gone into full stollen-production mode – drenching the fruit several days ahead, making the dough, cutting the loaves, baking them, dusting them with sugar and wrapping them attentively. For someone who doesn’t bake (or have a Teutonic bone in his body), dad’s got this German sweet bread down to an art. The final result is a beautifully dense, yeasty bread, brimming with sliced almonds and a boozy mixture of currants, raisins and citrus peel. The longer it sits, the better it gets, as the brandy further permeates the crumb and the almonds slowly transform into marzipan. There isn’t a trace of neon-coloured maraschino or stale walnut in this fruitcake. Not if dad has anything to do with it. And that’s the way we like it.

Wishing a very happy birthday to my dad ♥ and a Happy New Year to all of you, dear readers! Looking forward to sharing more tasty edibles with you in 2014.

Dresden Stollen – makes 4 medium loaves or 6 small ones stollen 21

  • 1⅓ cups currants
  • 1 cup orange zest
  • 1 cup lemon zest
  • 3 cups raisins (Thompson or sultanas)
  • 4 ⅓ cups sliced, blanched almonds
  • 6½ cups (1 kilo) sifted flour
  • 6 packets yeast (8 gr each)
  • 2 cups icing sugar
  • ½ tsp ground cardamom
  • tsp cinnamon
  • 2 pinches mace
  • 2 pinches allspice
  • ½ tsp salt
  • 1 cup brandy
  • 2 cups lukewarm milk (reserve 1 cup for proofing the yeast)
  • 1⅓ lbs butter, room-temperature

Pour the brandy over the mixture of currants, raisins, almonds & citrus zest. Mix and cover, allowing to soak overnight (or over several days). stollen 2 Proof the yeast by sprinkling it over 1 cup of the lukewarm milk (about 100ºF) to which has been added a tablespoon of sugar. Set aside in a warm place for about 10 minutes. The yeast is active if it forms a creamy foam on top of the milk. Sift the flour into a large mixing bowl. Add the room-temp butter, icing sugar, the remainder of lukewarm milk, spices and the proofed yeast mixture and mix. Transfer to a slightly floured work surface and knead thoroughly. stollen 3 stollen 4 stollen 5 Cover the dough and allow to rise for approx. 30 minutes in a warm place. Add the prepared fruit mixture. Knead the fruit mixture thoroughly into the dough. The dough should be smooth and elastic. stollen 12 
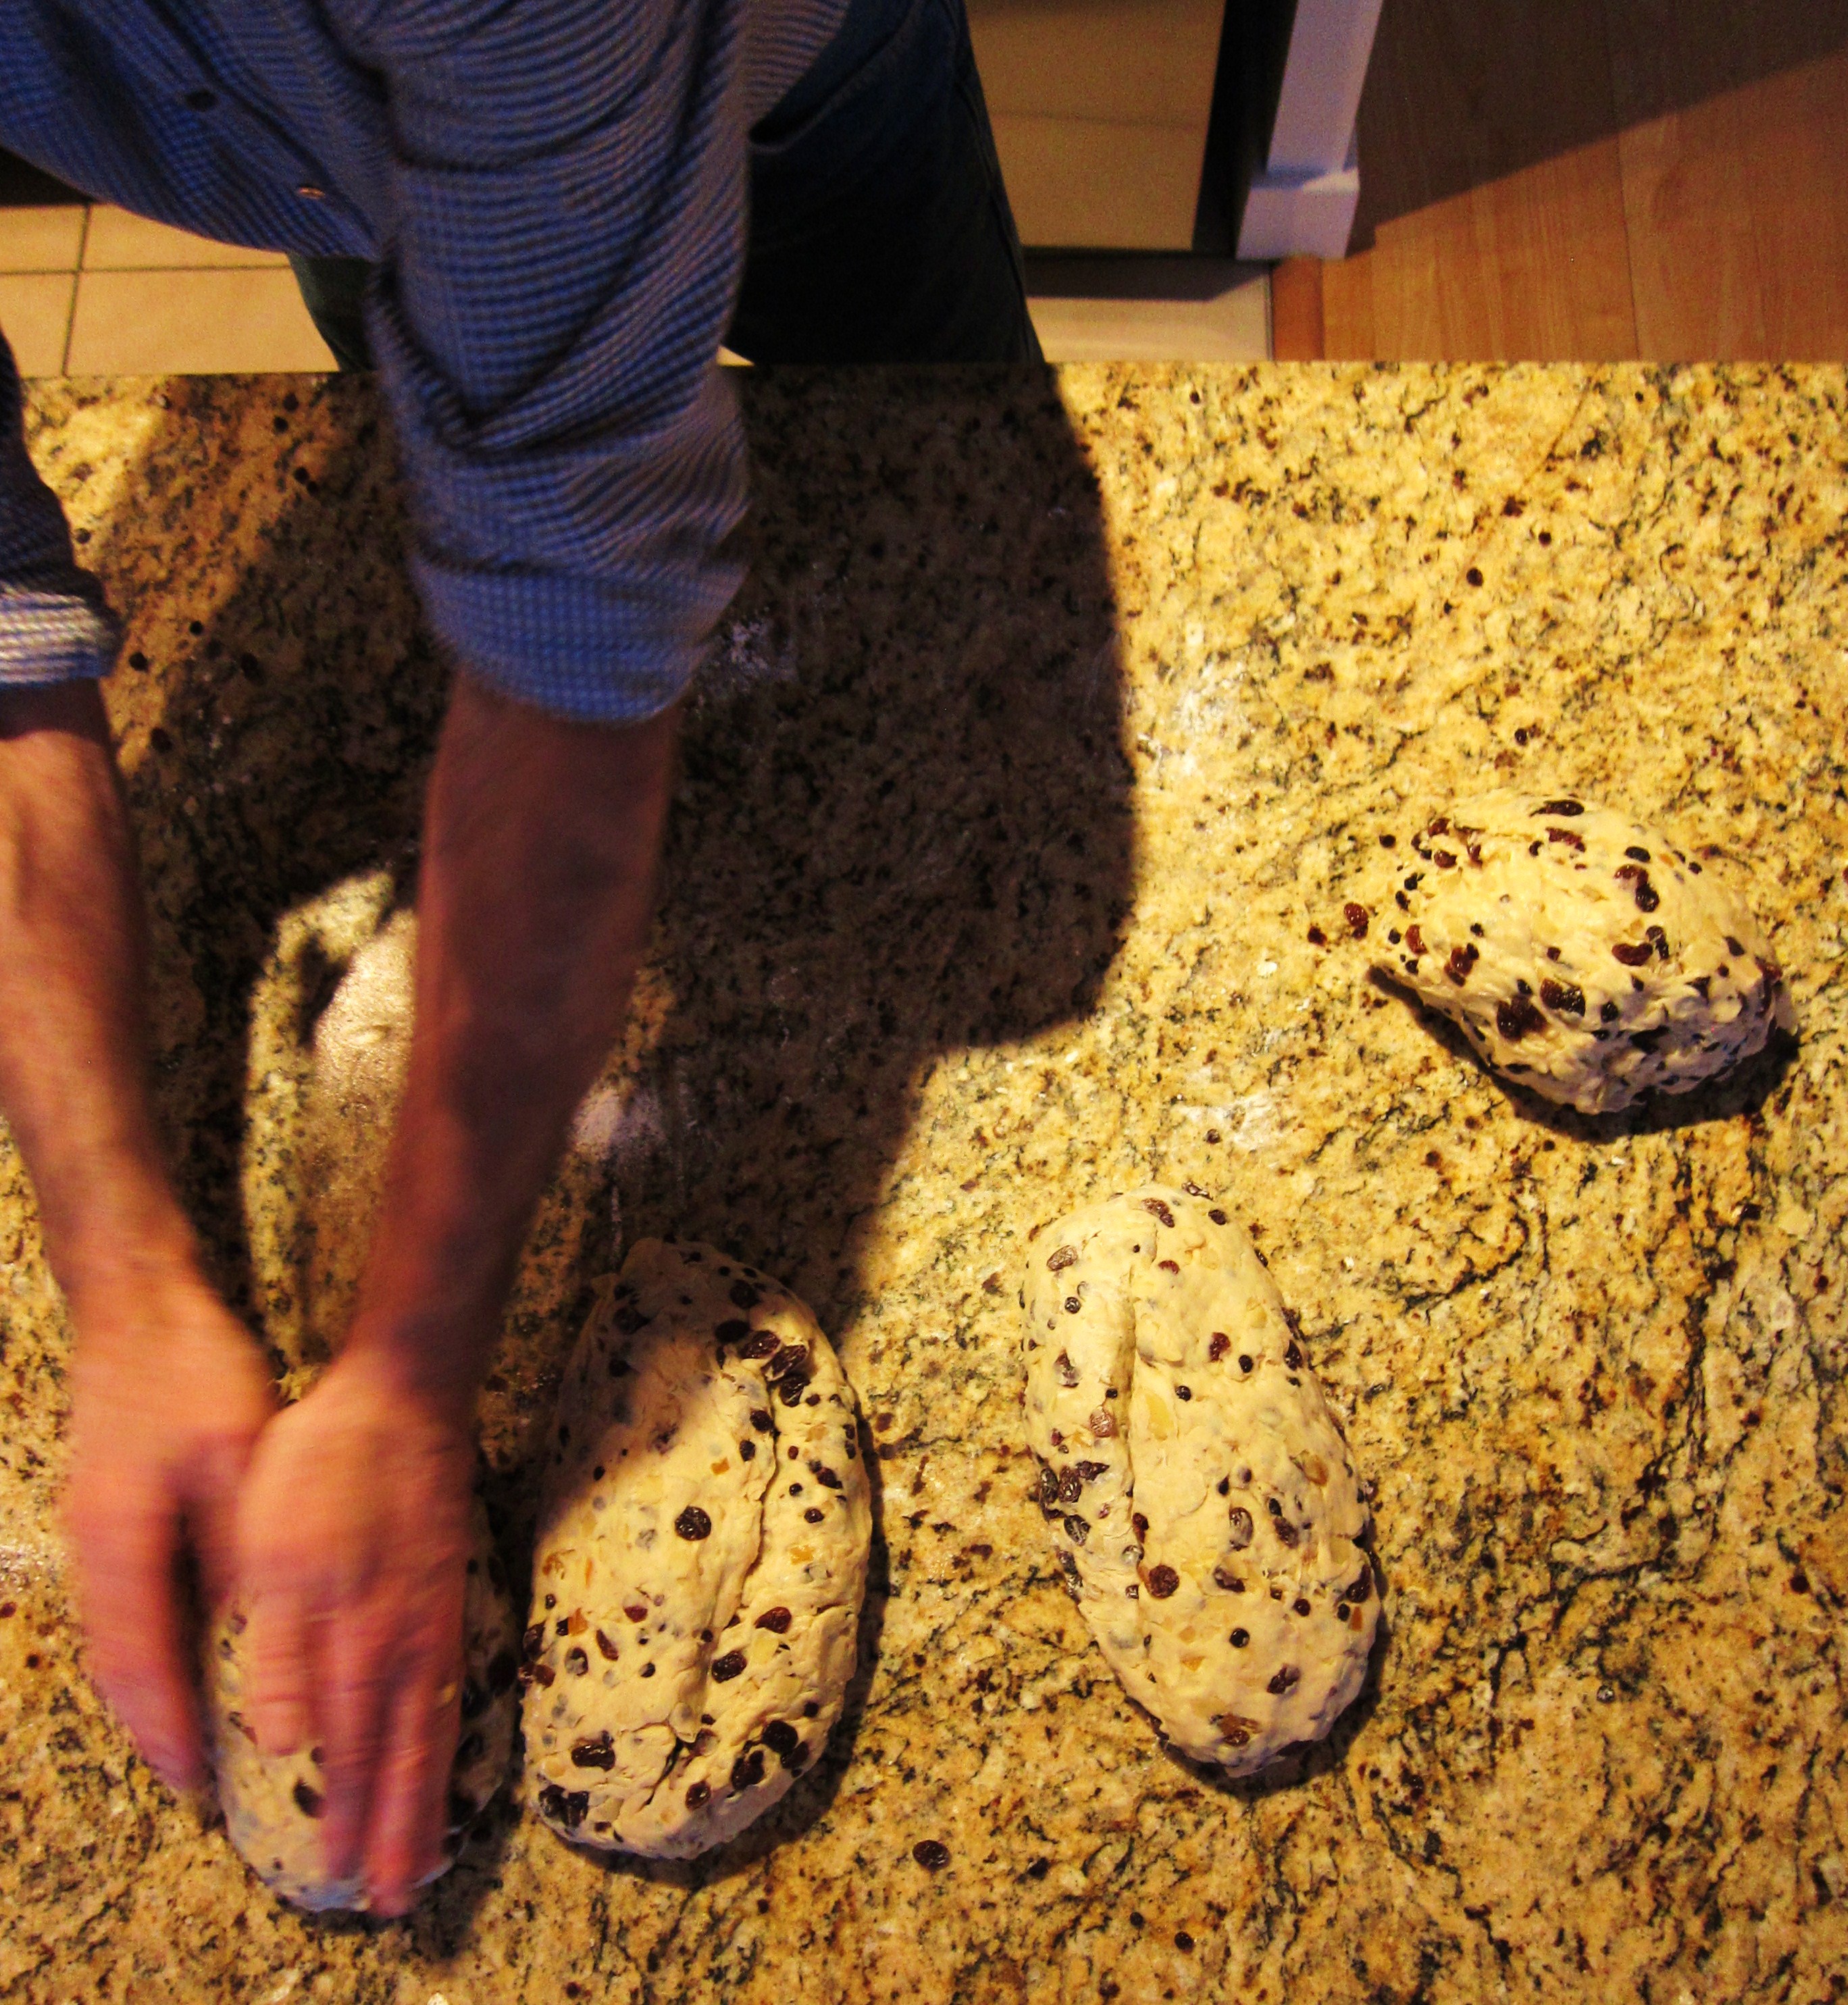
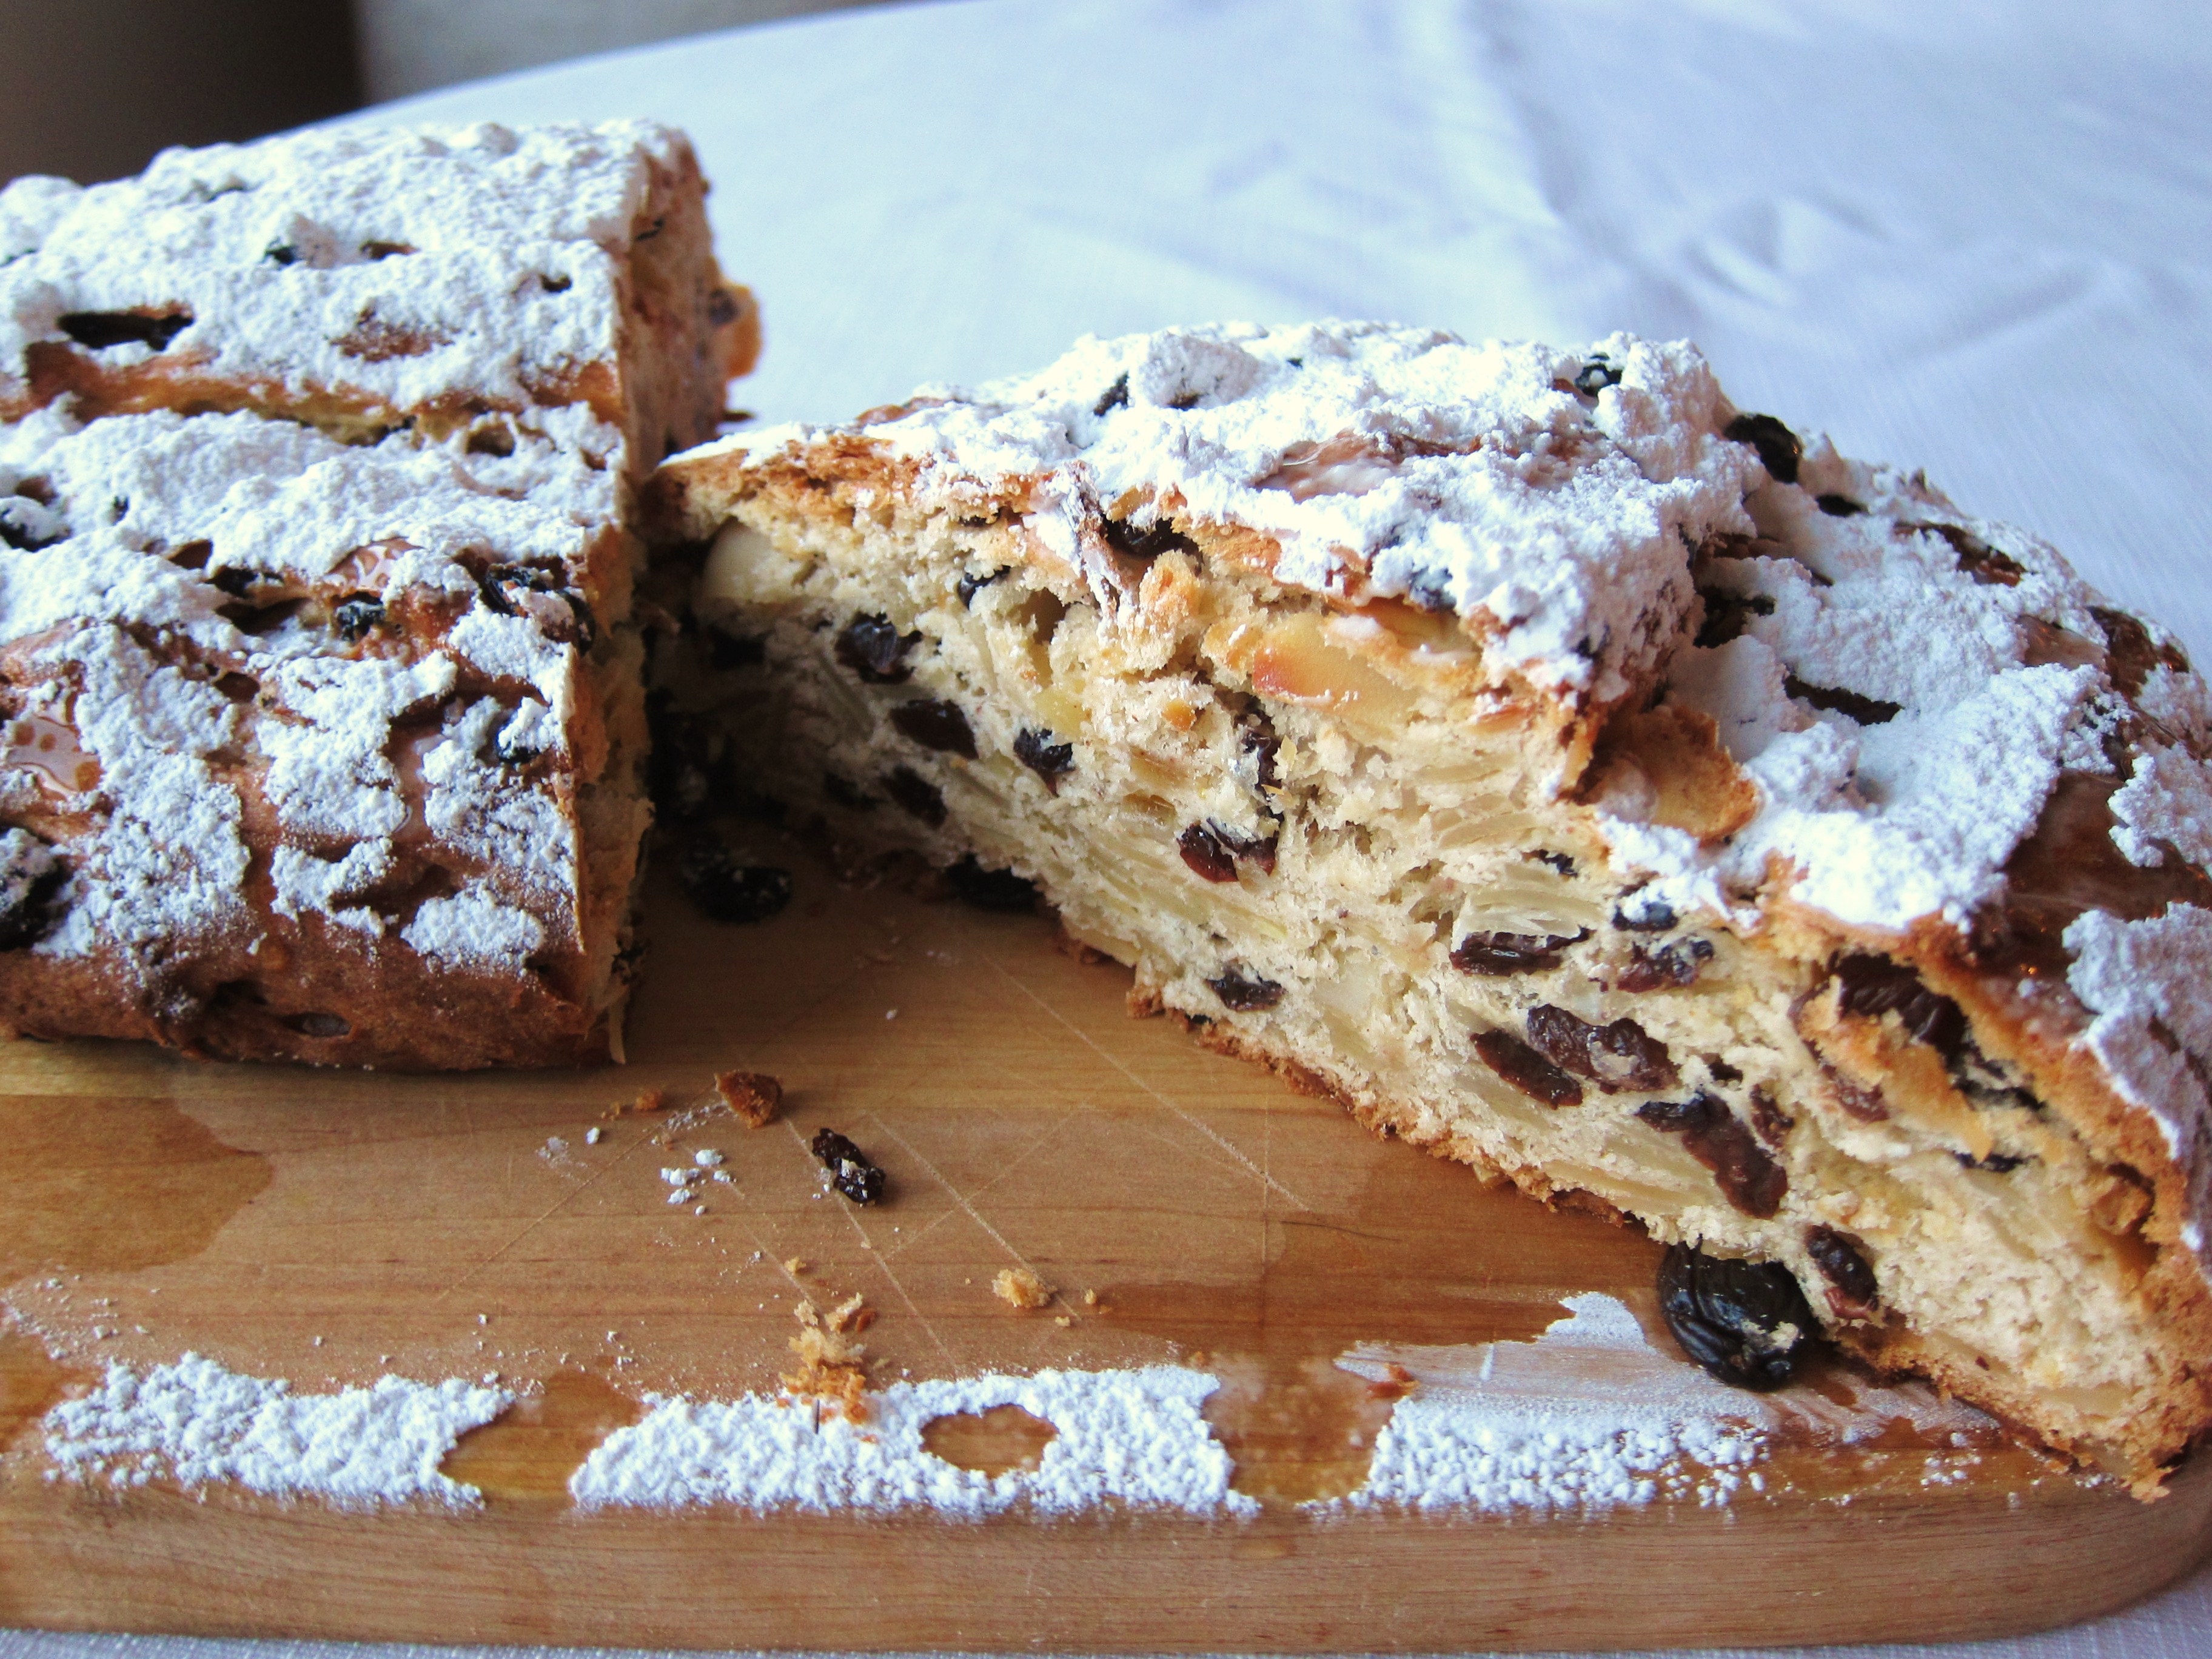
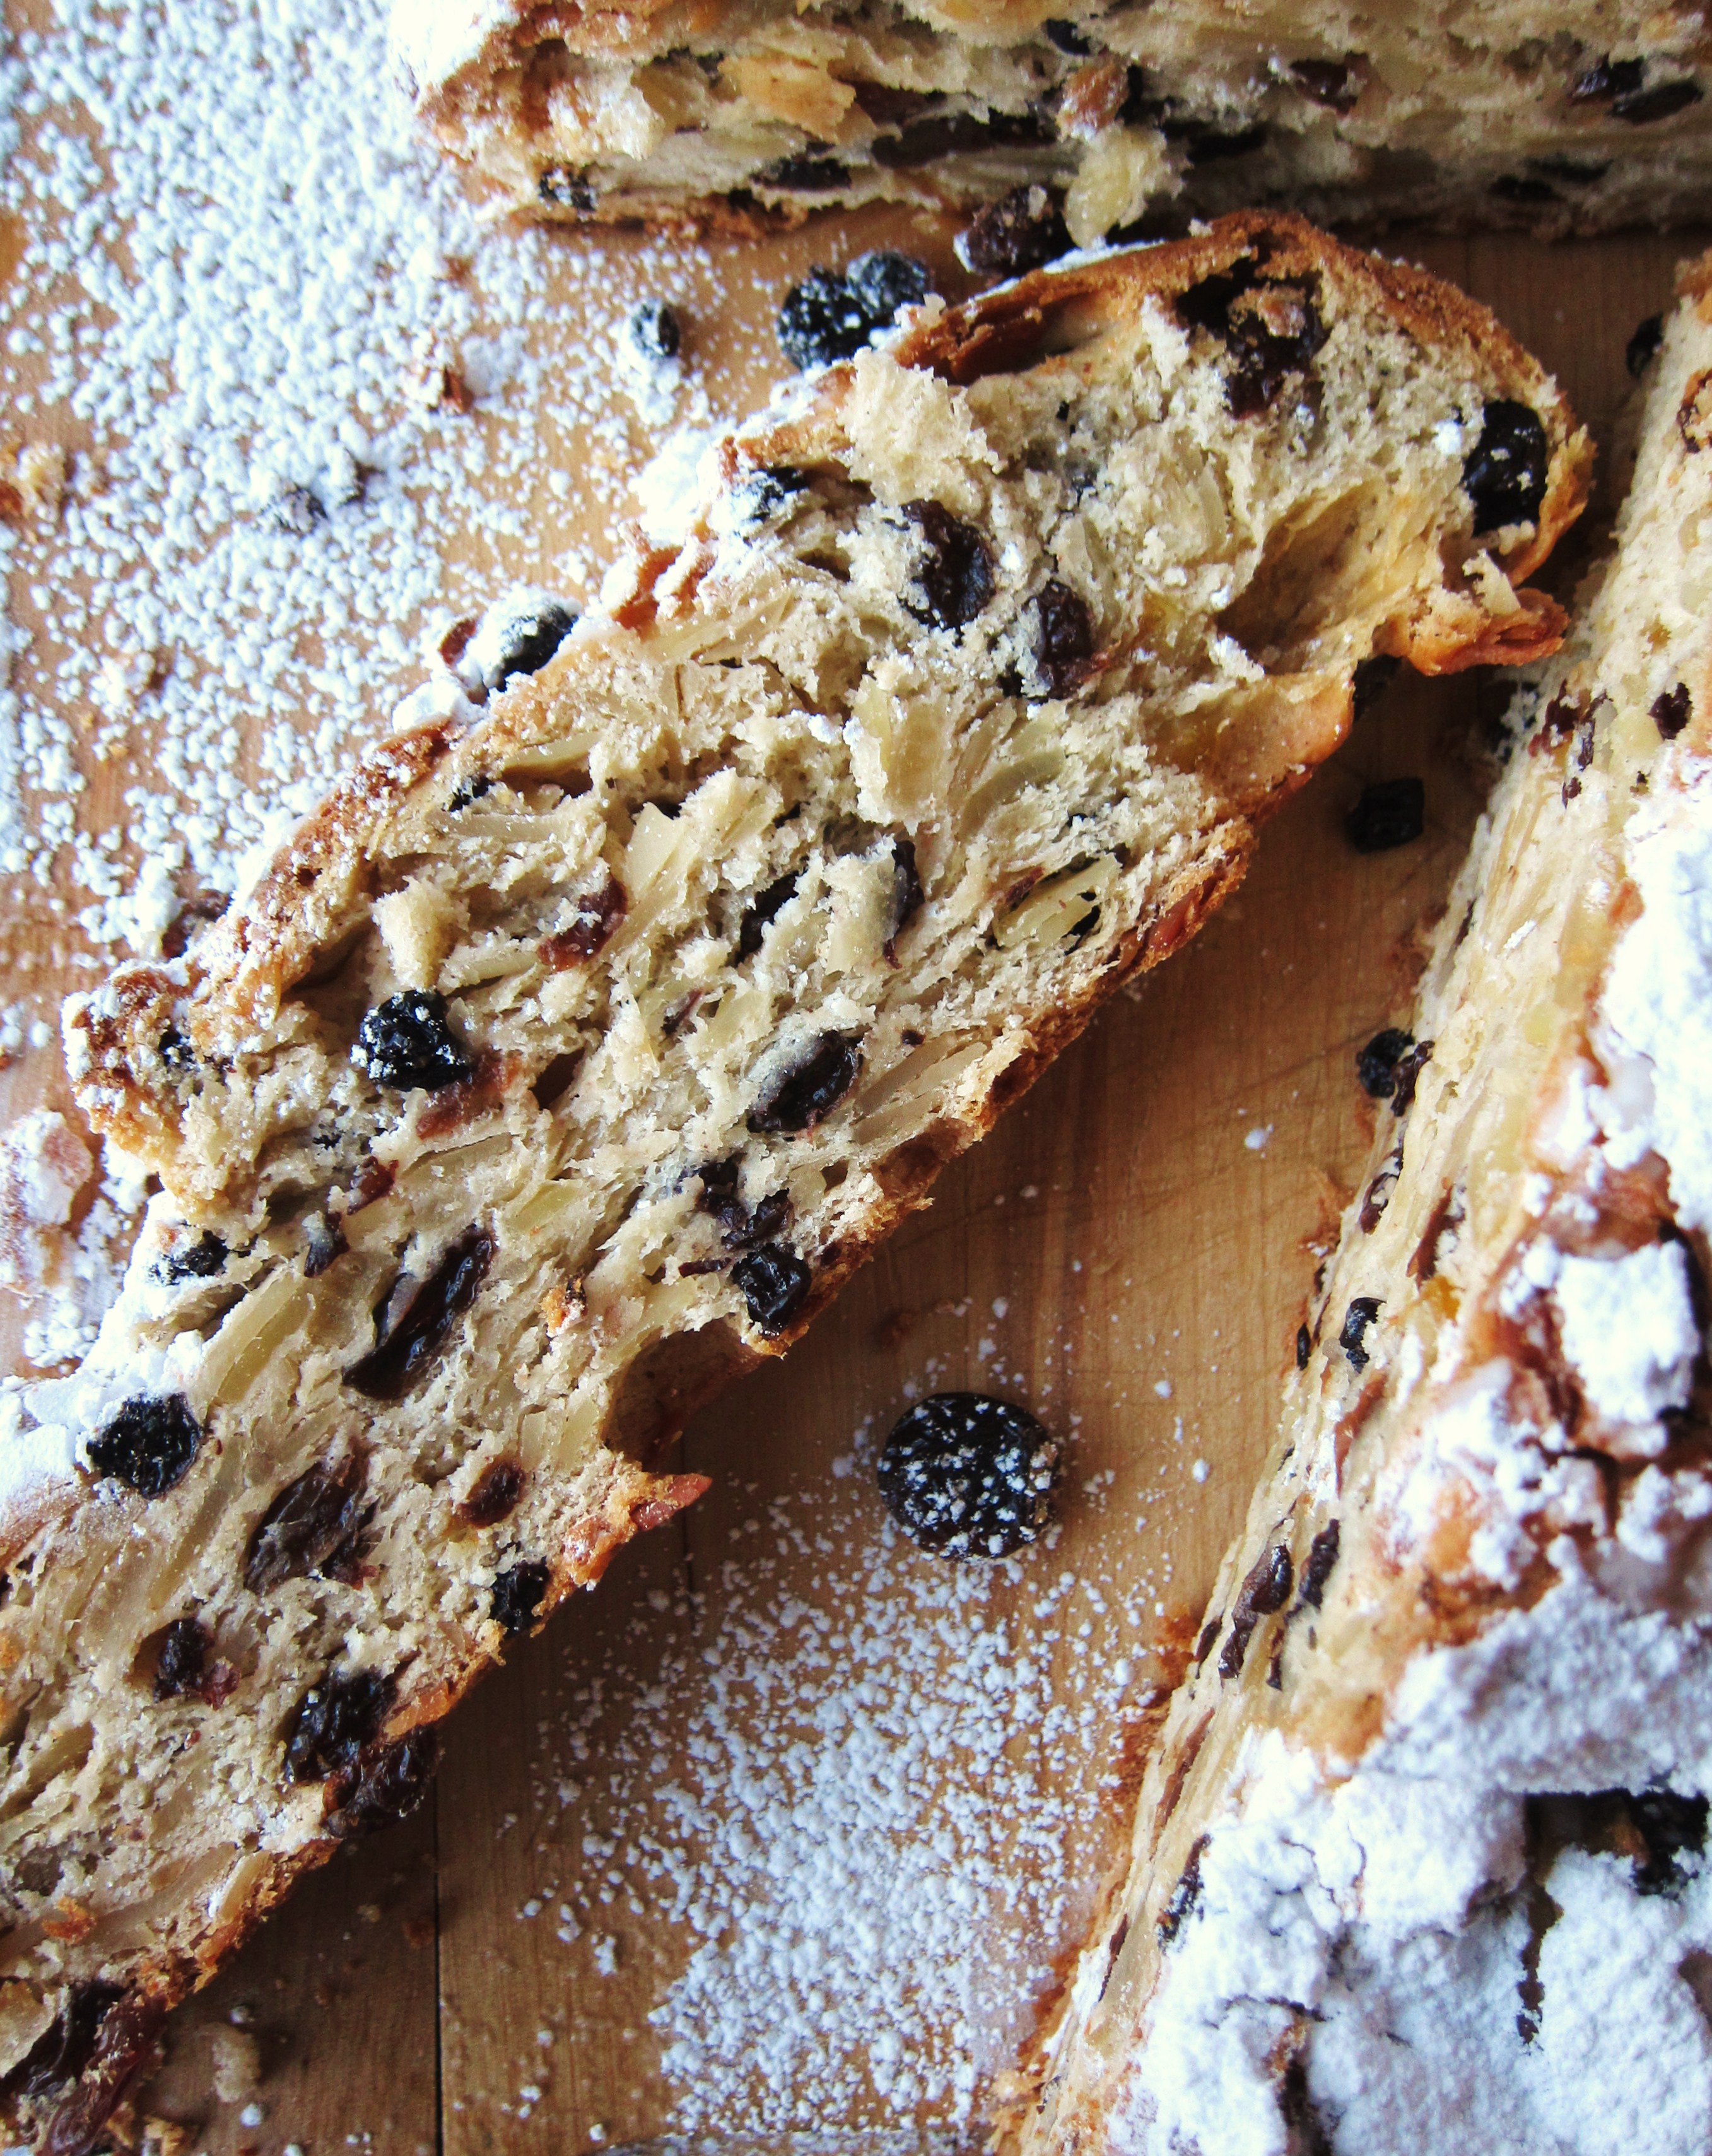
Roll the dough into a long thick cylinder shape and cut into 4-6 pieces. Form into loaves. stollen 15 Transfer to a greased and floured baking tray, cover with a clean dish towel and leave to rise for 20-30 minutes in a warm, draft-free place. Preheat the oven to 350º F and bake for 50 minutes. stollen 17 stollen 18While the stollen is still warm, brush with melted butter and dust with icing sugar. Drizzle a little brandy over-top. Wrap well in muslin cloth or aluminium foil and store in a cool place. stollen 19 stollen 20 stollen 22 Note: Dad likes to douse his stollen every couple of days with brandy to keep it moist (and, let’s be honest, make it more delicious and boozy). Just re-dust the whole loaf with a bit of powdered sugar before serving.

Share this:

  • Tweet
  • Share on Tumblr
Like Loading...
← Older posts
Newer posts →

Facebook

Facebook

Instagram

No Instagram images were found.

Recent Posts

  • Layers and Rows
  • Finding Buoyancy
  • February
  • Wednesday
  • Cross My Heart, Miso

Archives

  • May 2017
  • April 2017
  • February 2017
  • December 2016
  • November 2016
  • September 2016
  • August 2016
  • July 2016
  • June 2016
  • May 2016
  • April 2016
  • March 2016
  • February 2016
  • January 2016
  • December 2015
  • November 2015
  • October 2015
  • September 2015
  • August 2015
  • July 2015
  • June 2015
  • May 2015
  • April 2015
  • March 2015
  • February 2015
  • January 2015
  • December 2014
  • November 2014
  • October 2014
  • September 2014
  • August 2014
  • July 2014
  • June 2014
  • May 2014
  • April 2014
  • March 2014
  • February 2014
  • January 2014
  • December 2013
  • October 2013
  • September 2013
  • August 2013
  • July 2013
  • June 2013
  • May 2013
  • April 2013
  • March 2013
  • February 2013
  • January 2013
  • December 2012
  • November 2012
  • October 2012
  • September 2012
  • August 2012
  • July 2012
  • June 2012
  • May 2012
  • April 2012
  • March 2012
  • February 2012

Categories

  • Beverage
  • Breakfast & Brunch
  • Condiments
  • Cooking For Your Peeps
  • Cooking Solo
  • Cooking with Nonna
  • Food Away From Home
  • Food Writing
  • Holidays
  • Intro
  • Lunch & Dinner
  • Snacking
  • Soups
  • Sweet Tooth
  • The Basics
  • Vegetarian

Enter your email address to follow this blog and receive notifications of new posts by email.

Join 82 other subscribers

Blog at WordPress.com.

  • Subscribe Subscribed
    • julia chews the fat
    • Join 82 other subscribers
    • Already have a WordPress.com account? Log in now.
    • julia chews the fat
    • Subscribe Subscribed
    • Sign up
    • Log in
    • Report this content
    • View site in Reader
    • Manage subscriptions
    • Collapse this bar
 

Loading Comments...
 

    %d