• Home
  • About

julia chews the fat

julia chews the fat

Category Archives: Cooking Solo

February

13 Monday Feb 2017

Posted by julia chews the fat in Cooking Solo

≈ 8 Comments

separation bookshelf

Francophones have a good word for it. Déchirure. It’s what you’re left with when you tear, rip, or rip something apart, like you would a piece of paper, or clothing, or even a ligament, if you were being clumsy. There’s something about the way the syllables fall out of your mouth, and how the”sh” sound sandwiched in the middle somehow perfectly imitates the sound of ripping. That single word, that mouthful of syllables, harnesses the feeling so well. And it’s the first word I think of when I look at this photo.

A week ago, my partner and I split up. It’s been a very surreal and strange time to say the least, one with profound moments of sadness, but also gilded with moments of deep love, support, and appreciation of the other. He’s someone I’ve spent the better part of eight years with, someone I came home to, and someone I’ve cooked and shared a lot of meals with – at the table, watching a movie on the couch, or at our favourite places to eat out, perched side-by-side at the bar.

As you likely well know, this kind of loss is usually accompanied by a loss of appetite. Or perhaps more accurately, a state of appetite limbo. It comes and goes, just as this subtle lump in my throat surfaces from time to time, seemingly out of thin air. Sometimes I feel voracious, other times I feel queasy. And in the moments in between, food mostly tastes flat.

None of this of course has made me particularly want to think about food, let alone write about it. Its role has been fairly perfunctory, an automatic re-fueling of sorts. There have been a lot of frozen pizzas and lazy carbonaras, one of which I ate directly from the pot one night, stooped over the stove, feeling like the ultimate cliché.

I’ve told myself that all this – the bad eating, the not eating – comes with the territory of untethered feelings while they sort themselves out. As long as I get a few salads in there, and I quit eating under the light of the stove hood, I’m sure I’ll be fine.

Thanks for bearing with me while things find their rhythm again. Be back soon x

Share this:

  • Tweet
  • Share on Tumblr

Like this:

Like Loading...

Party Patties

01 Tuesday Mar 2016

Posted by julia chews the fat in Cooking For Your Peeps, Cooking Solo, Lunch & Dinner, Snacking, Vegetarian

≈ 4 Comments

It feels strange to be writing a post about sandwiches, considering that I’m not what you’d call a “sandwich enthusiast”. Sandwiches are fine and all, but for me they usually function as a perfunctory filler – the thing I pick up at an airport before a flight, or at the work cafeteria when I’ve forgotten my lunch and the hot meal du jour looks dodgy. I don’t know about you, but it’s hard for me to get exited about ham on rye or a floppy veggie wrap. Sandwiches have just never been my jam.

That said, I’m a big advocate of the falafel sandwich. In fact, I don’t think I’ve ever come across a falafel sandwich I didn’t like, even the cheap ones I used to inhale during my undergrad days (usually between classes or after late-night drinking excursions), that we’d buy from the dingy Lebanese take-out places around the downtown campus. The best ones had a crunchy exterior that gave way to a soft, crumbling chickpea interior. The ones slathered in garlicky tahini sauce, fresh parsley, bright pink pickled turnip, and wrapped in soft flatbread. Compared to what else was on offer around school – 99¢ pizza, McDonald’s, dubious-looking panini at the Coffee Depot – these falafel sandwiches were often a student’s best option for a cheap, quick, tasty bite.

Since then, and after a few attempts of my own, I’ve come to realize that while falafels are great take-out food, they can be tricky to make well at home. I suspect that it’s because the best ones are made with a deep-fryer (surprise, surprise…) and since I don’t actually have a deep fryer – which, for my overall health, not to mention exposed extremities, is probably a good thing – it means that I don’t ever really find myself trying to make falafel from scratch. Instead, I usually end up picking up one from that well-loved vegan spot in my neighbourhood, because it’s good and close-by and they can have that thing ordered, dressed and wrapped up in five minutes flat. But since I’m not made of money and can’t take on the role of La Panthère verte’s most valuable patron, I’ve been looking for alternatives I can make at home – where my pocketbook can stay clear from any cash registers and 8$ organic sandwiches.

In scouring the Internet for ways to use up the zucchini that were starting to wither away in the crisper drawer, I came across this recipe from Martha Stewart, which reminded me a little of falafel sandwiches (because of the chickpeas and the pita), but looked more home-kitchen friendly. (in truth, my eagerness to try the recipe may be chalked up to the fact that I mistakenly read it as “Zucchini Party Sandwiches” and my curiosity got the best of me. They weren’t in fact “party” sandwiches, but patty sandwiches – though, since making them, I would have no qualms calling them “party” sandwiches, given how colourful and flavourful they are.) (like a party in your mouth, har har…).

They’re something of a cross between a zucchini latke and a falafel – more toothsome than the former, less complicated than the latter. I tweaked Martha’s recipe slightly, using canola oil to fry them in (because, again – unlike Martha – I’m not made of money) and incorporating some curry powder, cayenne and a small amount of olive oil to the mixture for some added oumf. I highly recommend that you do the same, as the flavours mingle really well together; like people do, when the party goes from good to dancing-on-the-tables (!) great.

Have a good week, everybody x

Curried Zucchini-Chickpea Patty Sandwiches

Curried Zucchini-Chickpea Pa(r)tty Sandwiches – adapted from Martha Stewart
Serves 8 (a half-pita each)

Ingredients

  • 1 15.5-oz can chickpeas, drained and rinsed
  • 1 cup plain breadcrumbs (I used panko)
  • 1 medium zucchini, grated
  • 1 small red onion, grated
  • 1 egg, beaten
  • 1 Tbsp curry powder
  • ¼ tsp cayenne
  • 1 teaspoon coarse salt
  • freshly ground black pepper to taste
  • 1 Tbsp olive oil – for flavour
  • ¼ cup canola oil (or sunflower oil) – for frying

To serve:

  • 4 whole-wheat pitas, halved
  • 1 cup Greek yogurt
  • 1 cup fresh mint leaves
  • ½ cucumber, thinly sliced
  • A handful of lettuce leaves, and/or arugula and/or radicchio

Directions

1) Mash chickpeas in a bowl until more or less smooth (with a few nubs left in-tact). Stir in breadcrumbs, grated zucchini, onion, egg, curry, cayenne, salt and pepper. Form into eight 4-by-1/2-inch patties and set aside.

2) Put a pan on medium-high heat and warm the canola oil until hot, but not smoking. Fry the patties until golden and crisp, about 2 to 3 minutes per side.

3) Meanwhile, warm the halved pitas in the toaster on in a dry pan, just to warm through.

4) Stuff the pita halves with the cooked patties, some cucumber, lettuce, mint and yogurt.

Curried Zucchini-Chickpea Patty Sandwiches

Curried Zucchini-Chickpea Patty Sandwiches

Share this:

  • Tweet
  • Share on Tumblr

Like this:

Like Loading...

Mr. Van De’s Amaranth Leaves & Some Stupidly Delicious Noodles

20 Wednesday Aug 2014

Posted by julia chews the fat in Cooking For Your Peeps, Cooking Solo, Lunch & Dinner

≈ 4 Comments

Amaranth leavesIn case you’re wondering, these are amaranth leaves. They’re cultivated from a bushy, wild-looking super plant that grows grains, flowers and leafy greens. Until a couple of weekends ago, this would’ve looked like nothing more than a tousled mess of purple and green to me. But then I met a man by the name of Van De, who, amongst other things, taught me a thing or two about amaranth.

I’d like you to meet him.

Mr. Van De operates a small kiosk – two flip-out tables worth – at the Atwater food market. For the record, I’ll be quick to say that Atwater is not my go-to hunting ground for food. Demographic shifts have caused its products to become more expensive, fancier, chi chi. You can buy overpriced chutneys from England or artisanal squid-ink noodles from Sardinia or pineapples shipped all the way from Costa Rica. I’d much rather have rows of produce, piled high in front of ruddy vendors with dirt under their fingernails hawking their wares, and usually gravitate towards markets that are raucous and a little rough around the edges – places where you can hear belly-laughs and vendors yelling and old ladies bargaining; places where people of different colours, sizes and tax brackets mingle in the same space.

Ultimately, I’m there for the show as much as I’m there for the food.

In an ideal world, markets are places where you can also have a chat with the producers – the ones who’ve had their hands in the muck, so to speak. It might sound clichéed, but in my romantic ideals of what a good food market should be, its shining star is the producer who knows their product inside and out and is eager to cut you off a slice.

And this brings us back to Mr.Van De, because Van De is that kind of producer. It’s what makes him the MVP of Produce at the Atwater market – a place I rarely visit, until a few Sundays ago, when I had to pick up bread for a family get-together and Atwater was the closest spot. While I carefully dodged the droves of manicured ladies, I came across Van De’s little kiosk – his tables were laid out in front of a beat-up van with its doors flung open, exposing large vats of leafy produce. He’s literally selling stuff out of the back of his truck. Who IS this guy? I’d never seen him before, but I liked him already.

As it turns out, Van De specialises in Asian vegetables and sprouts, which he grows, without the use of pesticides, just 25 km outside the city. Stacks of bitter melon, pennywort, amaranth leaves, Vietnamese celery and watercress are laid out beside eachother in self-serve bins. It was like being at a candy store for grown-ups. When he saw me eyeing some bright green sprouts, he picked some out of the bin for me to try. Tenez, madame, essayez. Intensely bitter, but also nicely acidic and grassy, I later found out that out that they were rau đắng, an herb that looks like sunflower sprouts and is used mainly in Vietnamese soups and sautées. When I ask for small bag, he’s quick to inform me that they’re to be eaten in small quantities, preferably in the evening. This is a bit of a wink-wink, nod-nod moment, where he’s hoping I’ll catch his drift. But I don’t, and ask him why I have to be so careful. The word escapes him, so instead he begins gesticulating around his abdomen in a downward motion that can only be interpreted to mean that these tiny sprouts have powerful laxative properties. He looks me square in the eye, and with a wide grin asks, “Vous comprenez?” (Do you understand?). I nod appreciatively.

Mr. Van De – he looks out for you.

One additional advantage to Van De’s produce – the cherry on the sundae – is that it’s dirt cheap. I don’t remember exactly how much I paid for my sprouts and greens, but if I think it was something like 1$/100g. And when he saw how excited I was with all my new loot, he went to the back of his truck and returned with two generous handful of amaranth leaves, adding them into my bag free of charge. He didn’t say a word about it; he just smiled.

—–

That extra handful of amaranth leaves ended up in the recipe below, even if I knew nothing about amaranth before this chance meeting with Van De. I just thought they looked interesting (which, because I’m nuts, always seems like reason enough to buy a food item. Ask me about that time I bought that bulb of jicama that sat on my counter for two weeks). So once I got home, I wasn’t really sure what to do with them, aside from spending an inordinate amount of time ogling their purply-green complexion. Mr. Van De suggested adding them to a broth for a simple Vietnamese soup, or blanching them in salted water to serve as a side dish along with rice and meat, which sounded nice. But I remembered a Thai-style noodle recipe I’d had my eye on from Mandy Lee’s Lady and Pups. It’s basically a saucy, spicy noodle dish made with rendered pork fat, crispy pork belly, bits of browned chicken, fried shallots and a bunch of curry seasonings, bound together with coconut milk to create a flavourful, salty-sweet slurry. The recipe itself doesn’t call for amaranth leaves, but after tasting them and finding that they were a little like spinach (with a slightly deeper flavour), I figured it couldn’t hurt to toss in a few chopped leaves into the sauce.

This is the kind of food that makes you go back for seconds (or thirds…) even when you feel you’re about to burst at the midriff. It’s saucy, slurpy, addictive, diet-annihilating food. Don’t be surprised if you make involuntary grunting noises while shovelling every last bite into your gob. I suspect Mr. Van De would approve.

Khao-Soi-Style Noodles with Mr. Van De’s Amaranth Leaves – adapted from Lady and Pups

The rendered pork fat (makes for 2-3 servings – you can freeze any leftovers):

  • 130 grams of pork fat-slab (ask your butcher)
  • 4-5 shallots, finely sliced
  • 1 head of garlic, finely minced
  • 1/2 tsp of salt
  • 1/2 tsp of ground white pepper

The curry + noodles (for 1 large serving):

  • 1 large handfuls of dried rice vermicelli (thick-cut)
  • 2 tbsp of the reserved pork fat
  • 80 grams of ground chicken
  • 1 tbsp of Thai yellow curry paste
  • 3/4 cup of coconut milk
  • 1/4 cup of chicken stock
  • 1 tbsp of fish sauce
  • 2 tsp of soy sauce
  • 1 tsp of grated ginger
  • 1/2 tsp of sugar
  • 1/2 tsp of curry powder
  • 1/4 tsp of freshly ground black pepper
  • 1 tbsp of finely chopped cilantro
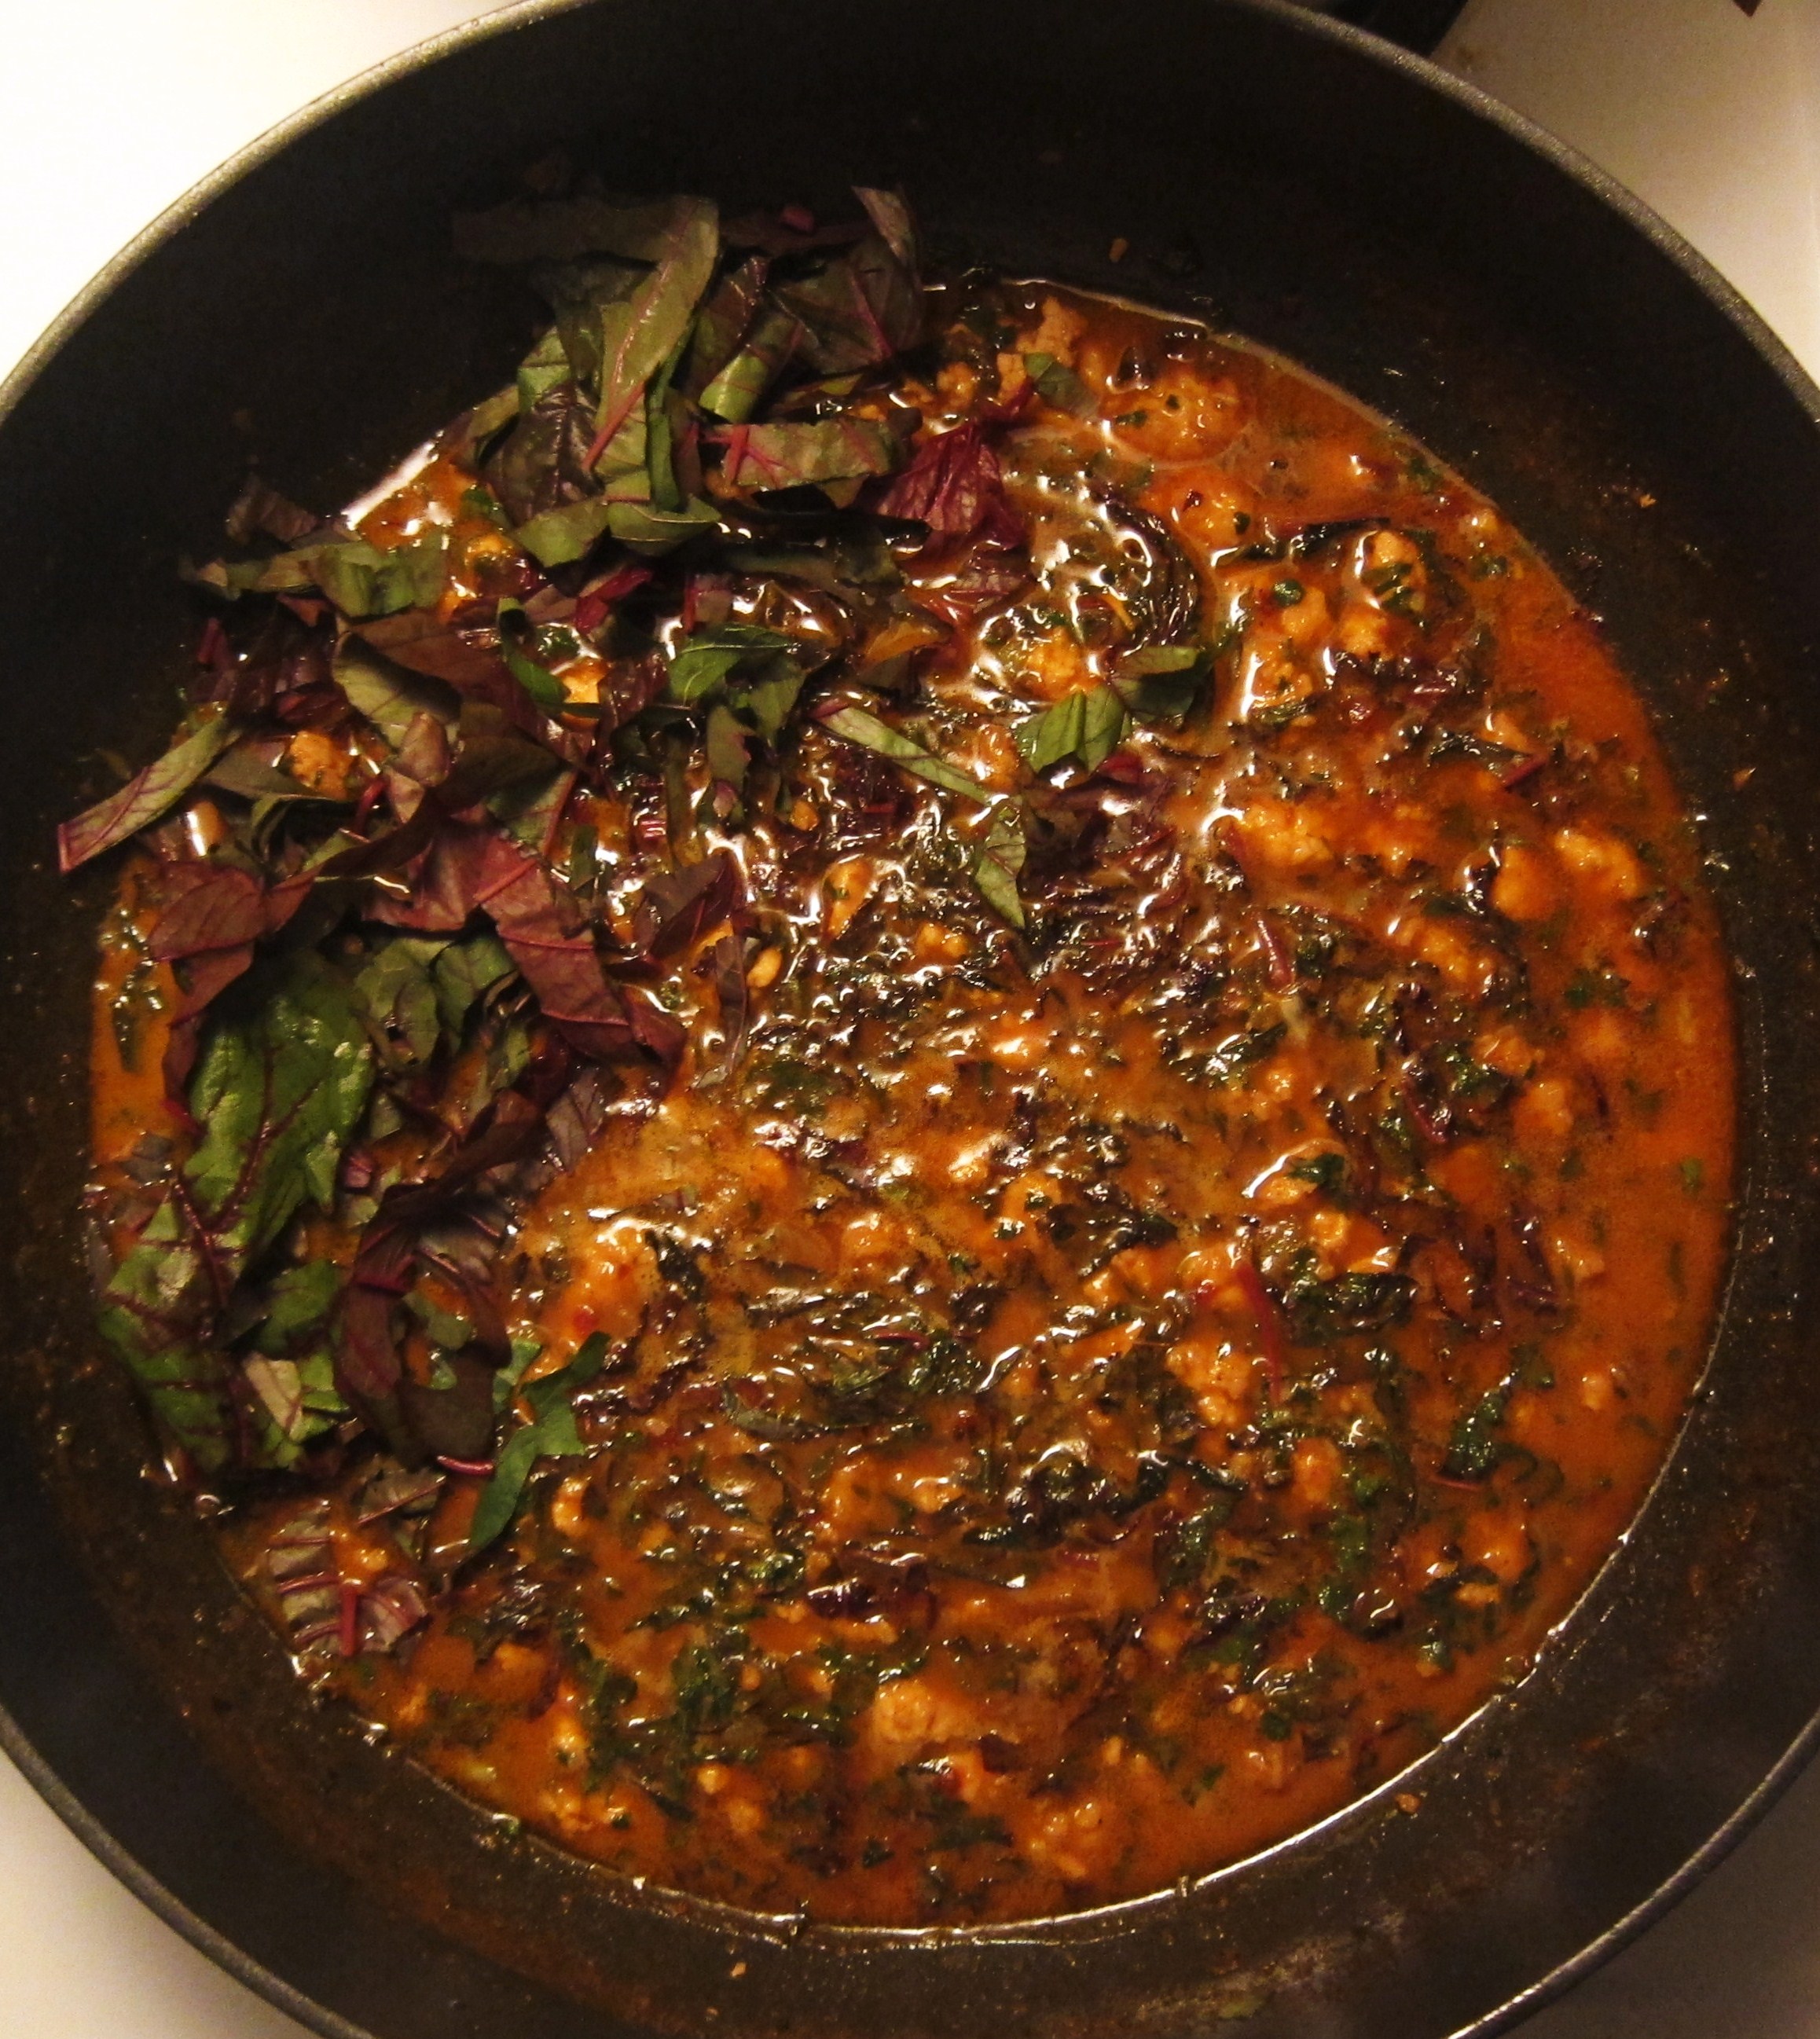
  • 1 handful of amaranth leaves, chopped (can be substituted with spinach)

The garnishes:

    • pork crackling + fried shallots/garlic (see recipe above)
    • handful of Thai basil, torn into pieces
    • lime wedges
    • sambal olek

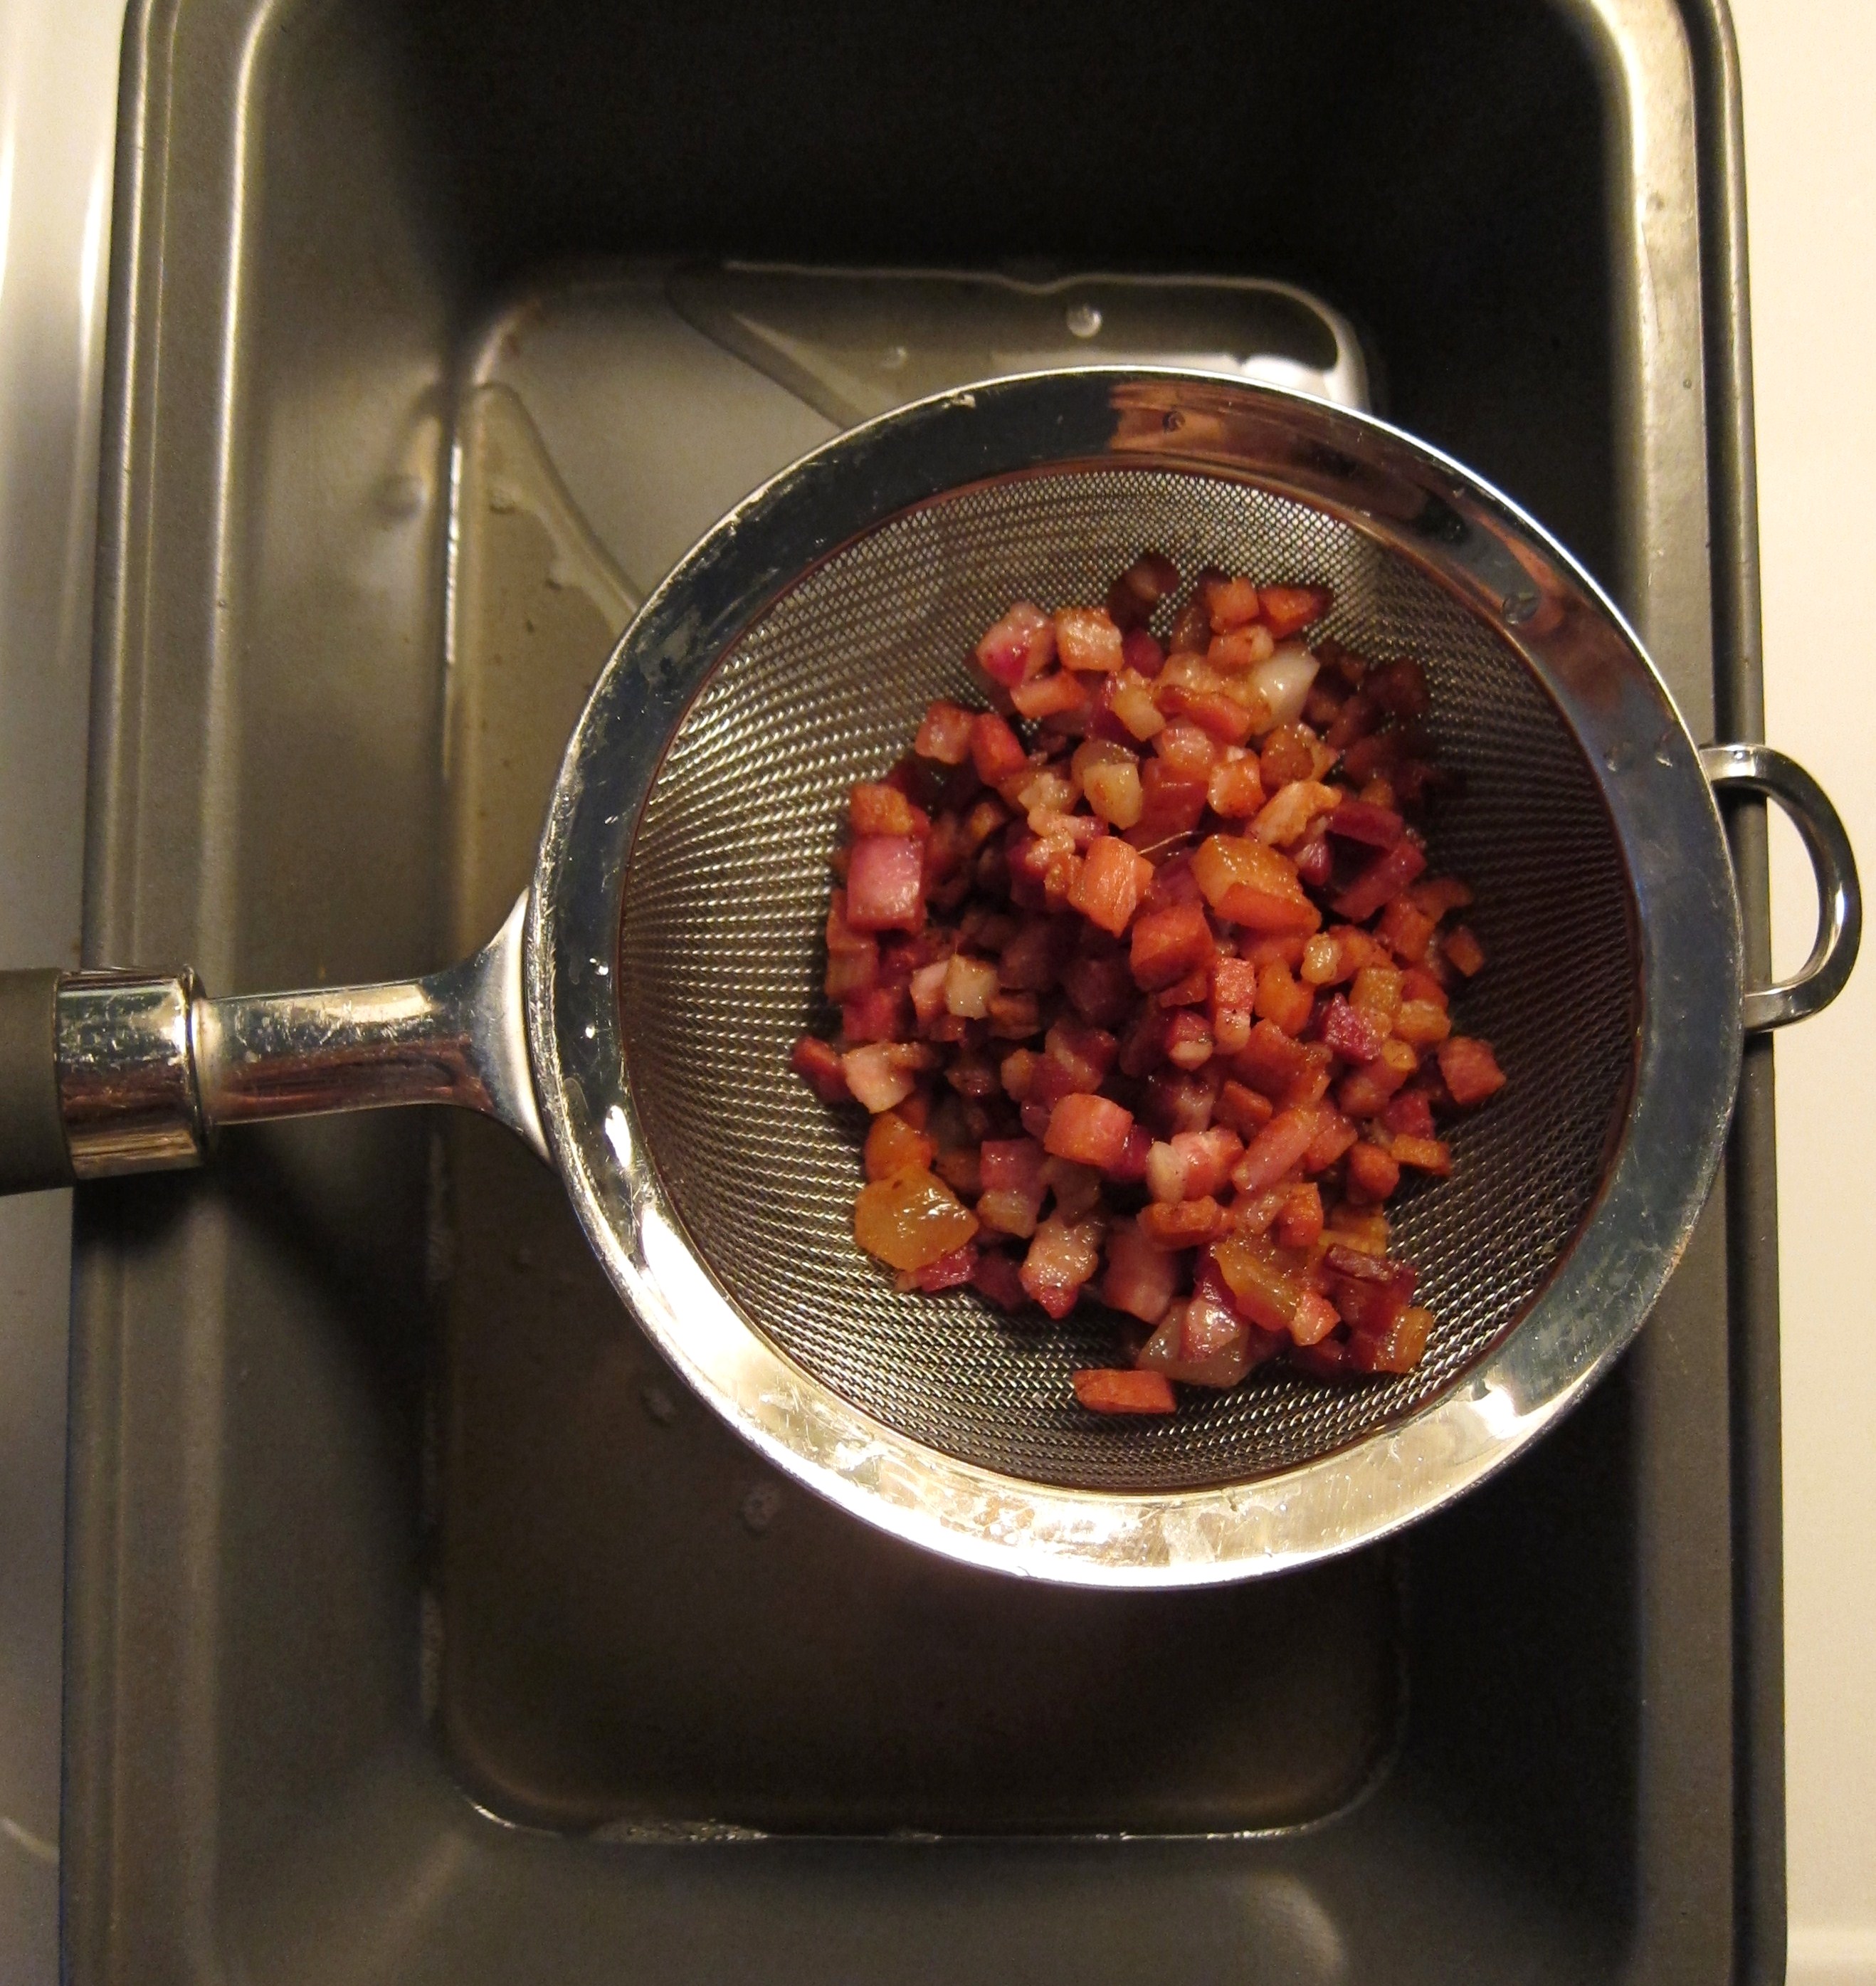
Making the pork crackling + rendering the fat:  Freeze the pork fat-slab until hardened (2 hours +). Cut into small diced pieces. Set a non-stick skillet or wok over medium heat and cook the diced pork fat until it has rendered out all its fat and becomes crispy and golden browned. Drain it through a fine sieve over a bowl, collecting the rendered fat. Season the pork crackling with salt and white pepper.

Rendered bacon

Return the pork fat to the skillet (about 1/2 cup) over medium-low heat, and add the sliced shallots.  Stir frequently and fry the shallots slowly until they are dehydrated, and turn medium-golden browned (about 10 mins). Drain them through a fine sieve, over a bowl, again collecting the rendered fat.  Season the fried shallots with salt and white pepper.

Return the pork fat to the skillet over medium-low heat.  Now add the minced garlic and repeat the same process. Drain the garlic as soon as they turn lightly-golden browned (3 mins). Season with salt and white pepper, and mix the seasoned pork crackling, fried shallots and garlic together.  Reserve the pork fat.

To make the noodles:  Bring a large pot of water to boil for the vermicelli.

Heat 2 tbsp of the reserved pork fat in a pot over medium-high heat.  Brown the ground chicken, then add the Thai yellow curry paste and cook for about 30 seconds.  Add all the seasonings and turn the heat down to medium-low, and cook until the mixture has reduced a little and thickened slightly (about 5 mins).  Add the amaranth leaves (or spinach) and cook 1-2 minutes or until just wilted (they will reduce substantially in size). Add the chopped cilantro and stir to combine.

Curry

Cook the vermicelli according to package-instructions. Rinse the noodles under cold water and drain well. Transfer to the pan with the curry mixture (which is still on medium-low heat). Toss to coat the noodles with the sauce and heat through.

Cooking noodles

Top with 3 tbsp of the pork crackling + fried shallots/garlic and torn Thai basil leaves.  Squeeze lime over all of it, stir, and shove generous forkfuls (or chopstickfuls) into your mouth.

Spicy noodles

Share this:

  • Tweet
  • Share on Tumblr

Like this:

Like Loading...

Hello, Winter.

01 Sunday Dec 2013

Posted by julia chews the fat in Cooking For Your Peeps, Cooking Solo, Lunch & Dinner, Vegetarian

≈ 2 Comments

Well, this is awkward. The last post I left you with involved a late-autumn frolic through the orchard and some apples. And now there’s somehow a solid layer of snow on the ground.

Hm. Funny how that happens.

If it’s any consolation, you haven’t missed much in the kitchen department – I haven’t been cooking a whole lot these days and even when I have, the results have been nothing to cry home about. And with Taste MTL happening earlier in the month, I was busy stuffing my gob here and here for my work with The Main, plus here because I was told it was fantastic (which it was).

Then health stuff made the last couple of weeks feel icky and prompted a lot of early nights, boiled artichoke dinners and zero computer screens after 7pm. It hasn’t exactly been girl-gone-wild around here.

With that unpleasantness out of the way (and with a bit more time on my hands), I’ve been catching up on winter recipe collecting, fattening up my Pinterest board and bookmarking my Ottolenghi and Bernard Clayton cookbooks, all of which has gotten me really jazzed about cooking through the colder months. There’s also the fact that there are ONLY 24 MORE SLEEPS ‘TIL CHRISTMAS, which means I’ve started to daydream about truffles, caramels, shortbreads, fig tarts, ginger cookies, pannetone, paneforte, torrone, clementines, pomegranates, almonds, chestnuts, lemons, persimmons, cinnamon, rosemary, sage, thyme, bourbon…and all the other usual suspects that I’m keen to share with friends and family and you!

While that stuff is in the works, I’d like to leave you with a recipe I made the other day that hit all the right (wintery) buttons. It’s essentially a caramelized, aromatic eggplant filled with pearly Israeli couscous, tangy yogurt and crunchy almonds. You’ll see that the recipe calls for sumac. If you haven’t already used this in your cooking, I highly encourage you to get your hands on some (barter or beg if you have to). Used mostly in Middle Eastern cuisine, it’s a fine, burgundy-coloured spice that has a lemony kick – good for sprinkling over salads, pilafs, roasted potatoes and grilled meats.

Thanks for checking in. See you here again soon, lovelies.

Spiced Eggplant with Herbed Israeli Couscous – serves 2 as a main, or 4 as a side
(adapted from Souvlaki for the Soul)

Couscous Eggplant

Ingredients

– 2 baby (Italian) eggplants, cut into 1cm slices
– ½ tsp turmeric
– ½ tsp ground coriander
– ½ tsp ground cumin
– ¼ tsp ground cinnamon
– ½ cup cooked Israeli couscous
– a handful of chopped flat-leaf parsley
– a handful chopped coriander (cilantro)
– ¼ cup slivered (or chopped) almonds, skin-on (or not)
– olive oil
– lemon juice
– salt and pepper
– Greek yogurt to serve
– sumac for garnish (optional)

Directions:

Pre-heat the oven to 350° F. Combine the ground turmeric, coriander, cinnamon and cumin in a bowl.

Drizzle the eggplants with some olive oil and and rub each with some of the spice mixture. Cook in the oven till eggplants have softened (approx 30-35 mins).

Combine the cooked couscous, herbs and almonds along with a drizzle of olive oil and a squeeze of lemon juice. Stir to combine.

Spoon the couscous mixture into each eggplant piece, adding a dollop of yogurt and a sprinkle of sumac to each. Serve straight away.

Couscous Eggplant - detail

Share this:

  • Tweet
  • Share on Tumblr

Like this:

Like Loading...

Lone wolf-ing it

29 Monday Apr 2013

Posted by julia chews the fat in Cooking Solo, Lunch & Dinner, The Basics, Vegetarian

≈ 4 Comments

I will admit that eating alone, and actually enjoying it, is somewhat of an acquired taste. Cooking just for yourself can be severely unmotivating because a) you know that you don’t need to impress/take care of anyone else; b) no one will reproach you for eating crackers for dinner or plucking something directly out of the jar with the fridge door wide open; and c) after a day of working, commuting, running errands, and overall hustling, it’s hard to muster the courage to dive head first into the kitchen to construct a meal. Once you get home after navigating through bursts of people and cars and buses and potholes, that popcorn and half-empty bottle of Perrier start to look like the best thing you’ve seen all day. In other words, when we’re tired and we know we’ll be dining solo, we usually gravitate towards things that are easy to grab and immediately gratifying (helloooo pickles), ultimately leading us to spoil our appetite for anything more substantial.

But I’m here to tell you that there’s is a better way. Even if you’re feeling capital “L” LAAAZY. Put down the box of Triscuits and allow me to introduce me to your new best friend: Cacio e pepe.

This is one of my go-to meals when I’m feeling completely bagged and uninspired. It takes under 10 minutes to make, it’s warm and comforting and home-made and a gentle reminder of how lone wolfing-it can be, well…nice.

Cacio e pepe (serves 1)

Cacio e pepe

¼ lb good-quality* dried spaghetti, linguini or bucatini
¼ cup (plus 1 Tbsp) very finely grated good-quality parmesan**
freshly ground black pepper
sea salt

*given the simplicity of this recipe, the quality of the ingredients is paramount. Don’t cheap out. You’ll regret it.

**for dishes like this, grating cheese on a microplane or the smallest holes of your box grater works best – that way the cheese melts as soon as it hits the hot pasta, resulting in a oozy, luscious plate of goodness.

Directions:

Cook the spaghetti in a large pot of boiling salted water until al dente.

Put a medium pot of fresh water to boil; once the water has reached a rolling boil, season with salt and add the pasta.

While the pasta is cooking, fill a deep glass or ceramic dish with hot water and submerge your favourite pasta bowl or plate in the water to warm it up before serving.

Once the pasta is cooked al dente, reserve ¼ cup of the cooking water, and then drain the pasta in a colander. Do not shake off the excess water. Transfer back to the pot, off the heat, and sprinkle with ¼ cup of the cheese and about 1 Tbsp of the cooking water. Mix to combine. Add a little more cooking water if you think the pasta looks dry.

Remove the pasta bowl from the warm water (without drying it) and place the pasta into it. Finish with some freshly ground black pepper and a sprinkling of the remaining cheese. Serve straight away with simple steamed greens or a salad (if desired).

Share this:

  • Tweet
  • Share on Tumblr

Like this:

Like Loading...

Beating the drum for breakfast in bed

09 Saturday Mar 2013

Posted by julia chews the fat in Breakfast & Brunch, Cooking For Your Peeps, Cooking Solo, Vegetarian

≈ 4 Comments

It started like any other Saturday – flip on the computer, the radio, get the Bialetti on the stove. Bored with eggs for breakfast, I tossed together a scone batter, cut it into segments and popped the pieces into the oven. Waiting for them to bake, I sat half-awake in front of my laptop, steeping in the newsreel trance that is social media.

Then I thought, Forget this. I’m going back to bed.

The timer went off, the scones came out of the oven. I shut off the computer, grabbed some coffee, a glass of juice and this month’s issues of The Walrus and Saveur and slid back under the sheets.

I bid you to not underestimate the power of breakfast in bed. It may feel lazy and backward and counter-productive (because you got your butt into gear to make breakfast, and now you’re back where you started). But it effectively breaks the routine and is a nice way to say “I like you”, to your partner, your kids and to yourself. Lounging around in a crumpled duvet with a magazine or the paper and a spread of food is, without a doubt, a prime way to start your weekend. Especially if Bill or Lou or Mulatu are accompanying you. And unlike meeting friends for brunch, you can stay comfortably unkempt, half-clothed and disheveled and bask in the glory that is breakfast sans bra. Don’t worry – Bill, Lou and Mulatu won’t mind.

Bfast spread

Orange-scented scones – adapted and translated from Josée di Stasio

  • 2 cups all-purpose flour
  • 2 tsp baking powder
  • 1/4 cup sugar
  • 1/2 tsp salt
  • 1/4 cup cold butter, cut into cubes
  • 2 tsp orange zest
  • 2 eggs
  • 1 tsp vanilla extract
  • 1/2 cup 35 % cream
  • demerara (raw) sugar for sprinkling – optional

Directions

Preheat oven 400 ° F and cover a baking sheet with parchment paper.

Sift flour, baking powder, sugar and salt into a medium bowl. Incorporate the cold butter into the flour with your fingers (or if you have hot hands, use two knives or a pastry blender) to reduce the pieces of butter the size of peas. Add the orange zest and stir to combine.

Whisk together eggs, cream and vanilla. Make a well in the center of the dry ingredients and pour the wet mixture into it. Stir quickly with a fork, bringing the flour into the center. When the mixture is almost amalgamated, transfer the dough on the floured work surface and knead just to make the dough. Add a little flour if necessary.Try not to overknead.

Roll out the dough with the palm of your hand about 1 inch thick in a circle 9 inches in diameter. Cut the dough disk into 8 wedges. Place the wedges on the prepared baking sheet, leaving about 2 inches between each scone. Sprinkle the surface of the scones with raw sugar.

Bake for about 10 minutes. Serve with jam, marmalade (my personal kryptonite) and/or softened butter.

(Note: I like my scones as basic as possible, but Di Stasio suggests adding raisins or dried cranberries to hers. Feel free to incorporate half a cup of either once you’ve incorporated the butter.)

Scones

Share this:

  • Tweet
  • Share on Tumblr

Like this:

Like Loading...

Sick-day omelette

10 Sunday Feb 2013

Posted by julia chews the fat in Breakfast & Brunch, Cooking Solo, The Basics, Vegetarian

≈ 4 Comments

Hi there.

I’m three days into a head cold, so this one’s going to be quickie. If there are spelling mistakes, or incoherencies, I apologize in advance. Trying to write with NeoCitran coursing through your veins feels like being at the steering wheel with one arm.

So I will be economical with my words, and just say this: MAKE THIS OMELETTE. It might just be the best one you’ve ever had. It’s filled with clusters of air bubbles that crackle and melt in your mouth – the kind of food that makes you involuntarily close your eyes between bites. Like women do in yogurt commercials.

Oh and the figs? They will sucker punch you into a euphoric haze. So, yeah, make those too.

Well. It was nice checking in with you – but if you don’t mind, I’m going to go back to drinking lemon tea and watching Timothy Olyphant in a cowboy hat.

Souffléed Omelette with Honeyed Figs (serves 1) – inspired by Luisa Weiss’ My Berlin Kitchen

omelette with honeyed figs

  • 3 eggs divided
  • 1 tbsp. cold butter 
  • Salt and freshly ground pepper

1) Divide eggs, putting whites into a medium bowl and yolks into a small bowl. Season egg yolks to taste with salt and freshly ground pepper, mix together with a fork, and set aside.

fig omelette 001

2) Beat egg whites with a whisk until soft peaks form. Fold egg whites gently into egg-yolk mixture until combined and set aside.

whipped egg whites

3) Melt butter in a cast-iron pan on medium heat. When the butter starts to bubble, pour egg mixture into skillet and spread evenly in pan. Cook omelette, gently shaking skillet over heat occasionally, until bottom is golden, 2-3 minutes. Loosen omelette and flip it onto the other side. Cook covered for an additional 2 minutes or until center in just set. Serve straight away.

(Note: another option is to fold the omelette into a half-moon after the first 2 minutes of cooking, then pop it into a 350°F oven to finish. You can also add grated cheese, chives, etc to the beaten egg yolks if you wish.)

For the Honeyed Figs:

  • 2- 3 fresh figs
  • 1 Tbsp honey
  • about 2 Tsbp goat’s cheese

Set the oven to 400°F. Wash and halve the figs. Lay in a roasting pan, cut-side up and drizzle with the honey. Add a dollop of goat’s cheese onto each fig. Place into preheated oven and bake for 6-8 minutes. Set the oven to broil and bake the figs for an additional 30 seconds or until the cheese is bubbling and golden.

Share this:

  • Tweet
  • Share on Tumblr

Like this:

Like Loading...

Summer grilled cheese

25 Wednesday Jul 2012

Posted by julia chews the fat in Cooking Solo, Lunch & Dinner, Vegetarian

≈ 4 Comments

The heat waves of the last couple of weeks have put me in a bit of a cooking coma. The last thing I’ve wanted to do in the 40°C heat of an apartment without air-conditioning is boil water or broil meat. So, my diet over the past while has consisted mostly of salads. It goes something like this: arugula, walnuts, goat’s cheese; mâche, pumpkin seeds, goat’s cheese; arugula, walnuts, cucumber, goat’s cheese. You get the picture. Snore.

It’s true that salads don’t need to be this monotonous. They really don’t. But being creative in the kitchen sometimes requires certain conditions. And humid heat is not amongst them. When you’re reclining on your couch in front of a rotating fan, in your bathing suit, in the dark, your mind is not usually dreaming up inspiring salad recipes. Rather, it ponders inanities such as, “How long will it take to fill the bathtub with ice cubes?” or “What are my chances of breaking into the city pool without getting arrested?”

As the weather seems to have dipped into cooler territory – at least for the next few days – I’ve gravitated toward things with a bit more substance. And nothing says “substance” like a good ol’ sloppy grilled cheese, particularly one that is bursting at the sides with not one, but two types of fromage. The following is my antidote to the light and breezy summertime salad. Because, let’s face it – salads are wonderful, but every once and a while it’s nice to cradle something hot and gooey in one’s hands.

And this, dear readers, is that something.

Summer Grilled Cheese

makes 1 sandwich

Ingredients

2 slices wholegrain or sourdough bread
2 tbsp Herb Pesto (see recipe below)
2 slices aged cheddar
2 tablespoons goat’s cheese, crumbled
1/2 avocado, sliced (or mashed)
a few leaves of baby spinach
olive oil
butter

Directions

Spread about 1 tablespoon of the Herb Pesto (see recipe below) onto each slice of bread. On one slice of bread, layer: 1 slice of cheddar, avocado, goat cheese, spinach, second slice of cheddar. Top with second slice of bread and press together gently.

Heat approx. 1 tsp. olive oil in a frying pan with a small knob of butter over medium heat. When butter is melted, place the sandwich in the pan and cook until golden brown. Press down on the sandwich lightly, then flip it over and cook the other side until it is golden brown.*

(*I can’t believe I just told you how to make a grilled cheese. You’ve probably been making them since you were old enough to man the stove.)

Herb Pesto

1 clove garlic, smashed
1-2 anchovy fillets (packed in oil) – omit for vegetarian option
handful of spinach
handful of fresh Italian parsley
handful of fresh basil
handful of chopped chives
juice of 1/2 a lemon
1/4 cup olive oil
salt and pepper to taste

Directions

Pulse garlic and anchovy in food processor until chopped. With the food processor running, add lemon juice, parsley, spinach and chives. Slowly drizzle in olive oil until it reaches the consistency of a pesto. Add more oil if you feel it needs it. Season with salt and pepper.

Share this:

  • Tweet
  • Share on Tumblr

Like this:

Like Loading...

A morning sans toast

03 Saturday Mar 2012

Posted by julia chews the fat in Breakfast & Brunch, Cooking Solo, Vegetarian

≈ 5 Comments

Baby, I am a toast girl, through and through. Make me toast with marmalade, and I’ll be yours forever.

Something magical happens to a piece of bread that’s been browned by radiant heat – it becomes something that taps into basic feelings of comfort and contentment. For me, toast also represents a history of experiences, all from different times and places: Grandpa used to make us whole-wheat toast with his sugar-free blueberry jam (for diabetics)- always cut straight through the middle, with the jam spread right to the edges. Two years of my adult life was spent getting up early on Sunday mornings to watch Coronation Street in the company of black tea and buttered toast. In the wee hours of the morning after a night out, almond butter on toast was a common go-to snack in my early 20s. And today, toast and cheese is pretty much the first thing on my mind once I’m up and out of bed.

It’s nothing less than a love affair, dear readers. Which is why on mornings when there’s not a single piece of bread in the house, it’s not uncommon to hear a low rumble of swear words slip out of my mouth. Anyone trying to convince me of the merits of cereal will be wasting their breath; a piece of hot, buttered sour-dough far surpasses a bowl of cold, soggy muesli. Every. Single. Time.

So what’s happens when there’s no bread in the house? Once the grumbling is out of the way, I usually weigh the following options: 1) get dressed and presentable and go buy some; 2) get dressed and (more) presentable and go have breakfast somewhere. But this morning, neither of these options were the least bit enticing. You couldn’t PAY me to wrestle with winter boots, a scarf, mitts and a set of unshoveled steps at 8am on a weekend to go out for a bread-run or a trek to the breakfast place. Winter 1, Julia 0.

—–

In cases like these, laziness can be beneficial as it forces you to be creative. It will test your ability to scrounge up the contents of your fridge and turn seemingly disparate food items into something edible: there are eggs, some leftover baby greens. And – oh well, hello there, Mr.Risotto. Care to join me for breakfast?

Risotto hash, scrambled egg and mesclun salad (Serves 1)

  • 1 egg
  • splash of milk
  • leftover risotto
  • baby greens
  • vinaigrette: olive oil, juice of 1/2 an orange, splash of red wine vinegar, 1/4 tsp whole-grain mustard, touch of honey
  • butter
  • olive oil
  • salt & pepper

Get 2 skillets ready: a small one for your egg and another for your risotto. In one skillet, heat about a tbsp of oil. Add your risotto and flatten it out all the way to the edges of the pan. Allow to crisp up on medium-high heat, turning once the bottom has turned toasty-brown. You don’t need to be gentle with it – you’re making a hash.

While the rest of the hash is browning, melt a small knob of butter in the other skillet. Beat the egg with a splash of milk and some salt and pepper. When the butter starts to get foamy, add your egg, removing it immediately off the burner – you should be able to cook the egg with the residual heat of the pan by gently pushing it to and fro.

Toss the salad with the vinaigrette and serve with the eggs and hash, remembering that you can always have toast tomorrow.

Getting it all in one forkful. Happy times.

Share this:

  • Tweet
  • Share on Tumblr

Like this:

Like Loading...

Oeuf Cocotte

10 Friday Feb 2012

Posted by julia chews the fat in Breakfast & Brunch, Cooking Solo, The Basics, Vegetarian

≈ 5 Comments

It’s not everyday that your health-practitioner offers you foodstuffs. Especially the home-grown kind. But it just so happens that my chiropractor has started keeping a few chickens in her backyard so, naturally, she’s become my no.1 egg supplier.

This, friends, is a very good thing.

One of her “girls” roaming the garden

There’s really nothing like a free-range egg – the yolks are generally thicker and darker and they just have this overall oumf about them. But free-range, organic eggs don’t come cheap and so I’m doubly grateful for the fortuitous circumstances that led me to getting my back fixed and getting free eggs.

This weekend, that small, mismatched batch in my fridge led to the recipe below. Aside from being super simple to put together, oeuf cocotte is arguably the lsweetest breakfast item you will ever lay your eyes on – one egg, baked in a ramekin with tangy crème fraîche, green onion, and a few diced vegetables. The ingredients you choose to include in your cocotte need not be the same every time – use whatever you have handy in the fridge that might go well with eggs. Pair it up with a little toast and a spicy Bloody Mary and you’re off to a very good day.

Oeuf  Cocotte

  • 1 egg
  • 1 tbsp crème fraîche (or fresh soft cheese, thick yogurt)
  • 1/4 of a green onion, sliced
  • small handful of diced vegetables, sautéed (zucchini, mushrooms, etc)
  • a few cherry tomatoes and/or sundried tomatoes
  • small knob of butter
  • a small handful of grated cheese
  • a smattering of fresh herbs (basil, cilantro, tarragon, parsley…preferably not all together)
  • one ramequin
  • one small ceramic, oven proof dish

Preheat your oven to 430°F. Rub the butter along the bottom and sides of ramekin. Lay your veg at the bottom, add a dollop of crème fraîche and then crack the egg on top. Season with salt and pepper. Sprinkle on the green onion and herbs. Finish with a layer of grated cheese.

Place the ramekin in a gratin dish and pour hot water into the dish until it reaches half-way up the sides of the ramekin. This is your bain-marie. Put in the oven for 10-12 minutes, depending on how oozy you like your eggs and serve with toast, etc.

blog 022

Share this:

  • Tweet
  • Share on Tumblr

Like this:

Like Loading...

Facebook

Facebook

Instagram

No Instagram images were found.

Recent Posts

  • Layers and Rows
  • Finding Buoyancy
  • February
  • Wednesday
  • Cross My Heart, Miso

Archives

  • May 2017
  • April 2017
  • February 2017
  • December 2016
  • November 2016
  • September 2016
  • August 2016
  • July 2016
  • June 2016
  • May 2016
  • April 2016
  • March 2016
  • February 2016
  • January 2016
  • December 2015
  • November 2015
  • October 2015
  • September 2015
  • August 2015
  • July 2015
  • June 2015
  • May 2015
  • April 2015
  • March 2015
  • February 2015
  • January 2015
  • December 2014
  • November 2014
  • October 2014
  • September 2014
  • August 2014
  • July 2014
  • June 2014
  • May 2014
  • April 2014
  • March 2014
  • February 2014
  • January 2014
  • December 2013
  • October 2013
  • September 2013
  • August 2013
  • July 2013
  • June 2013
  • May 2013
  • April 2013
  • March 2013
  • February 2013
  • January 2013
  • December 2012
  • November 2012
  • October 2012
  • September 2012
  • August 2012
  • July 2012
  • June 2012
  • May 2012
  • April 2012
  • March 2012
  • February 2012

Categories

  • Beverage
  • Breakfast & Brunch
  • Condiments
  • Cooking For Your Peeps
  • Cooking Solo
  • Cooking with Nonna
  • Food Away From Home
  • Food Writing
  • Holidays
  • Intro
  • Lunch & Dinner
  • Snacking
  • Soups
  • Sweet Tooth
  • The Basics
  • Vegetarian

Enter your email address to follow this blog and receive notifications of new posts by email.

Join 80 other subscribers

Blog at WordPress.com.

  • Follow Following
    • julia chews the fat
    • Join 80 other followers
    • Already have a WordPress.com account? Log in now.
    • julia chews the fat
    • Customize
    • Follow Following
    • Sign up
    • Log in
    • Report this content
    • View site in Reader
    • Manage subscriptions
    • Collapse this bar
 

Loading Comments...
 

    %d bloggers like this: