• Home
  • About

julia chews the fat

julia chews the fat

Monthly Archives: May 2015

Breaking Bread

31 Sunday May 2015

Posted by julia chews the fat in Breakfast & Brunch, Cooking For Your Peeps, Lunch & Dinner, Snacking, The Basics, Vegetarian

≈ 5 Comments

Homemade bread.

I’m a wimp when it’s come to those two words. As much as I like cooking, I’ve carefully avoided breadmaking for years, mostly for fear that it’s a labour-intensive process requiring special types of flour, fancy fresh yeast, elaborate kneading and expensive pieces of machinery, like electric bread makers and large mixers with paddle attachments. And that would just be to get the starter dough going. After that, there’d the issue of rising: Does it have to rise in a low heat oven? What if I don’t have a bread-proof setting on my oven? What if I kill the yeast? How will I know if I’ve killed the yeast? And so on and so forth.

Despite all this, I somehow own three cookbooks on bread – including Bernard Clayton’s New Complete Book of Breads, Soups and Stews, a hefty tome that has sat on the shelf undisturbed, for four whole winters now. I have an entire Pinterest board dedicated to bread, a place where I’ve been quietly stockpiling all sorts of recipes for leavened dough – from densely-flavoured sourdough to crackly baguette to Japanese milk toast – none of which I’ve actually made. But, despite my trepidation, I’m clearly interested in bread – the traditions, the techniques, the delicate alchemy that allows a sticky mass to transform into something crispy and chewy and ethereally light, all at once. It’s a magical beast. The unicorn of food. I’ve just been too timid to get close to it.

Then one day, out of nowhere, I decided to just effing do it already. It happened when I was making lunch with my mom over a long weekend this May:

Me: So, what if I made bread today?
Mom: Yeah, sure. If you want something easy, you should try that no-knead one Mark Bitterman did for the New York Times.
Me: You mean Mark Bittman?
Mom: Yeah, yeah…him. Anyways, it’s so easy. Seriously. There’s a video too. (she finds me the video online). Here, watch it. It’s all there. It’s super simple, you’ll see.

This isn’t the first time I’ve heard of this no-knead recipe. My mom’s been a big proponent of it for years. It’s a version of the old European clay-pot method, modernised by baker Jim Lahey, of Sullivan Street Bakery in Manhattan, and then popularised by Mark Bittman when he did a piece on it for The New York Times. In the video, Lahey walks us through his recipe, step by step, starting with the introductory promise that it’s so incredibly easy, “even a six year-old” (“or a four-year old!”) can make it.

With that bold endorsement in mind, I figured that if any recipe was going to help me cross the threshold into breadmaking, this would be it. The simplicity of Lahey’s recipe is what ultimately sold me. You don’t need to muck around with special bread flour or proofing or extraneous kneading, nor do you need an expensive mixer or a professional oven. All you need is –

flour
yeast
salt
water
your two hands

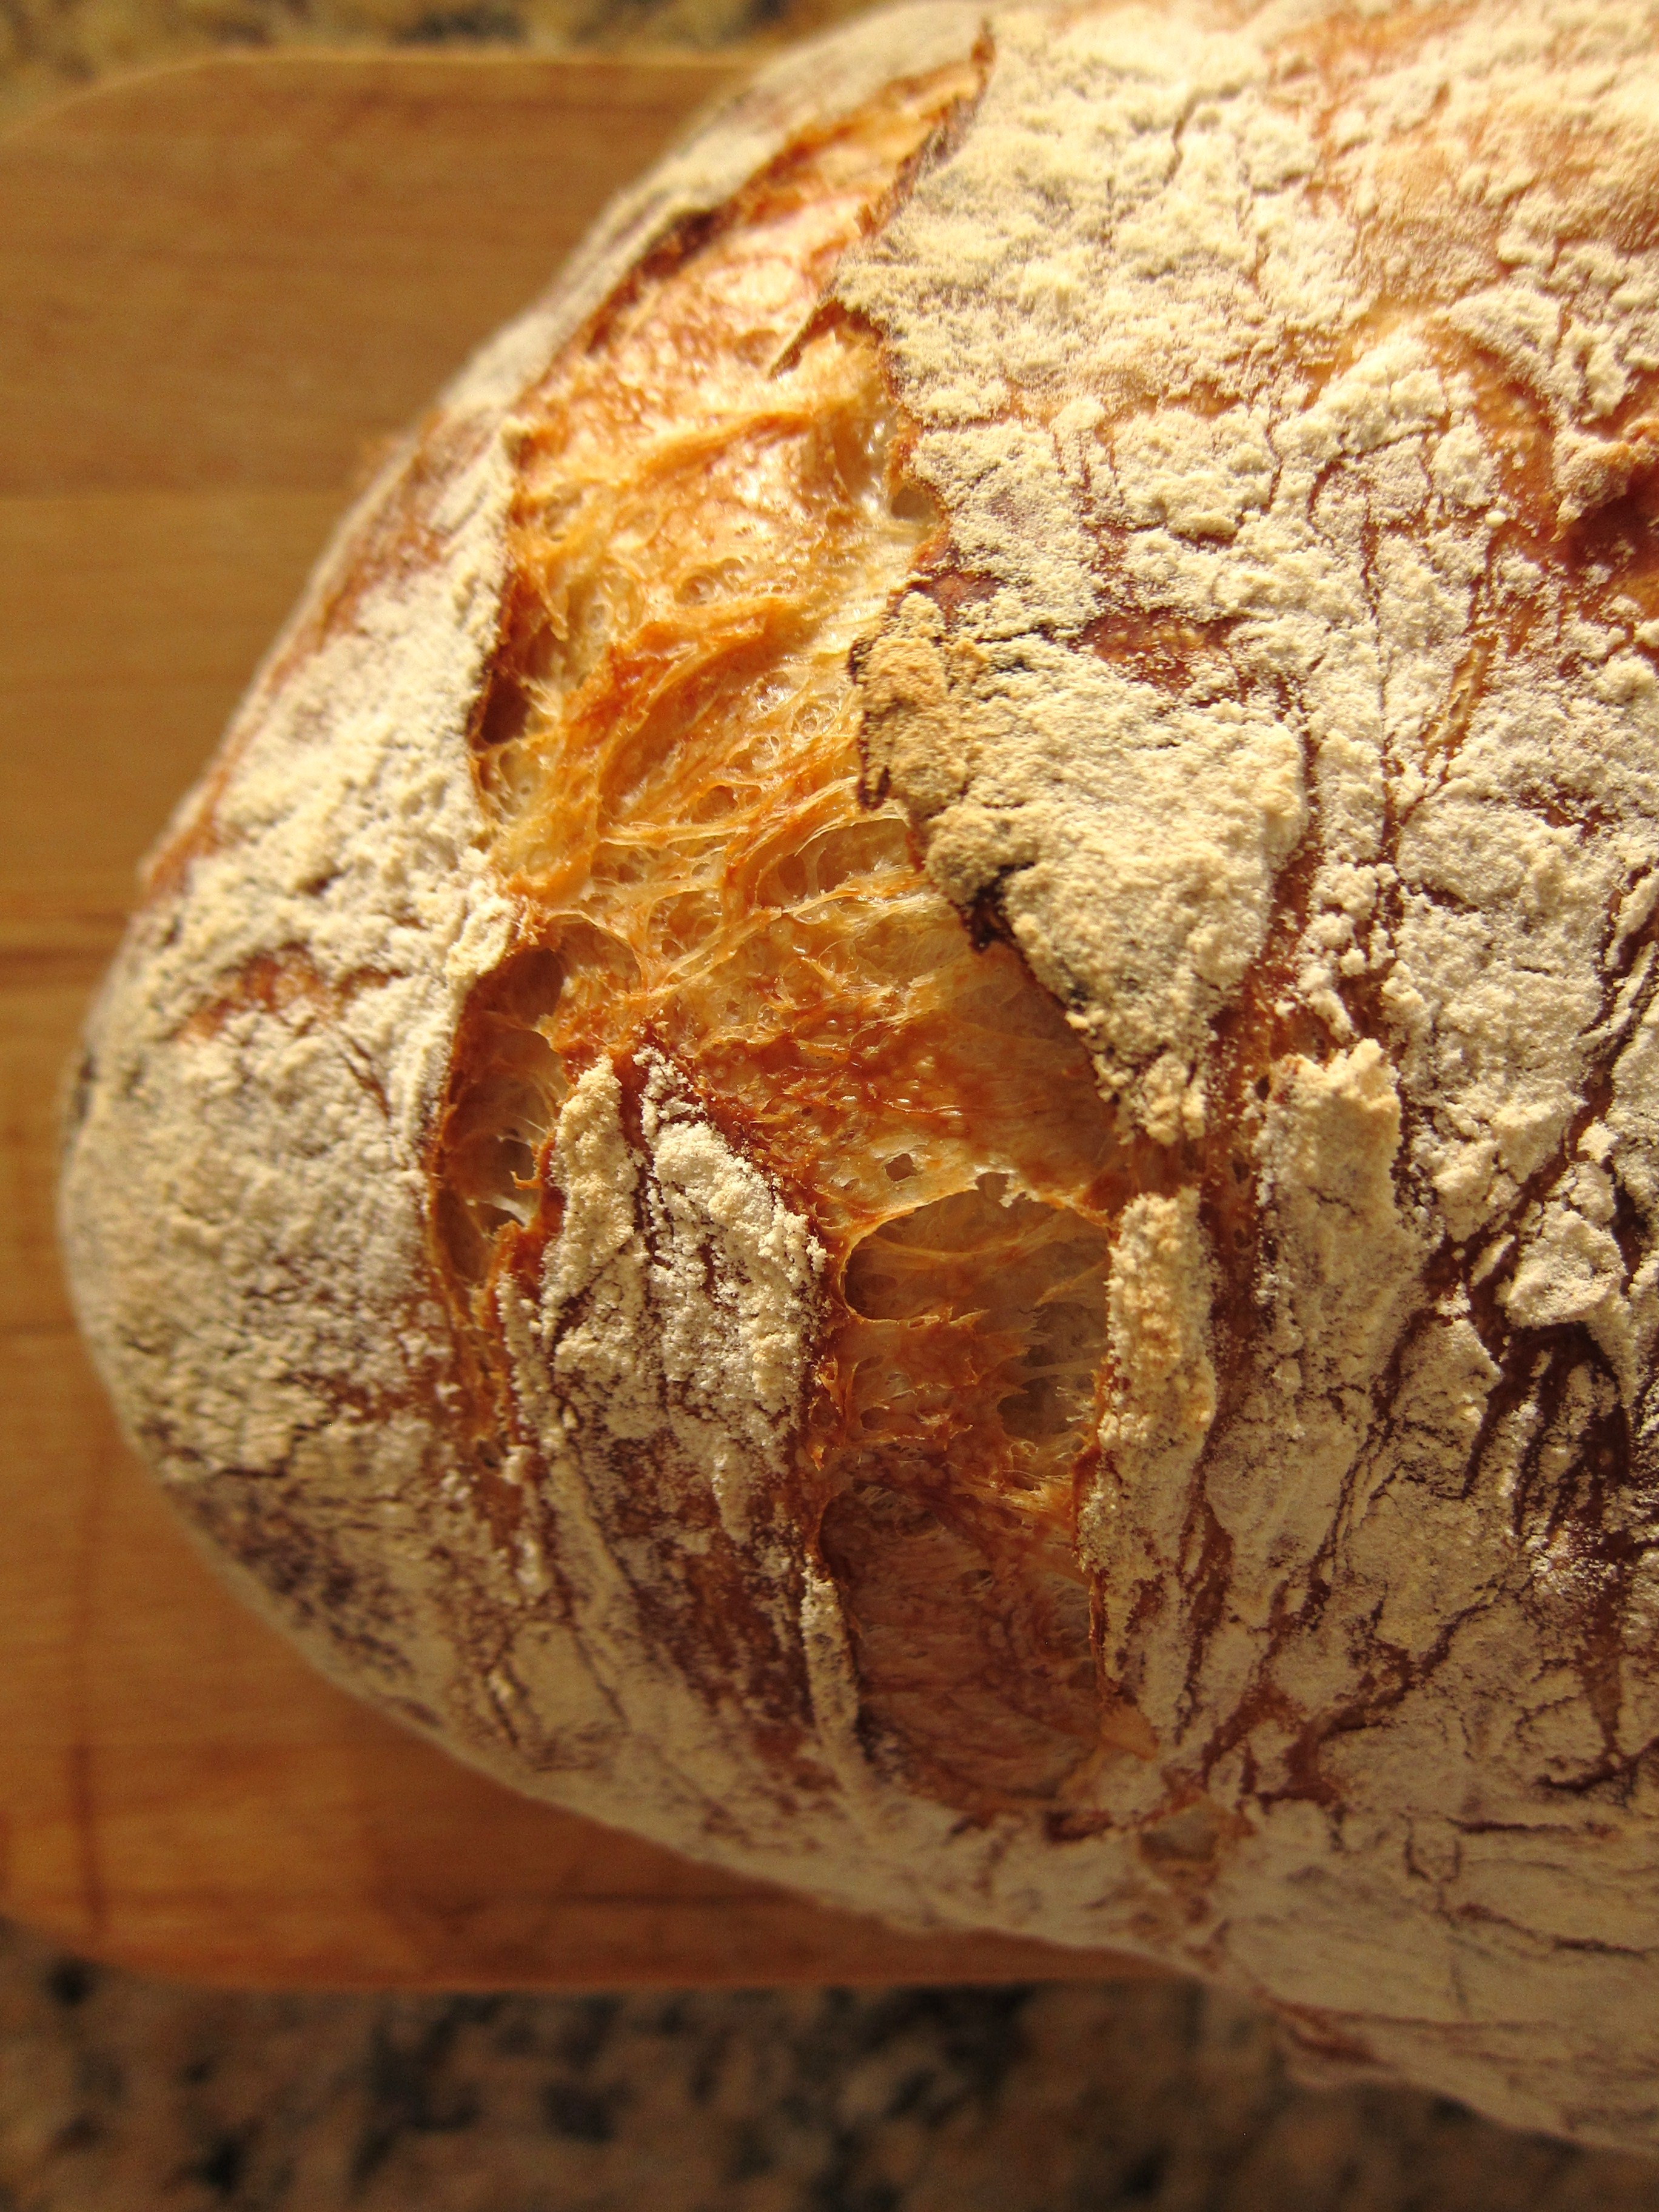
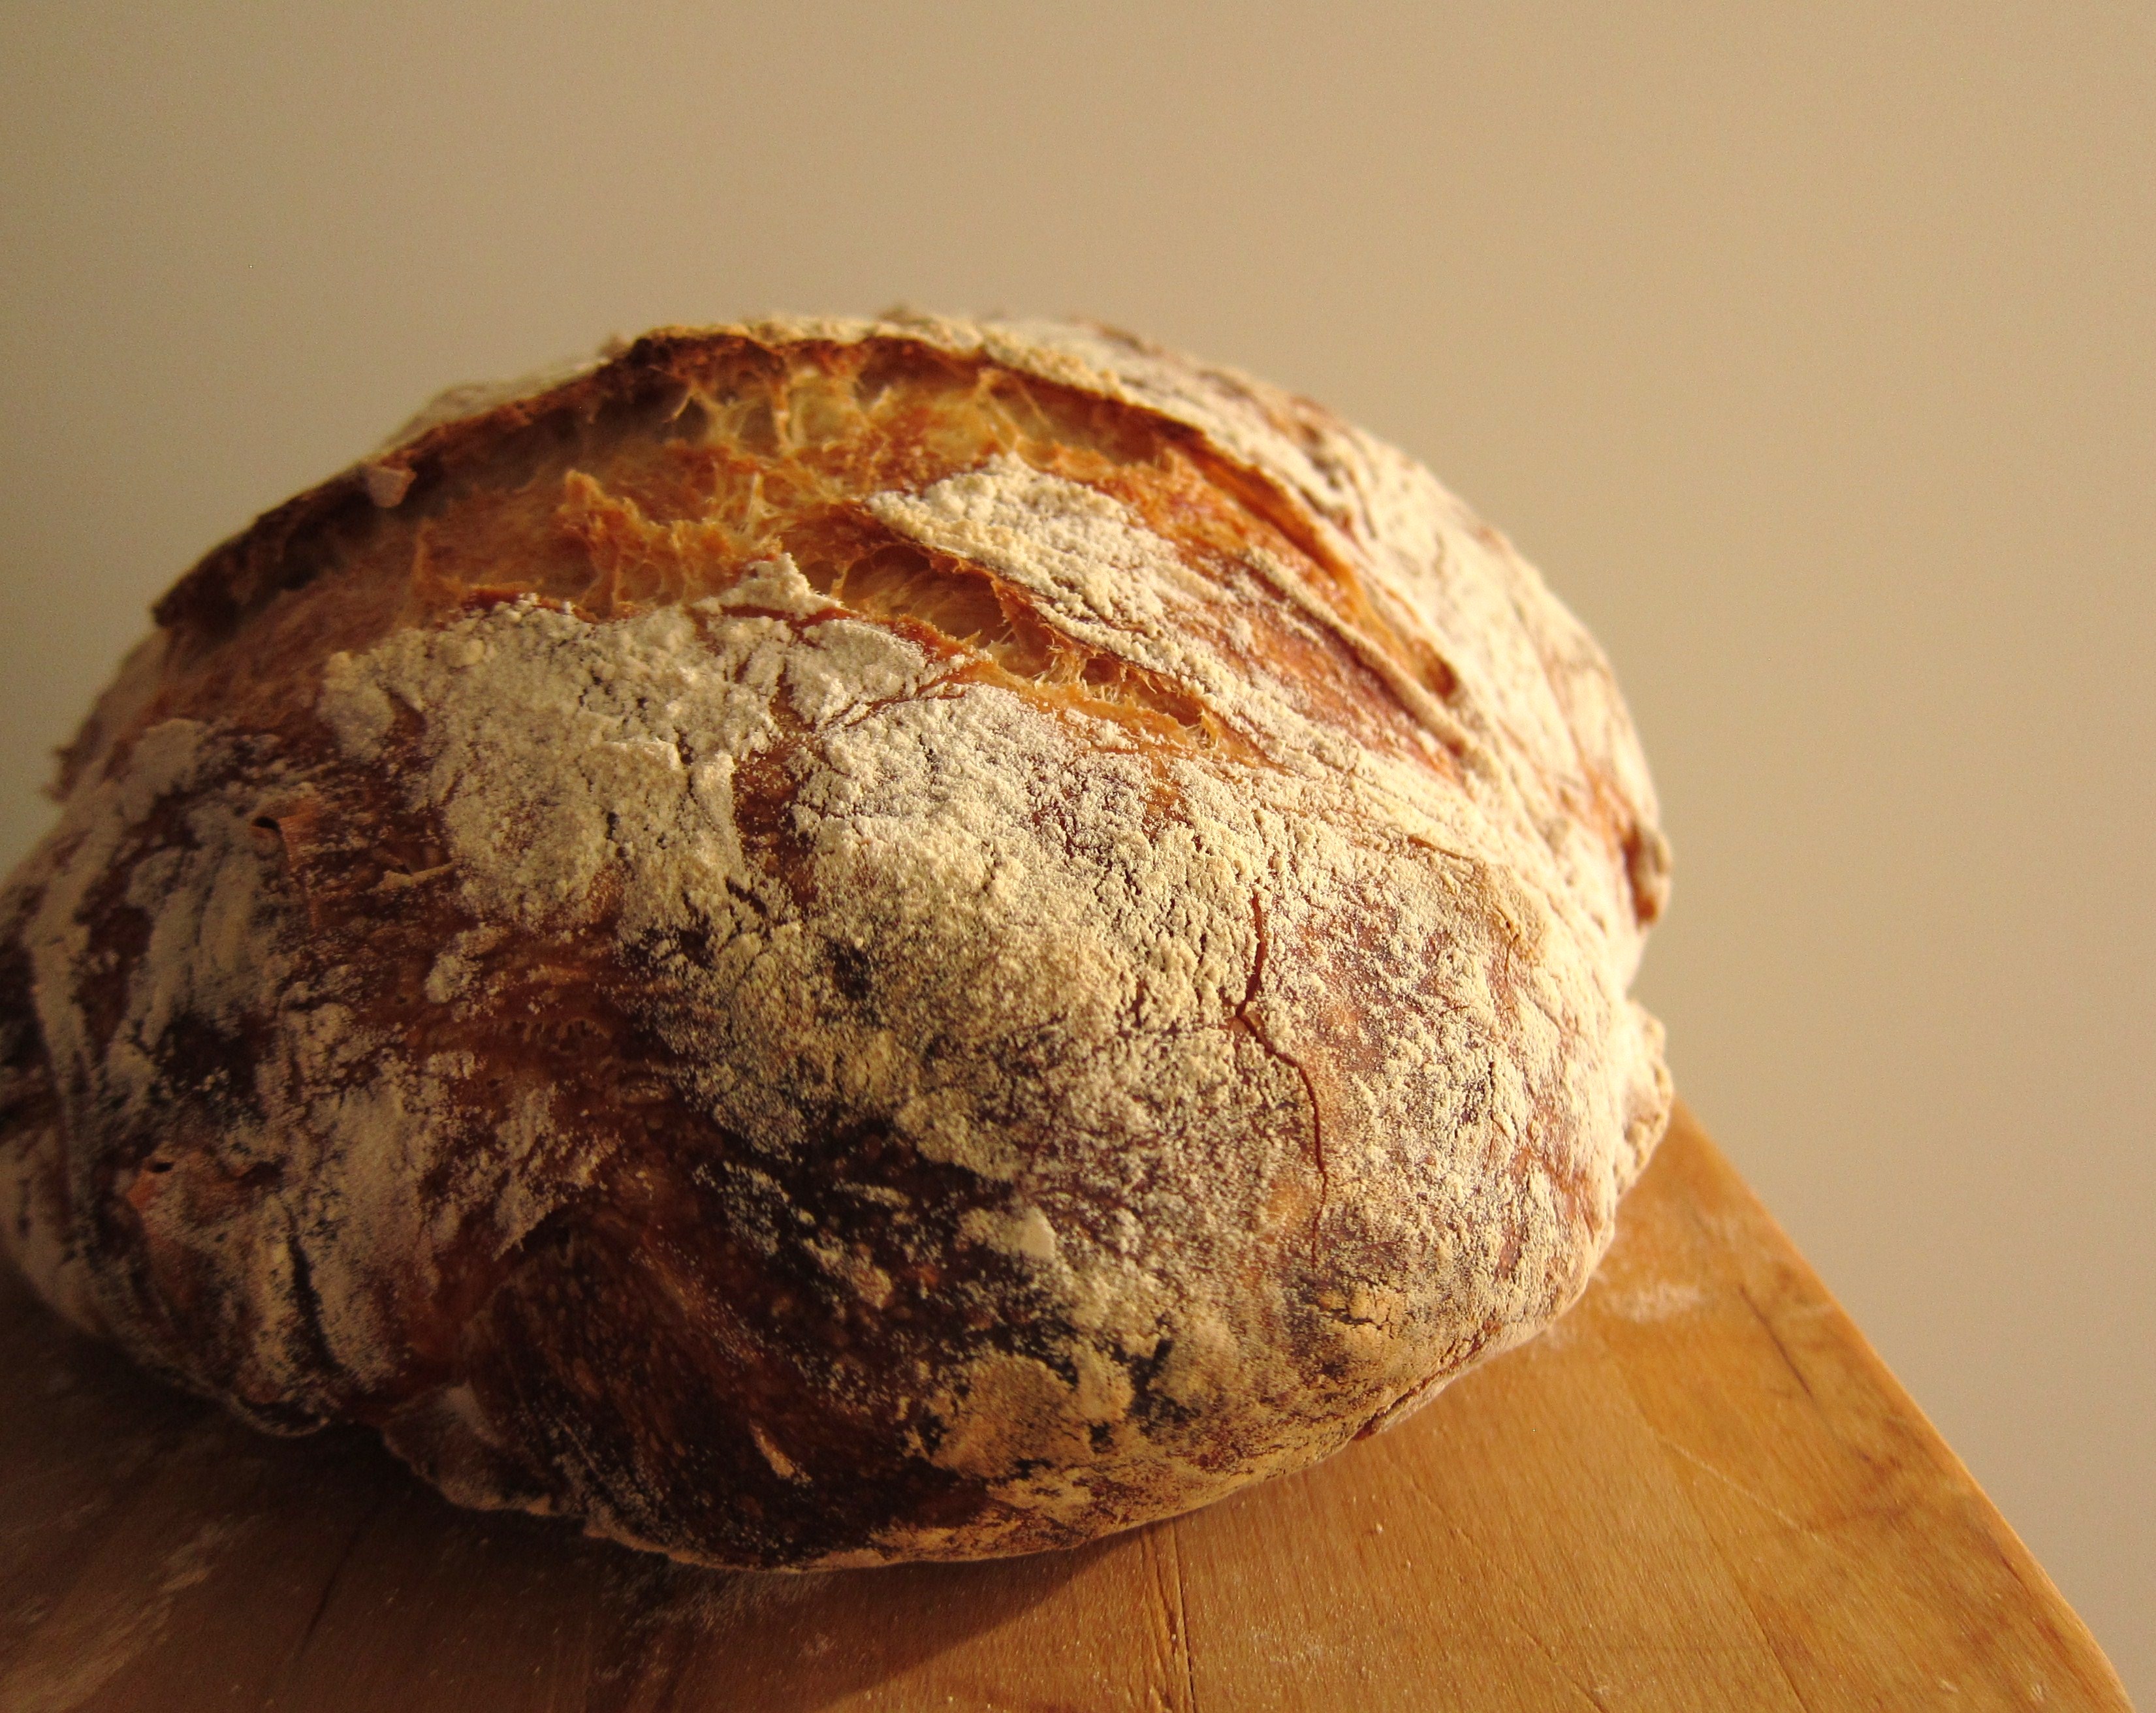
That, and a screaming-hot cast-iron Dutch oven. The cast-iron is an important part of the alchemy in this bread recipe, creating just the right amount of steam to get an airy interior and a crisp exterior. The idea is you set the pot in a 500ºF oven until it reaches temp, then toss in your dough (cover on for a bit, then cover off) and bake on high heat until the bread becomes crackly and lightly caramelised on the outside. Cast-iron pots retain heat extremely well, mimicking the qualities of a stone oven and a steam-injected oven at the same time. So, whether you’re a six year-old, or a four year-old (or even a monkey), the cast-iron pot will help your first attempt at bread look like this:

baked miche

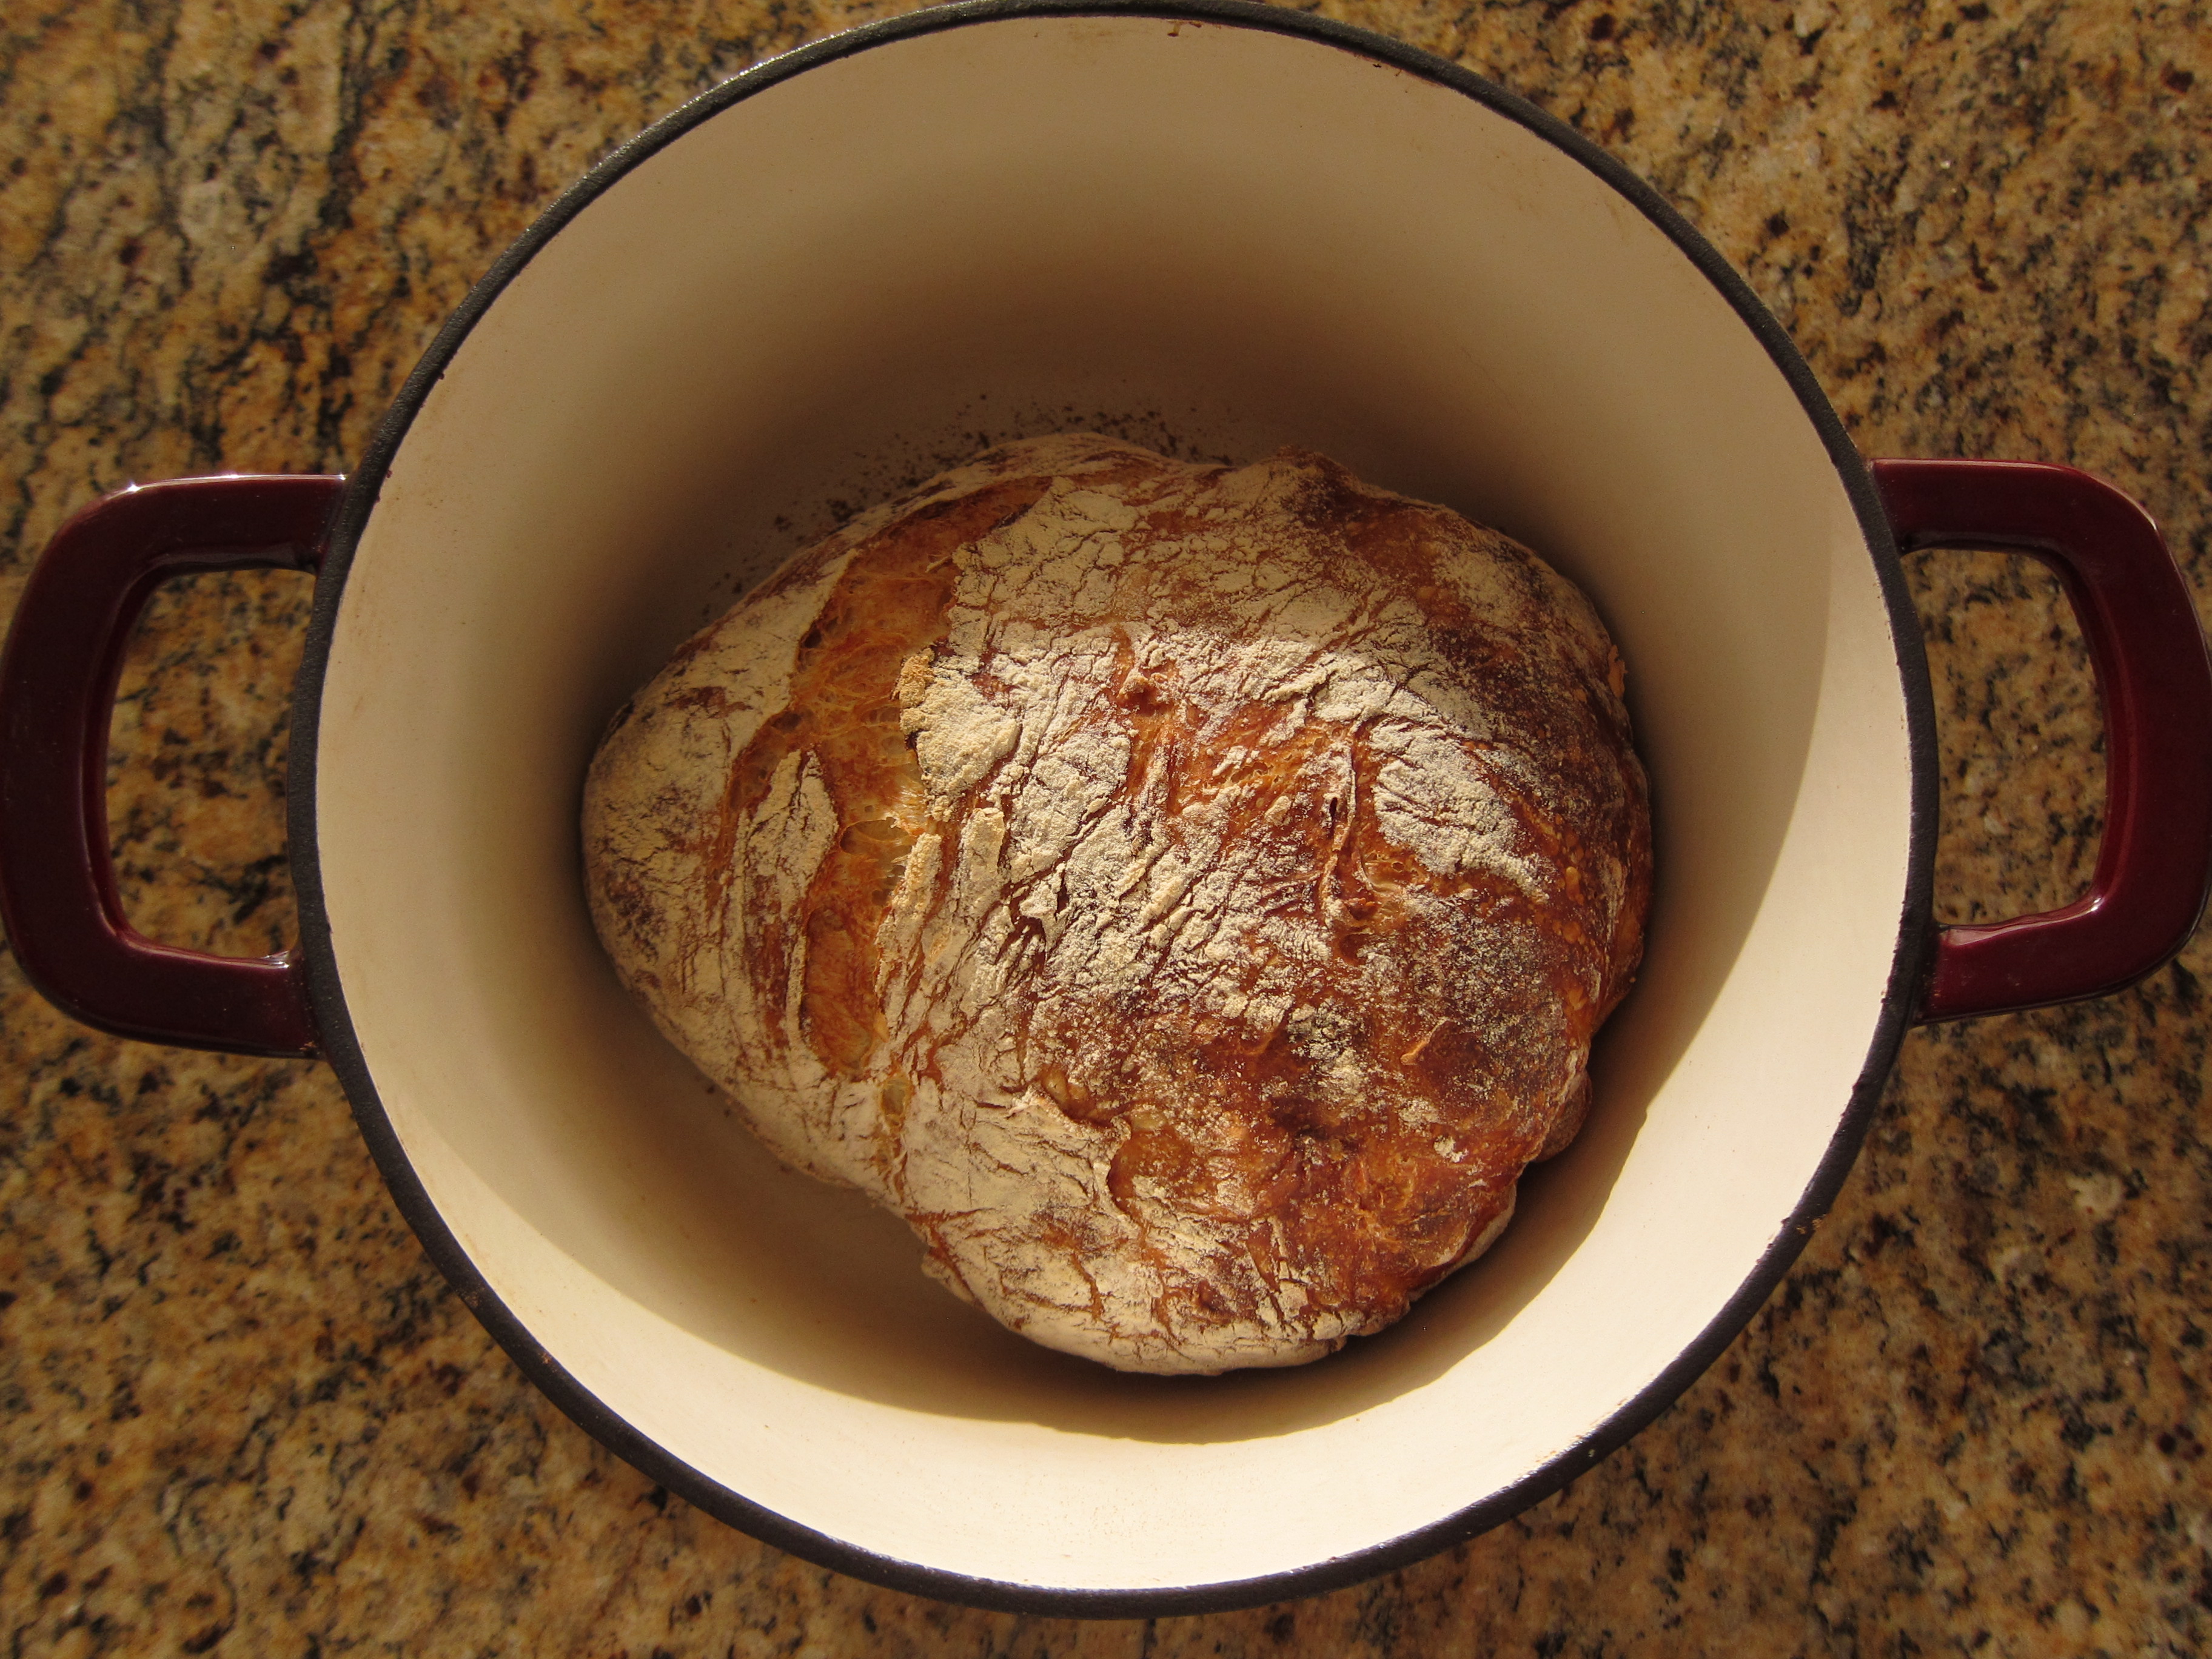
It’s seriously one of the easiest things you’ll ever make. And when you’re cracking into that first piece of freshly baked bread, straight from your oven, you’ll be so happy you made a go of it.

Happy baking, friendlies x

—–

Notes on the recipe:

  • the dough needs at least 12 hours for the first rise, then another 2 hours for the second rise. Start the night before and let it rise overnight. The longer you let the dough rise (min. 12 hours, max 24 hours), the more flavourful it will become.
  • when my mom discovered this recipe, she quickly starting making her own adaptations, one of which resulted in a drop-dead gorgeous focaccia recipe. All you need to is add a bit of olive oil to the dough and stretch it out on a pizza pan for baking. (I’ve included her recipe for a cherry tomato version below). If you decide to make both the bread and the focaccia, just double the dough recipe.

Note on Dutch ovens: if you don’t already have one, it’s an insanely useful kitchen tool have. They’re especially practical in the winter – to make soups, stews, curries – but are a must-have for this bread recipe. If you’re worried about the financial commitment, remember that you don’t need to buy the top-of-the-line models (the ones that can go for upwards of $350 a pop); I got a Lagostina version on sale at Canadian Tire for $90 and it works like a charm. They usually come with a 10 or 25-year (and sometimes, lifetime) guarantee, so they’re in it for the long haul. Just make sure that you get one with a 500ºF-resistant metal knob on the cover so that you can make your bread (the ones that come with a hard plastic knob are no bueno).

Jim Lahey’s No-knead Bread – makes one white miche

Ingredients

  • 3 cups all-purpose flour
  • ¼ tsp dry yeast (like Fleischmann’s)
  • 1 ½ tsp salt
  • 1 ½ cup water

Crucial kitchen tool: cast-iron Dutch oven

DIRECTIONS

STEP 1 – RISING

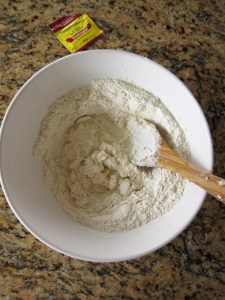
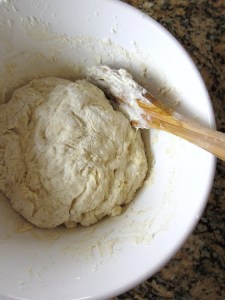
1) In a mixing bowl combine the flour, yeast and salt and blend with a whisk.

2) Pour in 1 1/2 cup of water and mix with a wooden spoon. Scrape any excess flour from the bottom and sides of the bowl, making sure the ingredients are well incorporated and form into a ball. The dough will have a stringy texture.

3) Place a piece of plastic wrap on the bowl to avoid the dough from drying out. Allow to rise in a warm dry, and draft free place for at least 12 hours and up to 24 hours. (I left mine at room-temperature on the counter-top overnight.)


STEP 2 – FOLDING & SECOND RISING

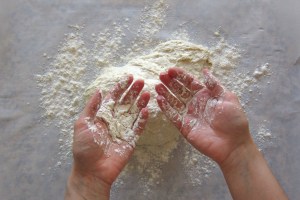
1) Dust a large piece of parchment paper, measuring about 24 inches with flour to prevent the dough from sticking during its second rising. Scrape the risen dough onto the floured parchment paper.

2) Sprinkle some flour on the dough and on your hand to prevent sticking. Lightly pat down the dough with your hands to form a piece measuring approximately 10 x 10 inches.

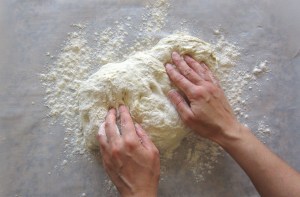
3) Fold one side to the centre; then fold the other side to meet the edge of the first side, like a book (see images below). Take the top edge and fold to the centre; take the bottom edge and fold to meet the top edge.

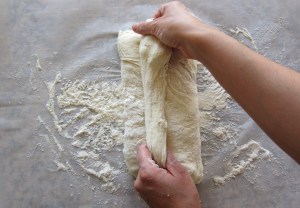
4) Turn the dough and place the folded side of the dough on the parchment paper and dust with flour to prevent sticking. Loosely wrap the dough in the parchment paper and place on a baking sheet. Cover with a tea towel. Transfer to a warm and dry place and allow to rise a second time (2 hours).


STEP 3 – BAKING

1) Place the cast iron Dutch oven with its cover, on the second rack from the bottom of the oven. Preheat the oven to 500ºF.  Dust the smooth side of the risen dough with flour to prevent it from sticking to the bottom while baking.

2) Once the oven reaches the required temperature.  Remove the pot from the oven and take the cover off. Place the dough, folded side up into the pot and cover. Bake for 30 minutes at 500ºF.

3) Remove the cover, reduce the heat to 450º F and bake for an additional 15-30 minutes until the crust becomes golden brown. To check if the bread is cooked, remove the loaf from the pot and tap the bottom with a knife – if it sounds hollow, the bread should be done. Cool on a baking rack.

baked miche

baked miche - detail

baked miche

baked miche

baked miche - section

—–

Tomato Focaccia

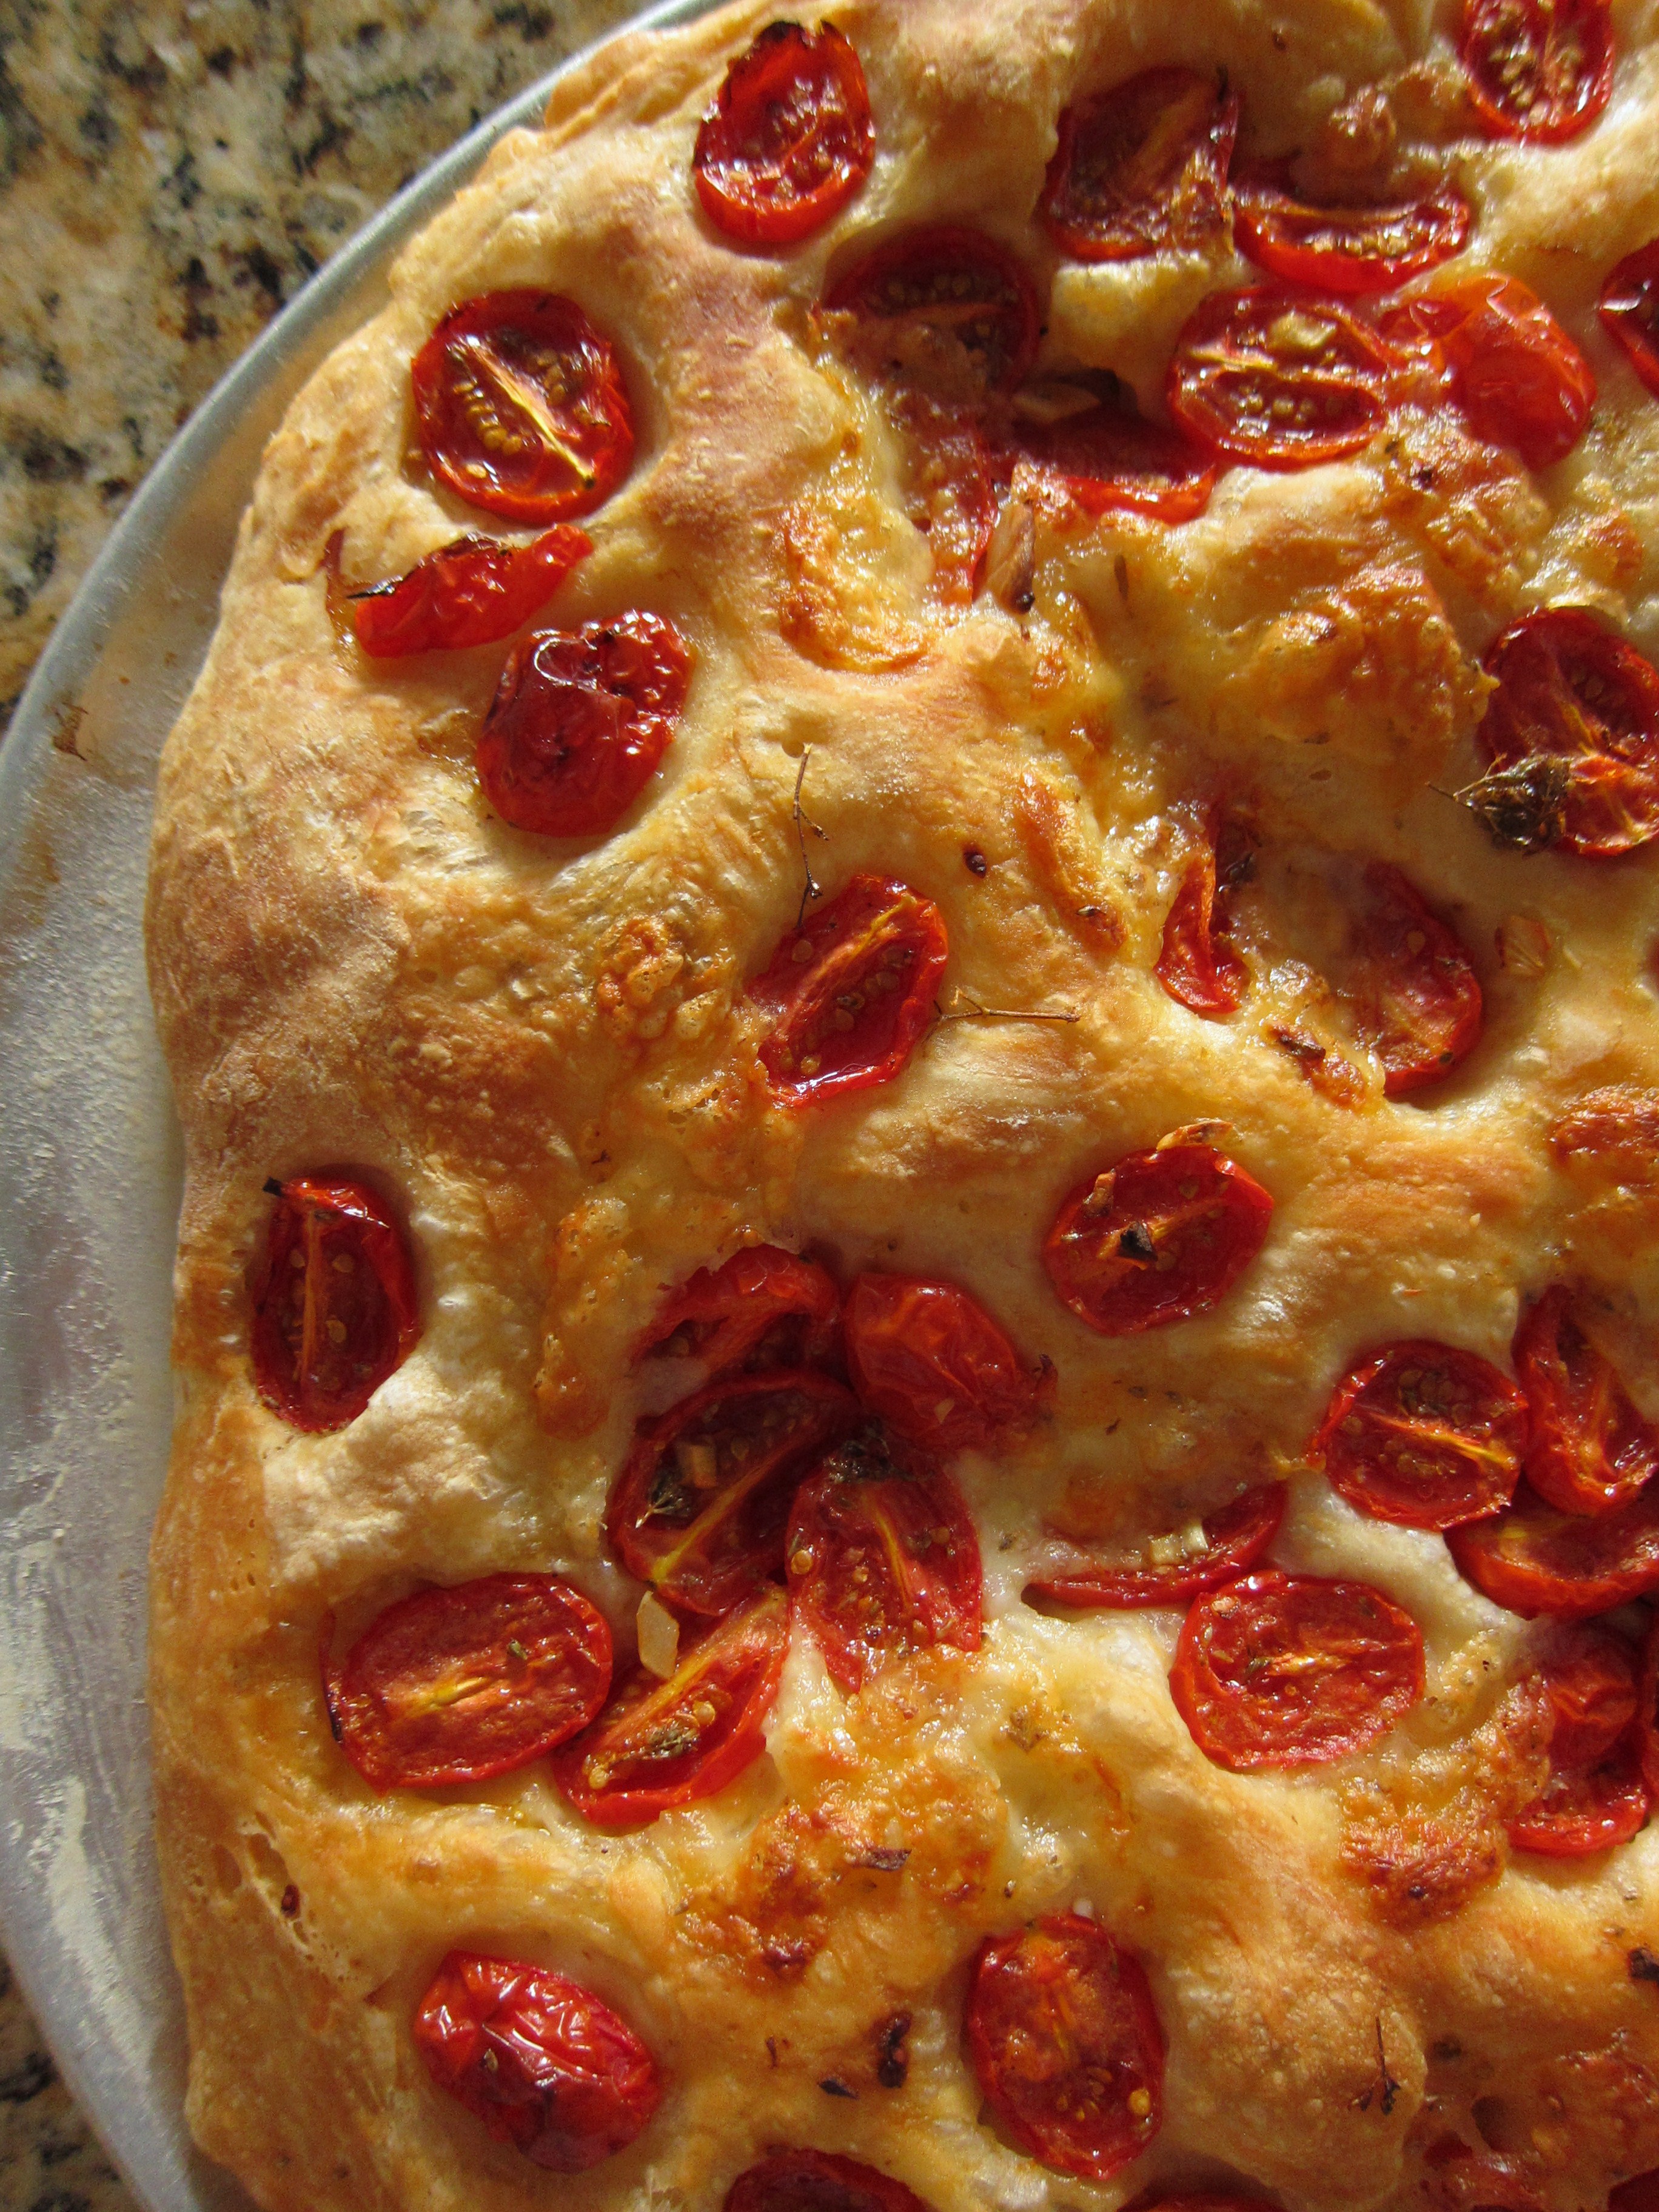
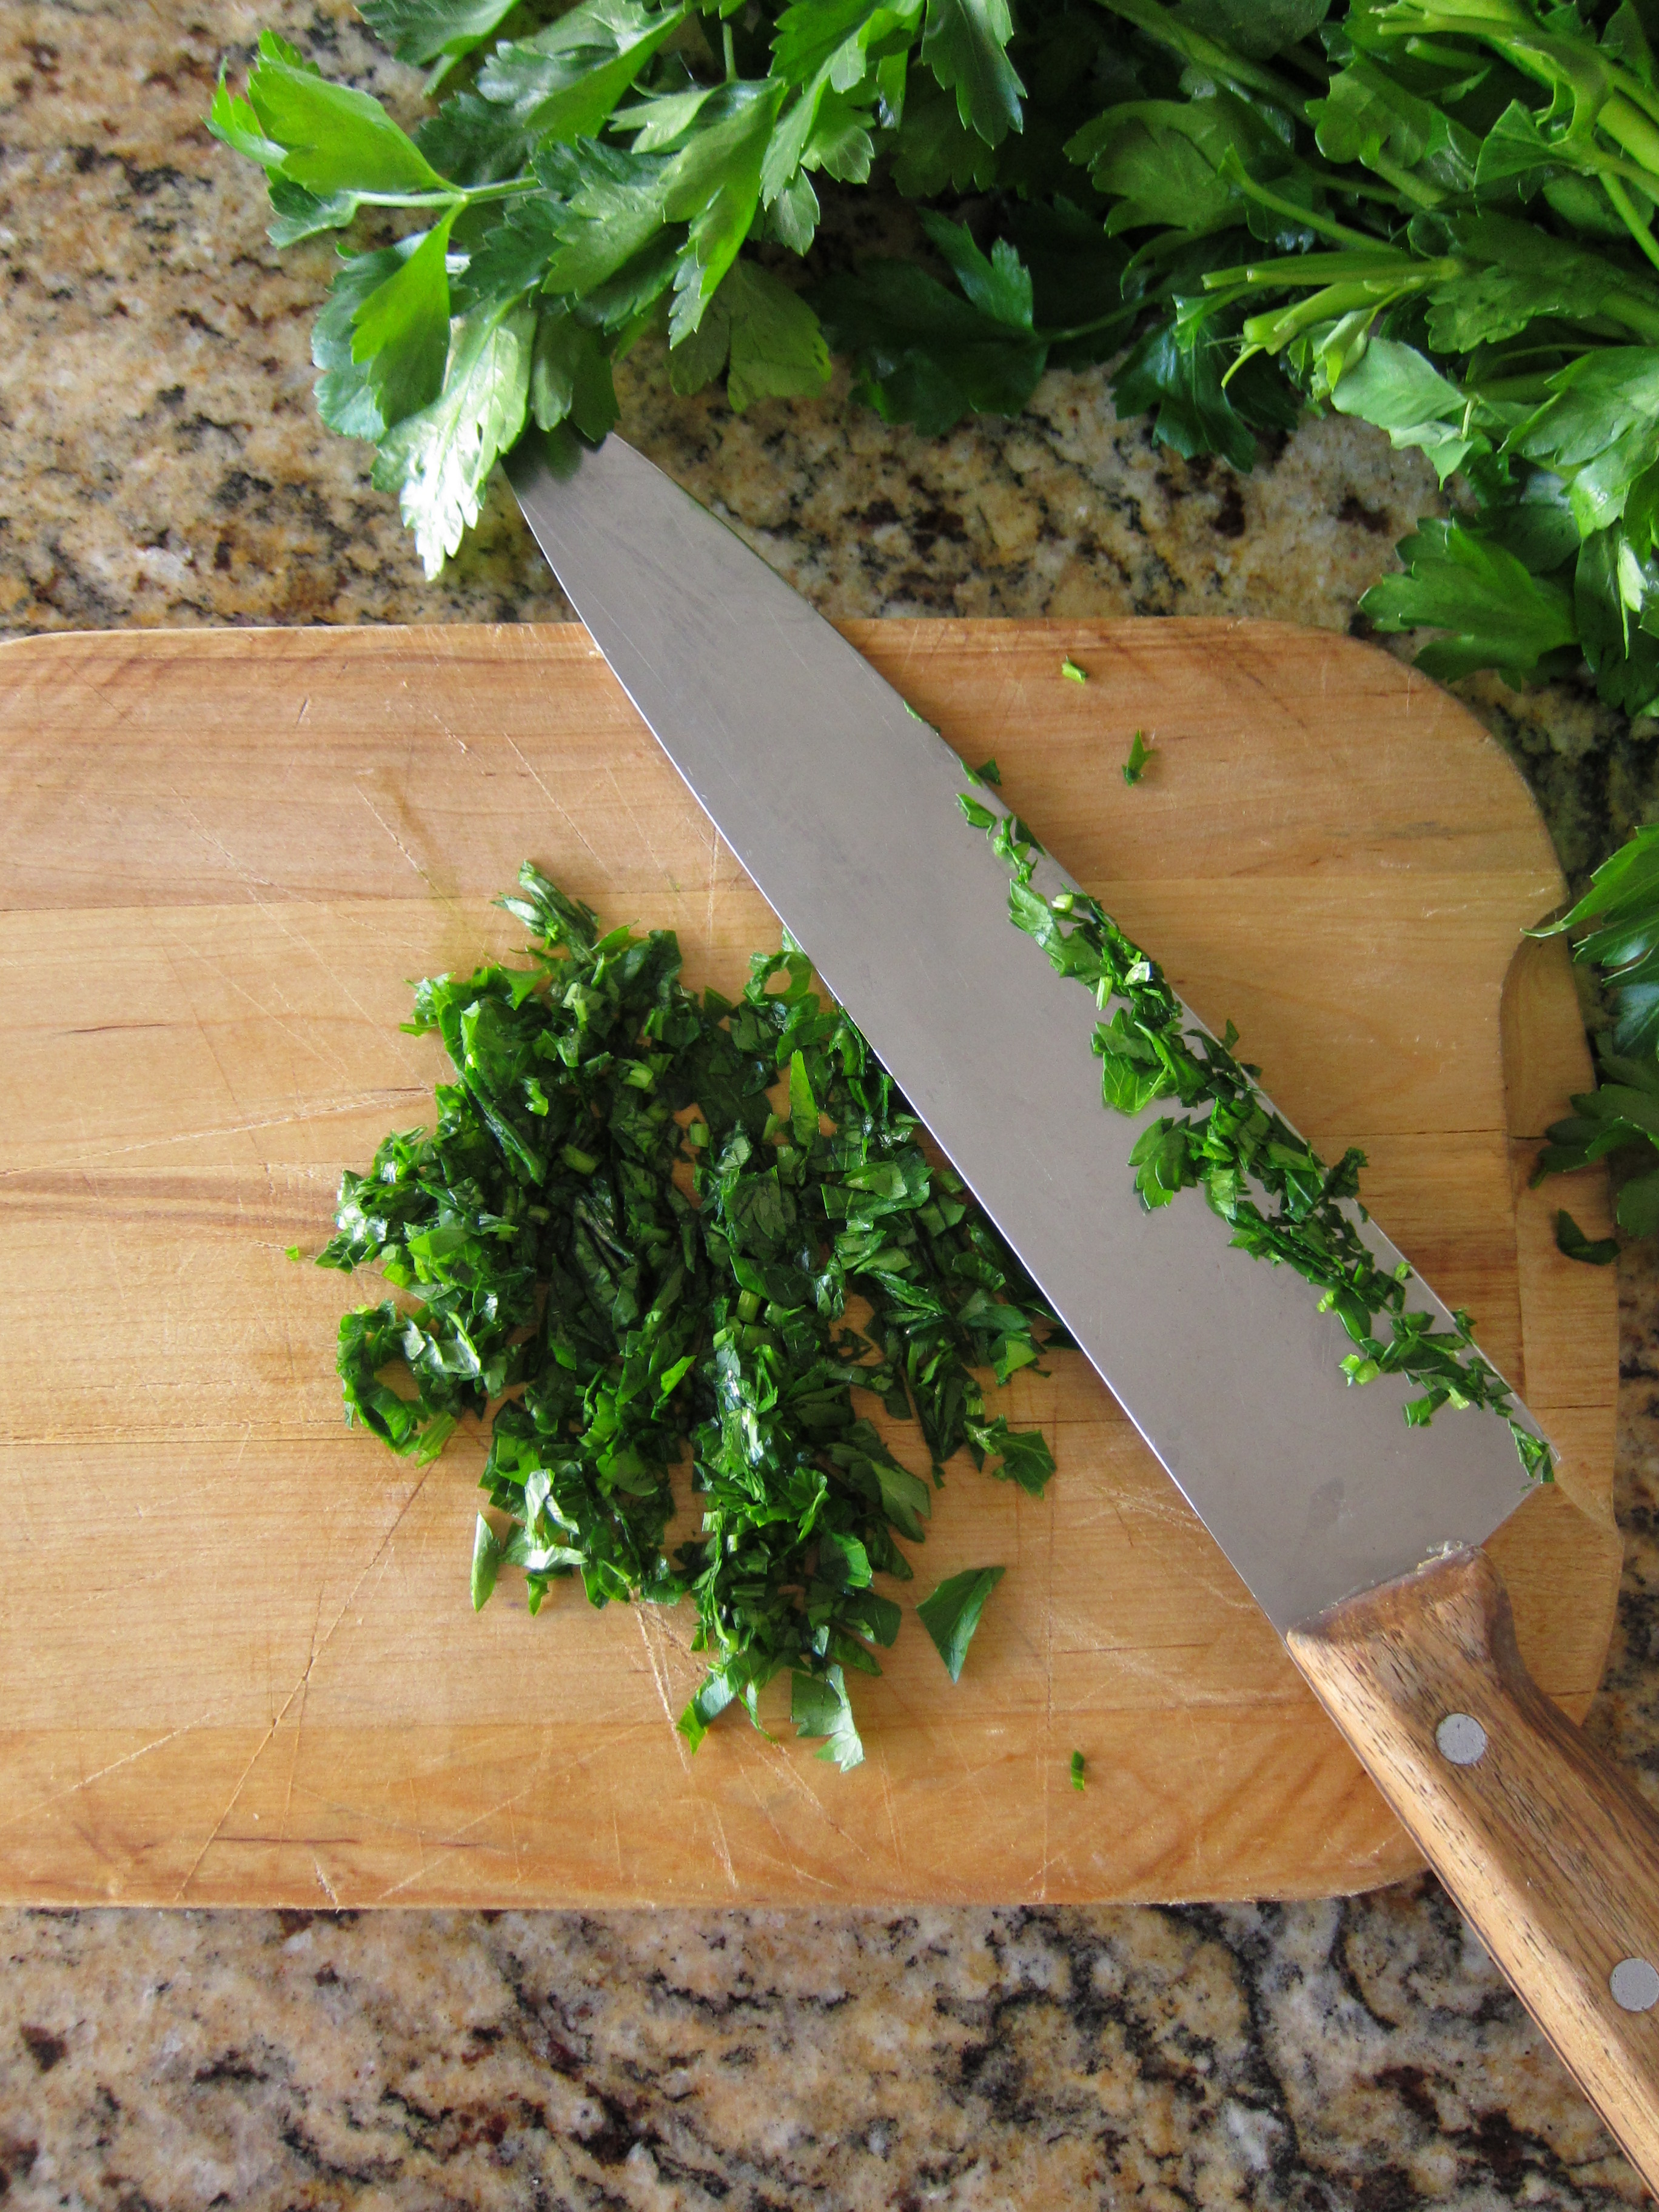
Mom’s Cherry Tomato Focaccia – makes one 12″ pie

  • 2 cups cherry tomatoes, cut in half
  • 1 garlic clove, finely minced
  • 1 Tbsp dried oregano
  • 3 Tbsp extra virgin olive oil (plus a little more for the topping)
  • 2 Tbsp grated Parmigiano Reggiano
  • 1/4 cup sliced bocconcini or cubed mozzarella
  • salt flakes and freshly ground pepper (to taste)

1) Follow the directions for bread in the recipe above, adding 3 Tbsp of olive oil to the dough when you add the water.

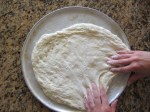
2) After the first rise (see directions above), transfer the dough to a greased and floured 12″ pizza tray. Dust the dough lightly with flour, and with your hands spread out to the edges of the pizza pan. Place in a draft-free place to allow to rise a second time (2 hours).


3) While the dough is rising, prepare the topping by adding the prepared tomatoes in a bowl and toss with a drizzle of olive oil, the Parmigiano Reggiano, bocconcini (or mozzarella), minced garlic, and oregano. Season with salt and pepper.

Tomato Focaccia

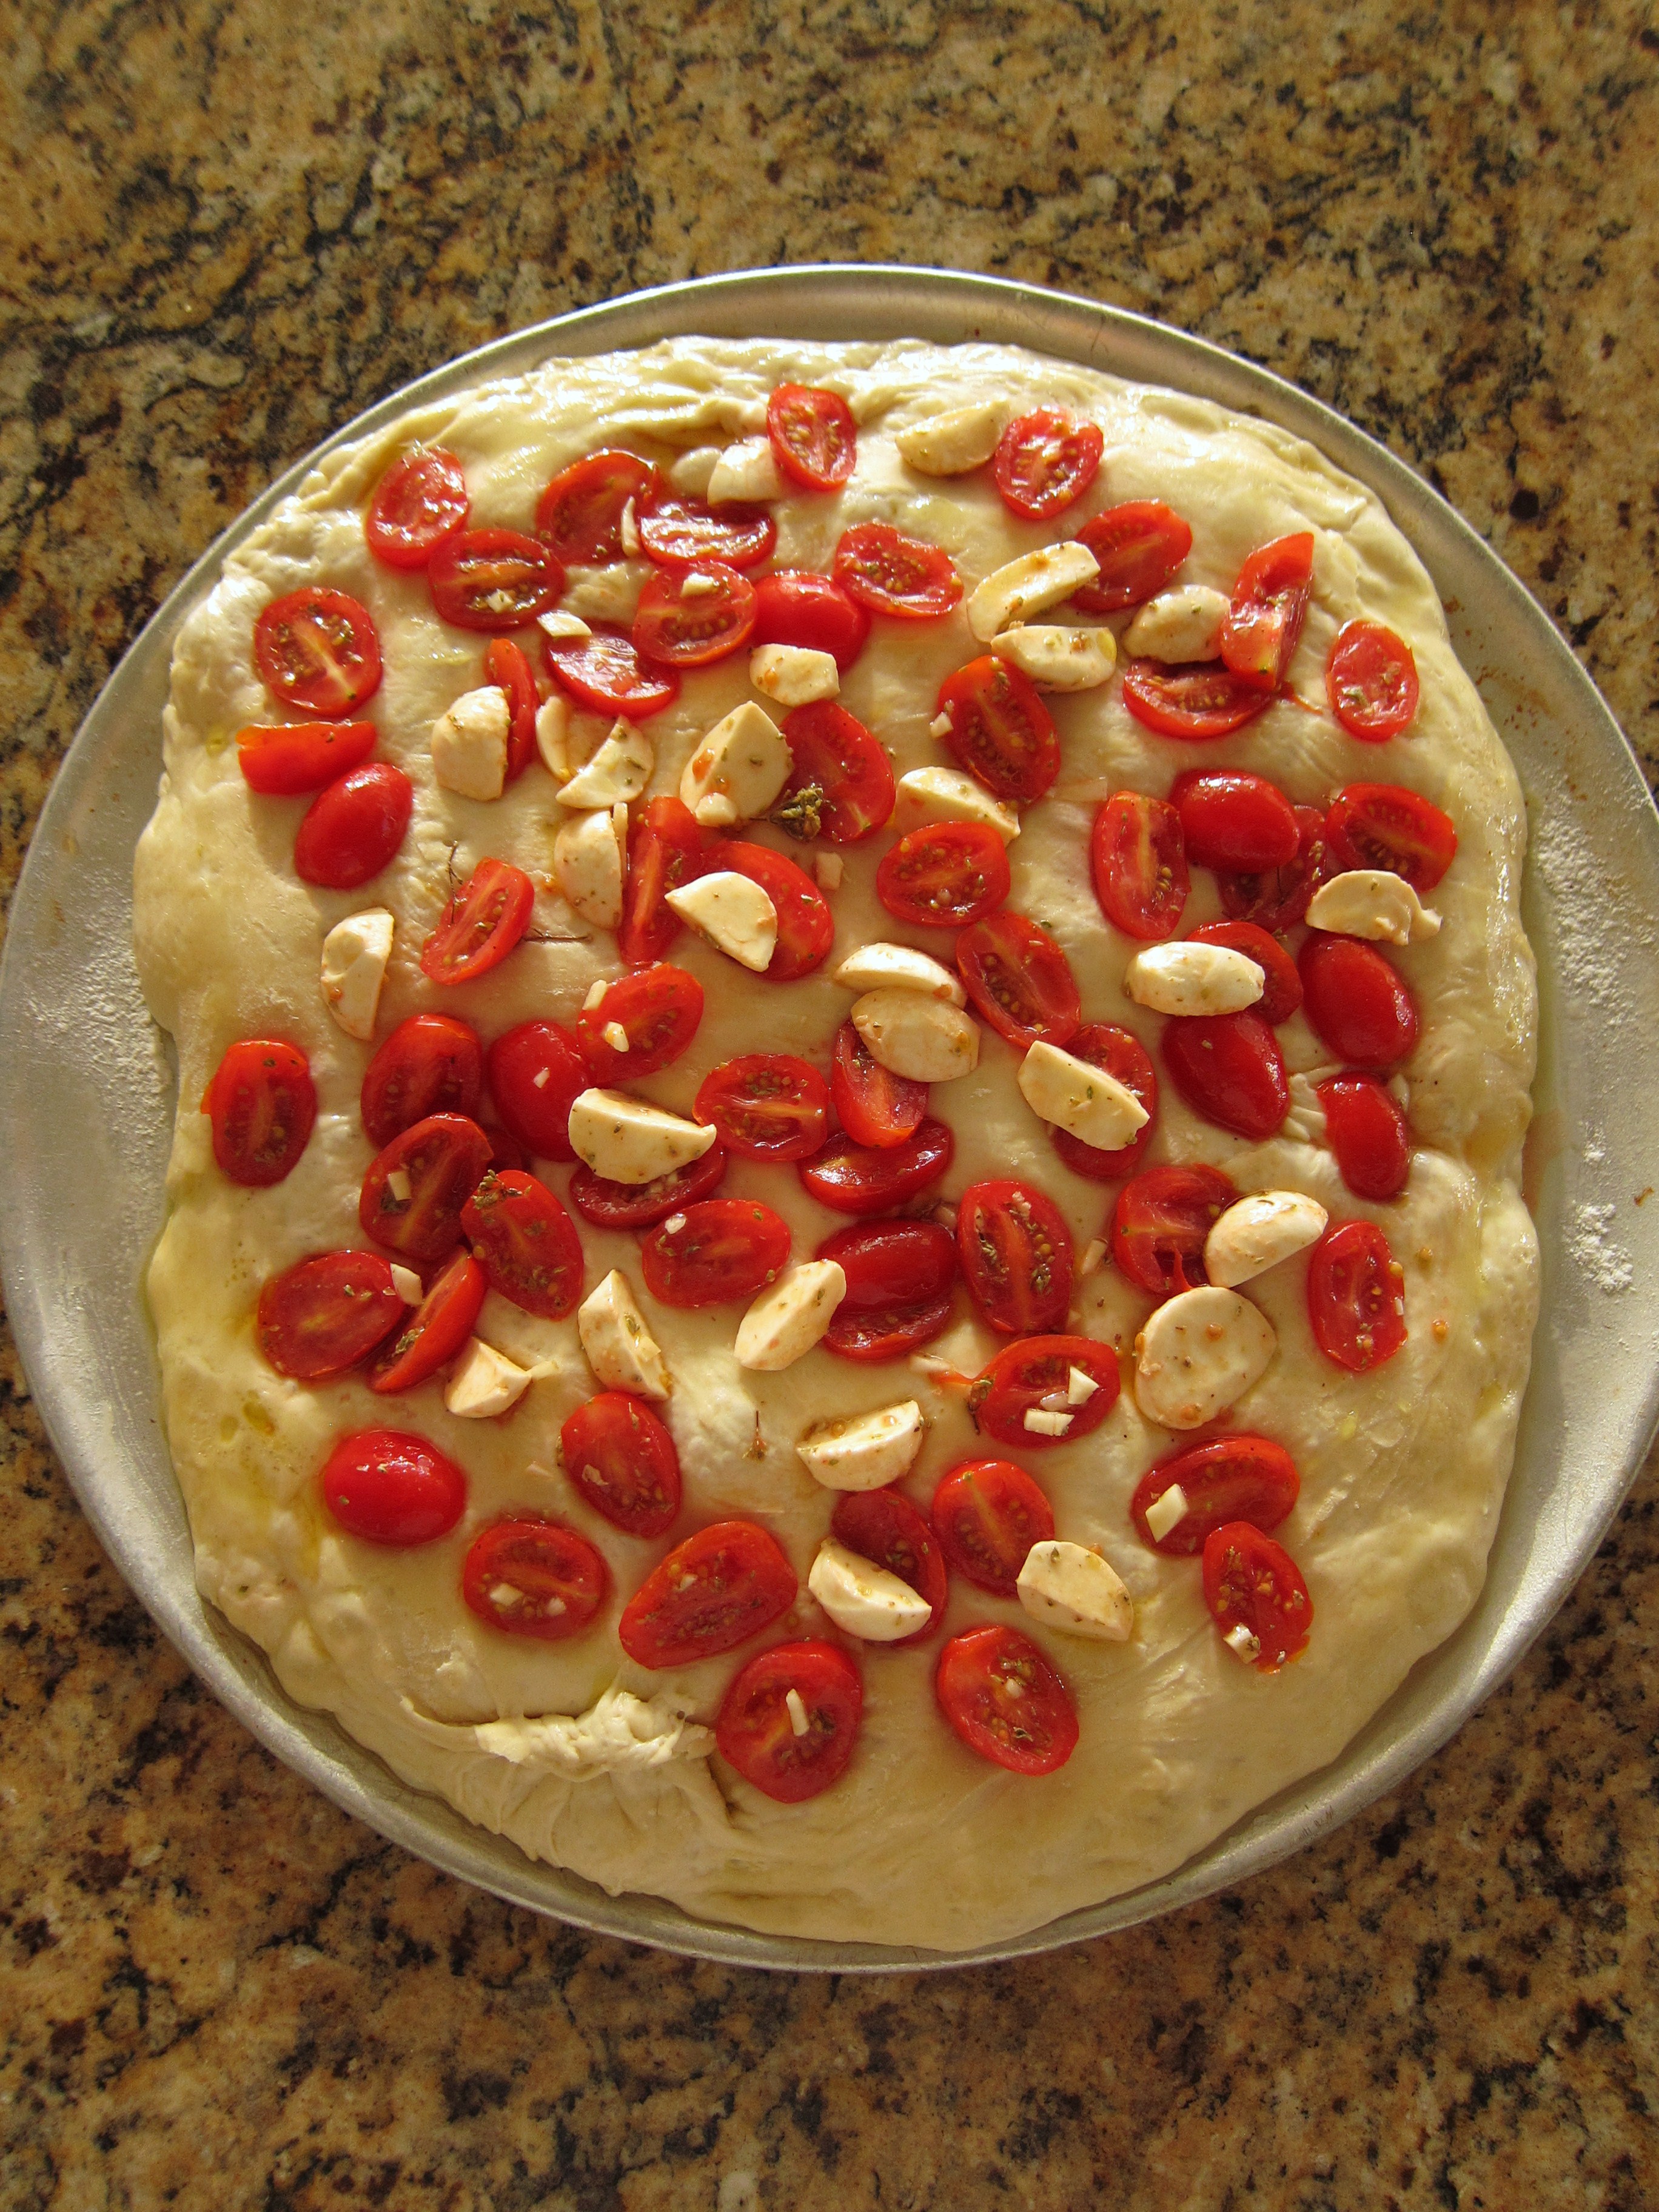
4) Once the dough has risen a second time (after 2 hours), preheat the oven to 500º F. Spread the tomato mixture gently over the focaccia dough and bake at 500º F for 15-20 minutes.

Tomato Focaccia

Tomato Focaccia - detail

Tomato Focaccia

Tomato Focaccia - detail

Share this:

  • Tweet
  • Share on Tumblr

Like this:

Like Loading...

Getting to Cake

14 Thursday May 2015

Posted by julia chews the fat in Breakfast & Brunch, Cooking For Your Peeps, Sweet Tooth, The Basics, Vegetarian

≈ Leave a comment

Blueberry-lined cake tin

I’ve fixated on these photos and this blank page for longer than I’m proud to admit. It’s been an uncomfortable dance – coming back to the page at least a half dozen times, starting, stopping, flipping sentences, deleting whole paragraphs, trying the whole thing over from scratch. At one point, I even poured myself a glass of bourbon, thinking that if nothing else was helping, it might. (It didn’t. I got heartburn instead). At that point, I started wishing I had a typewriter – not because I thought it would solve my writing issues, but because I fantasized about ripping the page from the machine’s roller, crumpling it into a ball, and tossing it unceremoniously into the trash can, along with my frustrations. A bit of visceral, paper-crunching therapy would be nice right now. Somehow, pressing down aggressively on the backspace button isn’t half as satisfying. But, this is real life, not a smoky film noir, so I’ll have to content myself with the sticky backspace button on my I’m-old-and-I-almost-died-but-haha-I’m-not-dead-yet-so-you’re-still-stuck-with-me-you-cheap-bastard! laptop. My only solace is knowing that we’re this much closer to getting to cake. Just a few more words and we’re there…

In the simplest of terms, what I’d like to tell you about this cake is this:

1) It’s drop-dead delicious
2) It’s absurdly easy to make
3) Everyone who tastes it, without fault, will ask for seconds (or thirds, depending)

I think these three points form a pretty solid endorsement, especially when it comes to baked sweets, which often get a bad rap for being fussy. It’s a fail-proof, fool-proof dessert, capable of making anybody’s palate swoon. The batter bakes up fluffy and light, and the blueberries become nice and syrupy, crowning the top in a smooth, indigo-tinged layer. You’ll be grateful to know about this cake the moment you get invited to a last-minute dinner party, or picnic, or office gathering, and you’re asked to bring the dessert!! when really you were hoping they’d ask you to bring the wine and cheese. It’s a cake that comes together really quickly and without much mess, whether you’re a dessert-making novice or a baking pro who’s just feeling a little lazy that day. Once you lay that beautiful thing in front of your dining companions, the pieces will glide effortlessly, one by one, off the serving plate until all that’s left are a smattering of crumbs, blue-tinged lips and happy bellies.

—–

Quick note on the recipe: I’m still using frozen blueberries right now, since we’re not in blueberry season in Quebec yet, but the recipe works with either – fresh or frozen. It’s entirely up to you.

Quick note on the pictures: for the final result, you’ll have to use your imagination – the cake got flipped, berry-side up, onto a serving plate much later in the day and the camera wasn’t nearby. Which is ok, because darting for the camera might have ruined the moment. To give you an idea, it will more or less look like this. When you flip the cake, remember to be bold – lay a serving plate on top of the pan, keep one hand on the plate and one hand on the bottom of the cake pan, and flip, confidently and swiftly, in one go. If you’re worried about the berries sticking to the bottom of the pan, don’t fret – the butter at the bottom of the pan will ensure that the cake slips out of the pan without incident.

Now go forth and make cake!

Blueberry Upside Down Cake – adapted from Canadian Living Magazine

  • ¼ cup melted butter
  • ½ cup brown sugar
  • 2 cups blueberries (fresh or frozen)
  • 1 Tbsp lemon juice
  • ½ cup butter
  • ¾ cup granulated sugar
  • 1 egg
  • 1 tsp vanilla
  • 1 ⅓ cups all-purpose flour
  • 2 tsp baking powder
  • ¼ tsp salt
  • 1 tsp cinnamon (optional)
  • ¾ cup milk

1) Preheat the oven to 350°F.

2) In 9-inch square cake pan, combine melted butter and brown sugar; spread evenly on bottom. Spread blueberries evenly over top. Sprinkle with lemon juice.

3) Cream butter; gradually add sugar, beating until light. Beat in egg and vanilla. Sift or mix together flour, baking powder, salt and cinnamon if using. Add dry ingredients alternately with milk to creamed mixture.

4) Spread batter evenly over blueberry layer.

5) Bake in preheated oven for 45 to 50 minutes or until toothpick inserted in centre comes out clean. Let cool 10 minutes in pan, then turn out on to large flat plate.

Spreading the batter

Batter spread

Batter - detail

Baked cake

Baked cake - detail

Share this:

  • Tweet
  • Share on Tumblr

Like this:

Like Loading...

Sustenance Salads

03 Sunday May 2015

Posted by julia chews the fat in Lunch & Dinner, Vegetarian

≈ 5 Comments

In looking back at the last few recipes I’ve left you with (pasta! polenta! caaaaake!!!), you might start to think it’s been a debaucherous carb-fest 24/7 over here. It is sometimes, but not always. Like most people, we eat salads from time to time too. Even sans croutons! Imagine!

I think it’s safe to say that knowing how to assemble a good salad – or better yet, and handful of good salads – is an essential part of the home cook’s repertoire. That said, the salads most of us toss together are made without a recipe (as they probably should be), which is why I hesitate to call these ones “recipes”. Think of them more like sources of inspiration you can call upon when you find yourself stuck in a salad rut (mixed greens, olive oil, vinegar, repeat) and you’re in need of something with a little more oumf.

With winter not far behind us (lest we forget that almost exactly one week ago, a flurry of snowflakes blew through Montreal), I still haven’t entered wispy, summery salad-making mode. The salads I’ve been making lately aren’t decked out in frilly sprouts or edible flowers. At least not yet. Right now, I’m still making salads with a bit of brawn, ones that can sustain me through the afternoon without the need to reach for a bag of chips from the vending machine at 3pm. Come to think of it, these salads – real sustenance salads – are good in any season. My standby trio of ingredients includes lentils (Puy are great in salads), toasted grains and/or some vegetable that’s been roasted or tossed in raw. Every once and a while, some flaked tuna might make an appearance; sometimes there’s a little radish or arugula to lighten things up. But ultimately the bones are the same – legume (lentils, beans, chickpeas), grain (farro, quinoa, couscous, brown rice), veg (whatever is in the fridge), the whole thing tossed with an improvised vinaigrette, and wham, bam, thank you M’am, you’ve got yourself a capital-S Salad.

Below you’ll find two of my new favourites. They’re a couple of good ones to have in your back pocket for quick lunches and (soon! very soon!) picnics:

Salad #1 – brought to you by the 5lb bag of carrots and 3lb bag of beets I’ve been slowly chipping away at over the last couple of weeks. Buying produce in bulk, on sale, always seems like a good idea until it doesn’t. After a week of carrot cake and carrot curry and carrot slaw, you start running out of ideas. And then you enter into dicey territory – should I pickle the rest? Can I make a facial mask with carrots? Can I dye teatowels in beet juice? Maybe my neighbours want beets? To everyone’s benefit, this salad came along instead, helping to make a nice dent in the stockpile. Everything goes in raw – carrot, beet, citrus, herbs – then you toast some pumpkin seeds in tamari and oil and throw those on top for an earthy, salty crunch, along with a sweet and sour dressing. It’s an electric pink bowl of crunchy vegetables and juicy fruit segments, closely resembling a large bowl of confetti. If this salad were a party, it’d be the one where all the fun people were invited and there was an open bar.

Salad #2 – this one is more or less an Ottolenghi-inspired concoction: lots of crispy raw fennel, yellow beets and cucumber are combined with tender mixed greens (frisée, raddichio, watercress, mint) and topped with parsley-studded Puy lentils, pistachios and a drizzle of tahini vinaigrette. That dressing – as simple as it is – is a revelation. You’ll want to put it on everything.

Before you get started, remember that you can riff on these recipes as much as you like. Salads are extremely forgiving; there’s always a little wiggle room. Don’t have an orange? Use a grapefruit. Don’t have apple cider vinegar? Swap it for some white or red wine vinegar. Make use of whatever’s already in your fridge, pantry and garden. Salads are all about colour and contrast, texture and depth of flavour. Find a balance between those things and, man, you’re in business.

Ruby Red Beet & Carrot Salad

Ruby Red Beet and Carrot Salad with Toasted Pumpkin Seeds (adapted from The Food Federation) – serves 4-6 as a side

  • 2 carrots, grated
  • 1 beetroot, grated
  • ½ red onion, thinly sliced
  • 1 orange (or grapefruit), segmented
  • a small bunch of coriander or flat leaf parsley(or a combination)
  • 1 tsp oil
  • 1 tsp tamari (or soy sauce)
  • ½ cup pumpkin seeds

For the dressing:

  • 1 tsp olive oil
  • 1 tsp honey
  • 1 Tbsp apple cider vinegar
  • 1 tsp wholegrain mustard
  • 1 clove garlic, crushed

To assemble:

1) Combine all the dressing ingredients in a bowl and set aside.

2) Heat a frying pan over a medium heat. Toss the seeds with the oil and tamari and toast in the hot pan. Toss frequently until they are crispy and a dark brown colour. (nuts and seeds burn quickly, so keep an eye on them while they toast)

3) Place all the salad ingredients in a large bowl. Add the seeds and the dressing and toss to combine.

—–

Lentil Tahini Salad with Shaved Fennel – serves 4 as a light meal

For the lentils:

  • 2 cups cooked Puy lentils (The Kitchn has good tips on cooking lentils here)
  • small handful of parsley, washed and chopped
  • lemon juice, to taste
  • salt and pepper, to taste

For the salad:

  • 3-4 cups of mixed salad greens* (frisée, raddichio, watercress, arugula, romaine, and/or mesclun), washed and torn
  • 1 English or garden cucumber, sliced into thin long strips
  • 1 medium yellow beet, peeled and thinly sliced
  • half a fennel bulb, thinly sliced
  • ¼ cup fresh mint, washed and torn
  • ¼ cup toasted pistachios
  • nigella seeds, basil seeds, or black sesame seeds for sprinkling (optional)

For the dressing:

  • 2 cloves garlic, smashed and minced
  • juice of 2 lemons
  • 2 Tbs olive oil
  • 1 Tbs tahini paste

To assemble:

1) Combine the cooked lentils with the chopped parsley; season with salt and pepper and a squeeze of lemon juice. Mix and set aside.

2) Combine dressing ingredients; whisk together and set aside.

3) Arrange the salad ingredients on a serving platter, layering as you go along – mixed greens and mint first, then beets, cucumber, and fennel. Add the seasoned lentils on top. Sprinkle with toasted pistachios and seeds (if using). Give the dressing another whisk and drizzle on top. Serve any remaining dressing alongside.

Chopped Parsley

Ingredients - Lentil Tahini Salad

Lentils with Parsley

Lentil Tahini Salad with Fennel

Share this:

  • Tweet
  • Share on Tumblr

Like this:

Like Loading...

Facebook

Facebook

Instagram

No Instagram images were found.

Recent Posts

  • Layers and Rows
  • Finding Buoyancy
  • February
  • Wednesday
  • Cross My Heart, Miso

Archives

  • May 2017
  • April 2017
  • February 2017
  • December 2016
  • November 2016
  • September 2016
  • August 2016
  • July 2016
  • June 2016
  • May 2016
  • April 2016
  • March 2016
  • February 2016
  • January 2016
  • December 2015
  • November 2015
  • October 2015
  • September 2015
  • August 2015
  • July 2015
  • June 2015
  • May 2015
  • April 2015
  • March 2015
  • February 2015
  • January 2015
  • December 2014
  • November 2014
  • October 2014
  • September 2014
  • August 2014
  • July 2014
  • June 2014
  • May 2014
  • April 2014
  • March 2014
  • February 2014
  • January 2014
  • December 2013
  • October 2013
  • September 2013
  • August 2013
  • July 2013
  • June 2013
  • May 2013
  • April 2013
  • March 2013
  • February 2013
  • January 2013
  • December 2012
  • November 2012
  • October 2012
  • September 2012
  • August 2012
  • July 2012
  • June 2012
  • May 2012
  • April 2012
  • March 2012
  • February 2012

Categories

  • Beverage
  • Breakfast & Brunch
  • Condiments
  • Cooking For Your Peeps
  • Cooking Solo
  • Cooking with Nonna
  • Food Away From Home
  • Food Writing
  • Holidays
  • Intro
  • Lunch & Dinner
  • Snacking
  • Soups
  • Sweet Tooth
  • The Basics
  • Vegetarian

Enter your email address to follow this blog and receive notifications of new posts by email.

Join 80 other subscribers

Blog at WordPress.com.

  • Follow Following
    • julia chews the fat
    • Join 80 other followers
    • Already have a WordPress.com account? Log in now.
    • julia chews the fat
    • Customize
    • Follow Following
    • Sign up
    • Log in
    • Report this content
    • View site in Reader
    • Manage subscriptions
    • Collapse this bar
 

Loading Comments...
 

    %d bloggers like this: