• Home
  • About

julia chews the fat

julia chews the fat

Category Archives: Vegetarian

Sustenance Salads

03 Sunday May 2015

Posted by julia chews the fat in Lunch & Dinner, Vegetarian

≈ 5 Comments

In looking back at the last few recipes I’ve left you with (pasta! polenta! caaaaake!!!), you might start to think it’s been a debaucherous carb-fest 24/7 over here. It is sometimes, but not always. Like most people, we eat salads from time to time too. Even sans croutons! Imagine!

I think it’s safe to say that knowing how to assemble a good salad – or better yet, and handful of good salads – is an essential part of the home cook’s repertoire. That said, the salads most of us toss together are made without a recipe (as they probably should be), which is why I hesitate to call these ones “recipes”. Think of them more like sources of inspiration you can call upon when you find yourself stuck in a salad rut (mixed greens, olive oil, vinegar, repeat) and you’re in need of something with a little more oumf.

With winter not far behind us (lest we forget that almost exactly one week ago, a flurry of snowflakes blew through Montreal), I still haven’t entered wispy, summery salad-making mode. The salads I’ve been making lately aren’t decked out in frilly sprouts or edible flowers. At least not yet. Right now, I’m still making salads with a bit of brawn, ones that can sustain me through the afternoon without the need to reach for a bag of chips from the vending machine at 3pm. Come to think of it, these salads – real sustenance salads – are good in any season. My standby trio of ingredients includes lentils (Puy are great in salads), toasted grains and/or some vegetable that’s been roasted or tossed in raw. Every once and a while, some flaked tuna might make an appearance; sometimes there’s a little radish or arugula to lighten things up. But ultimately the bones are the same – legume (lentils, beans, chickpeas), grain (farro, quinoa, couscous, brown rice), veg (whatever is in the fridge), the whole thing tossed with an improvised vinaigrette, and wham, bam, thank you M’am, you’ve got yourself a capital-S Salad.

Below you’ll find two of my new favourites. They’re a couple of good ones to have in your back pocket for quick lunches and (soon! very soon!) picnics:

Salad #1 – brought to you by the 5lb bag of carrots and 3lb bag of beets I’ve been slowly chipping away at over the last couple of weeks. Buying produce in bulk, on sale, always seems like a good idea until it doesn’t. After a week of carrot cake and carrot curry and carrot slaw, you start running out of ideas. And then you enter into dicey territory – should I pickle the rest? Can I make a facial mask with carrots? Can I dye teatowels in beet juice? Maybe my neighbours want beets? To everyone’s benefit, this salad came along instead, helping to make a nice dent in the stockpile. Everything goes in raw – carrot, beet, citrus, herbs – then you toast some pumpkin seeds in tamari and oil and throw those on top for an earthy, salty crunch, along with a sweet and sour dressing. It’s an electric pink bowl of crunchy vegetables and juicy fruit segments, closely resembling a large bowl of confetti. If this salad were a party, it’d be the one where all the fun people were invited and there was an open bar.

Salad #2 – this one is more or less an Ottolenghi-inspired concoction: lots of crispy raw fennel, yellow beets and cucumber are combined with tender mixed greens (frisée, raddichio, watercress, mint) and topped with parsley-studded Puy lentils, pistachios and a drizzle of tahini vinaigrette. That dressing – as simple as it is – is a revelation. You’ll want to put it on everything.

Before you get started, remember that you can riff on these recipes as much as you like. Salads are extremely forgiving; there’s always a little wiggle room. Don’t have an orange? Use a grapefruit. Don’t have apple cider vinegar? Swap it for some white or red wine vinegar. Make use of whatever’s already in your fridge, pantry and garden. Salads are all about colour and contrast, texture and depth of flavour. Find a balance between those things and, man, you’re in business.

Ruby Red Beet & Carrot Salad

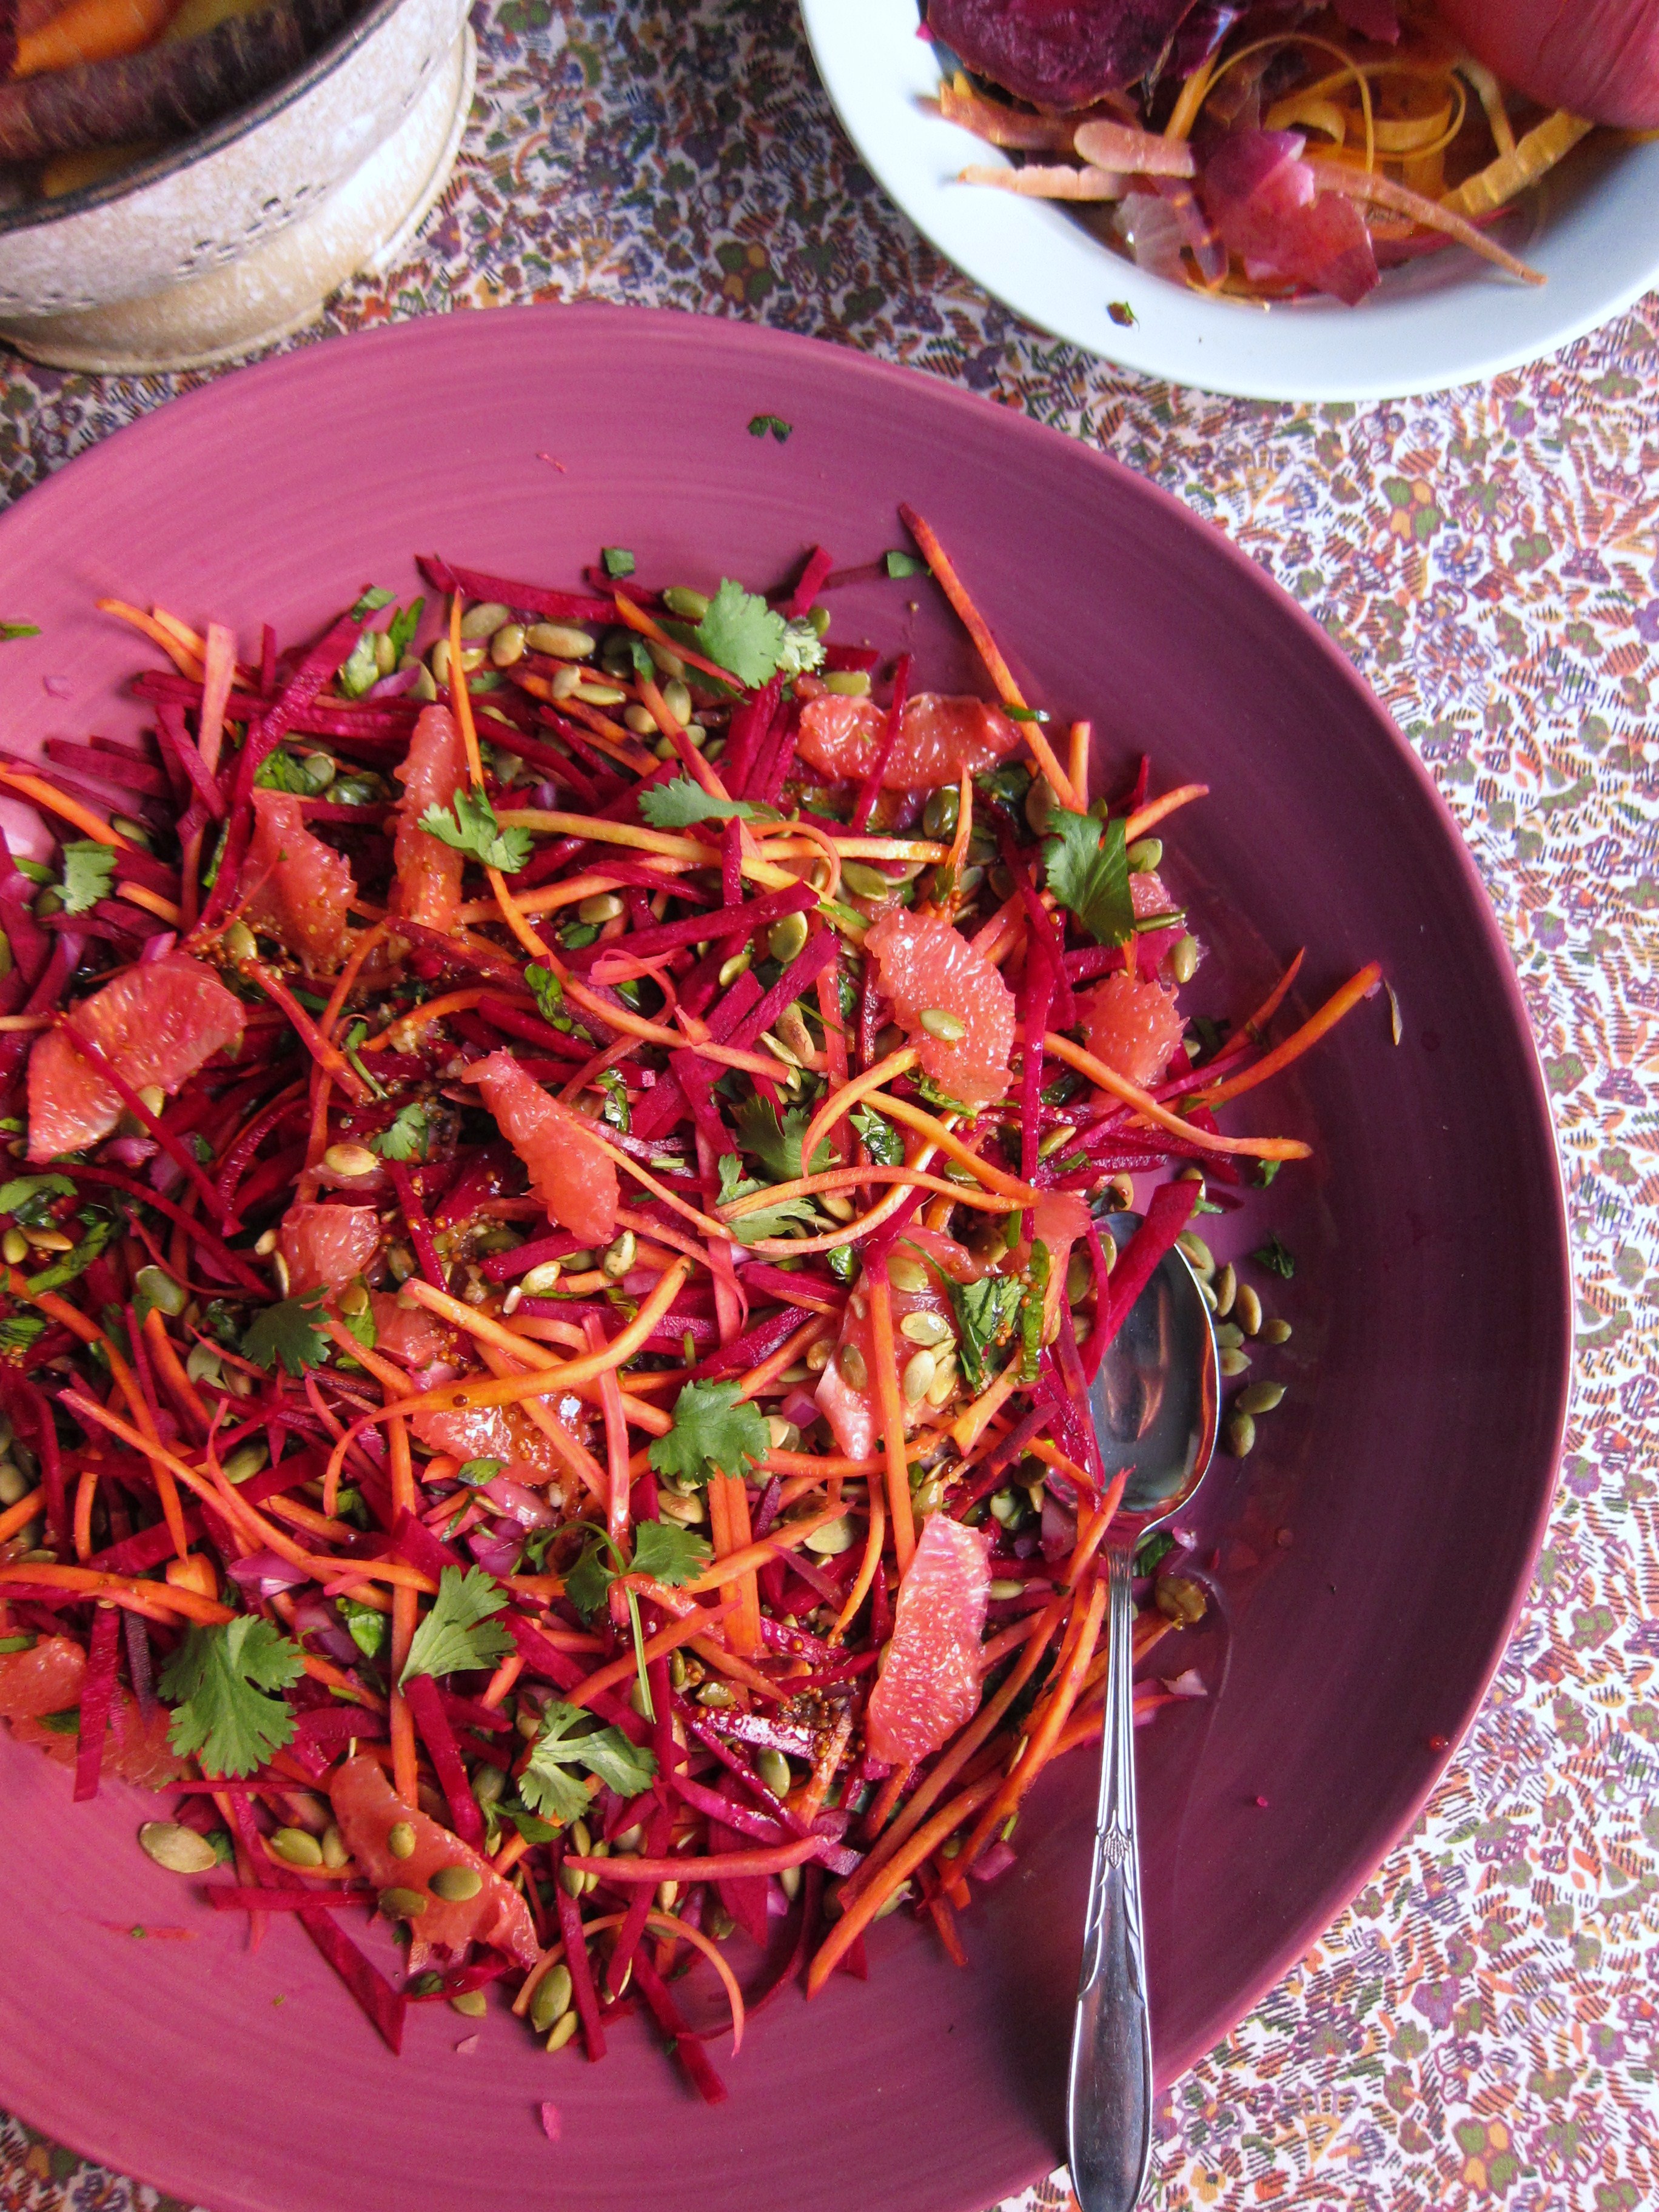
Ruby Red Beet and Carrot Salad with Toasted Pumpkin Seeds (adapted from The Food Federation) – serves 4-6 as a side

  • 2 carrots, grated
  • 1 beetroot, grated
  • ½ red onion, thinly sliced
  • 1 orange (or grapefruit), segmented
  • a small bunch of coriander or flat leaf parsley(or a combination)
  • 1 tsp oil
  • 1 tsp tamari (or soy sauce)
  • ½ cup pumpkin seeds

For the dressing:

  • 1 tsp olive oil
  • 1 tsp honey
  • 1 Tbsp apple cider vinegar
  • 1 tsp wholegrain mustard
  • 1 clove garlic, crushed

To assemble:

1) Combine all the dressing ingredients in a bowl and set aside.

2) Heat a frying pan over a medium heat. Toss the seeds with the oil and tamari and toast in the hot pan. Toss frequently until they are crispy and a dark brown colour. (nuts and seeds burn quickly, so keep an eye on them while they toast)

3) Place all the salad ingredients in a large bowl. Add the seeds and the dressing and toss to combine.

—–

Lentil Tahini Salad with Shaved Fennel – serves 4 as a light meal

For the lentils:

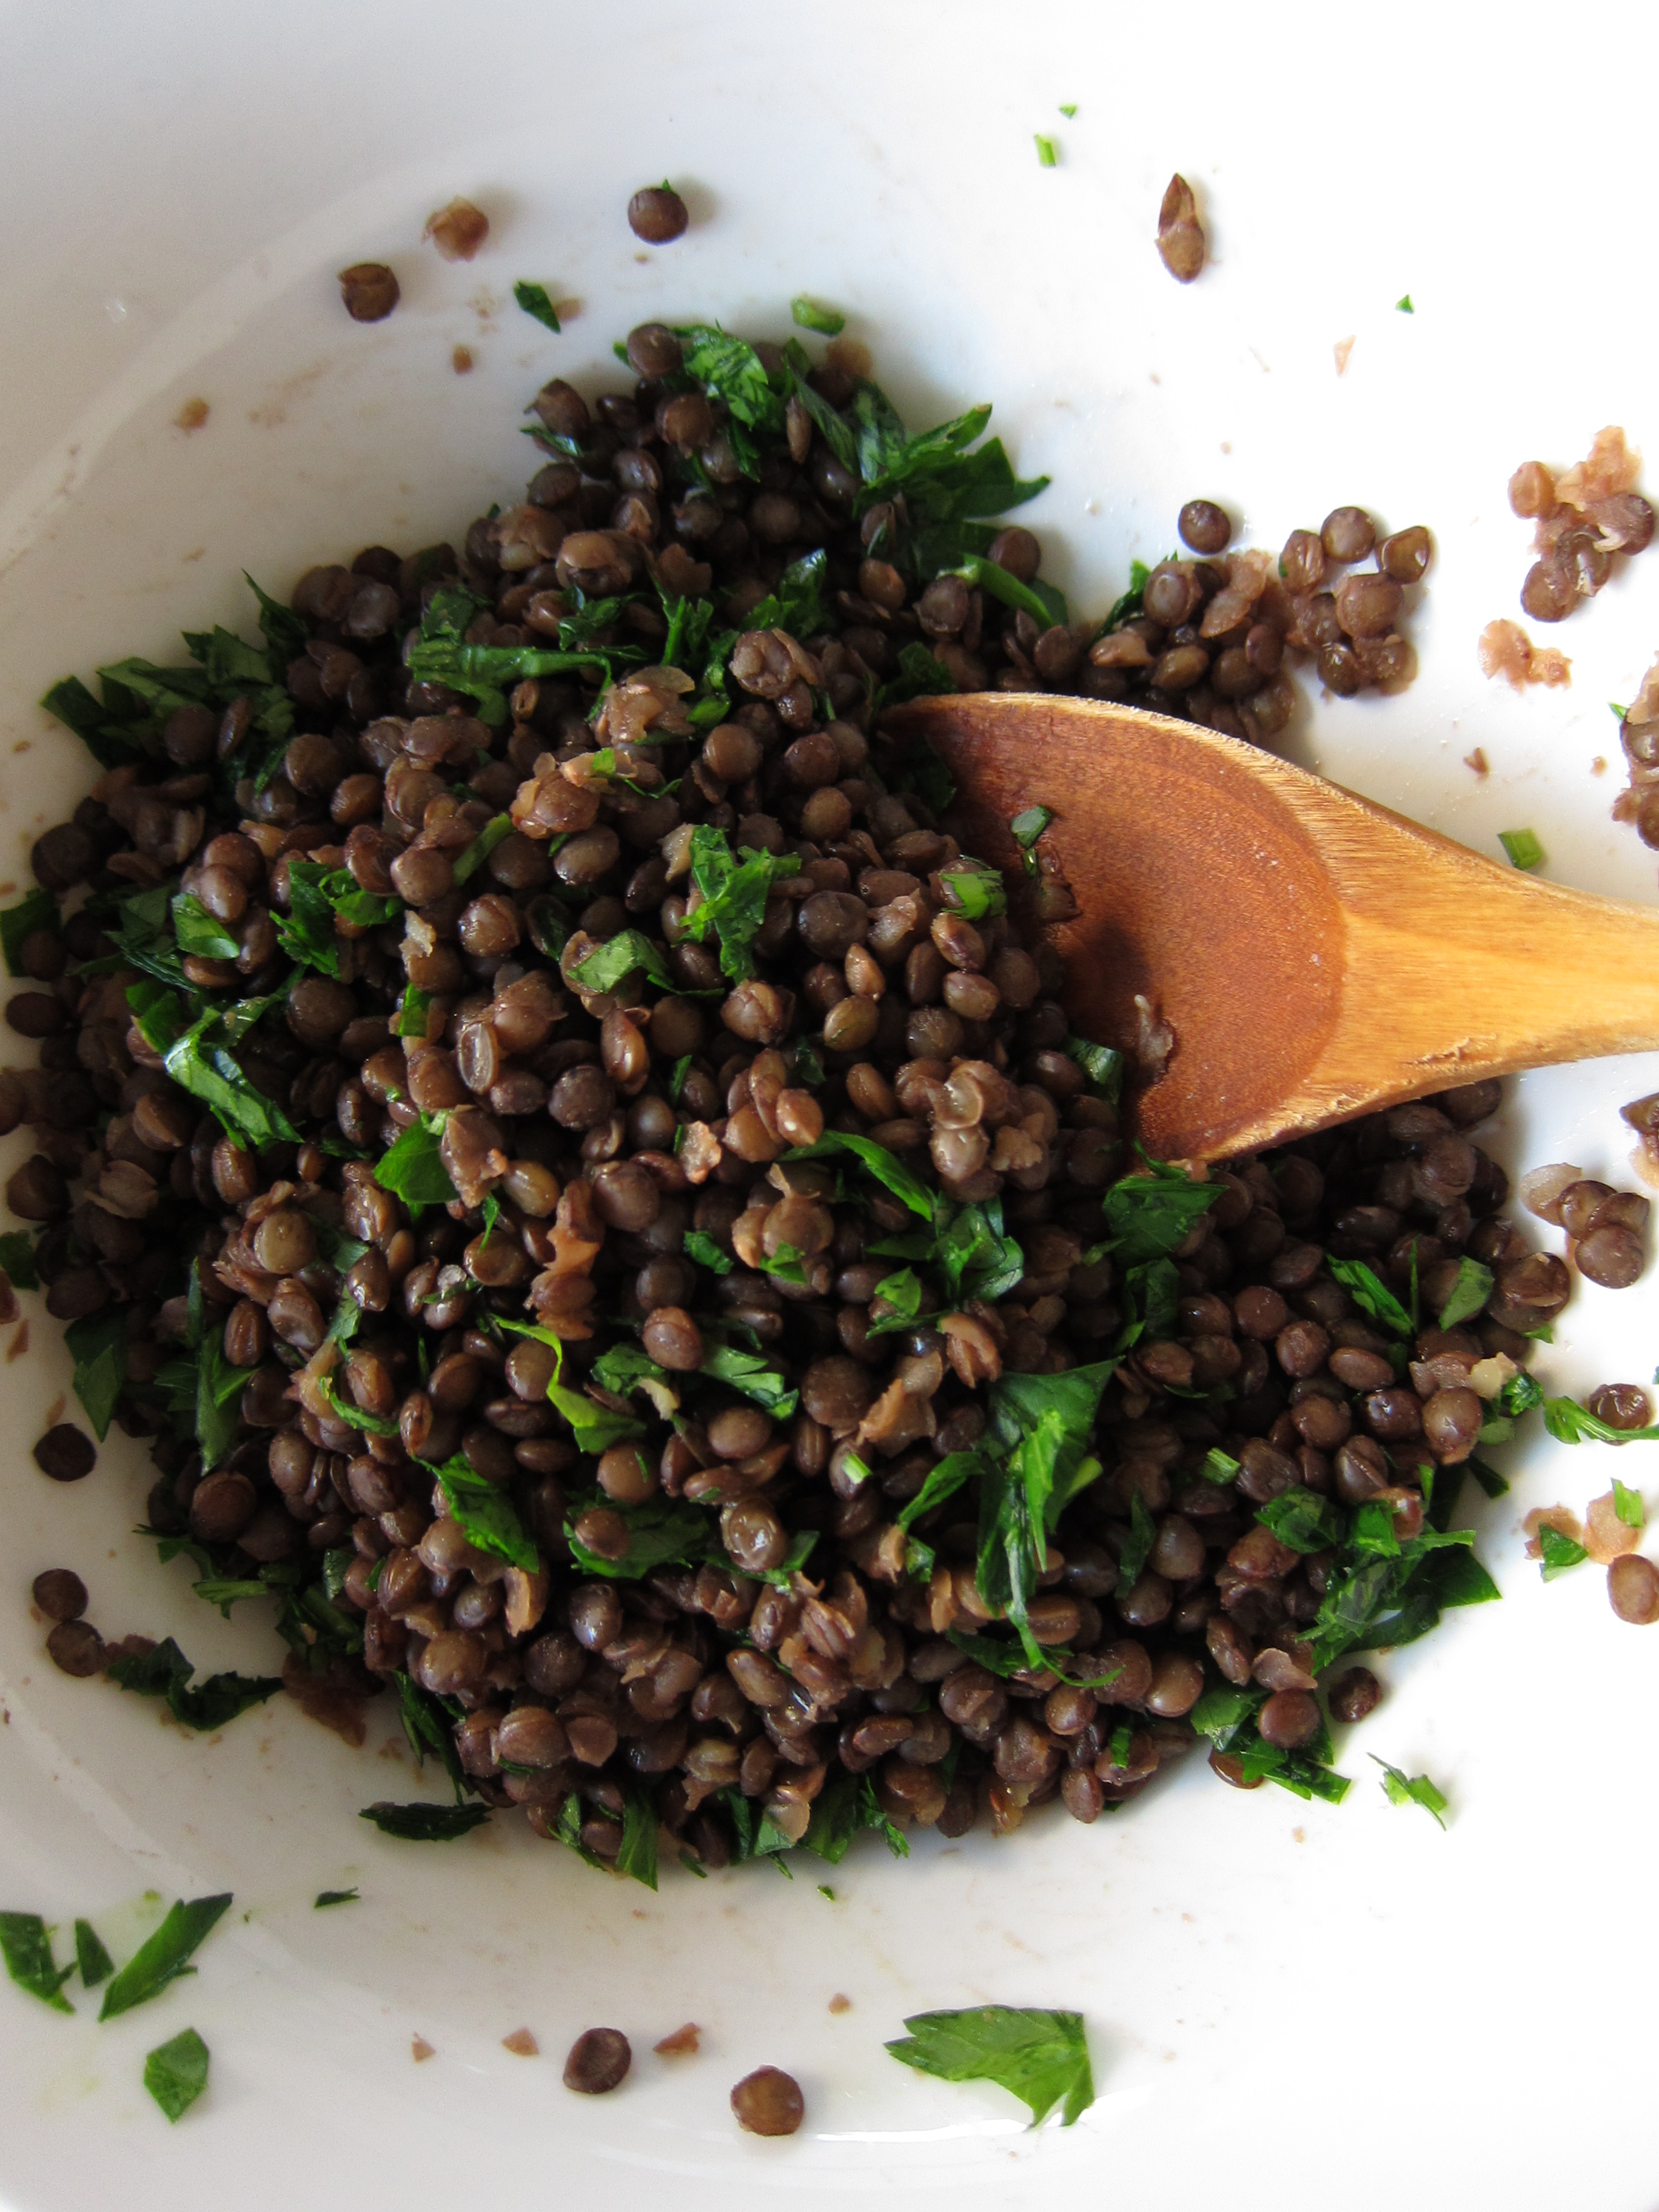
  • 2 cups cooked Puy lentils (The Kitchn has good tips on cooking lentils here)
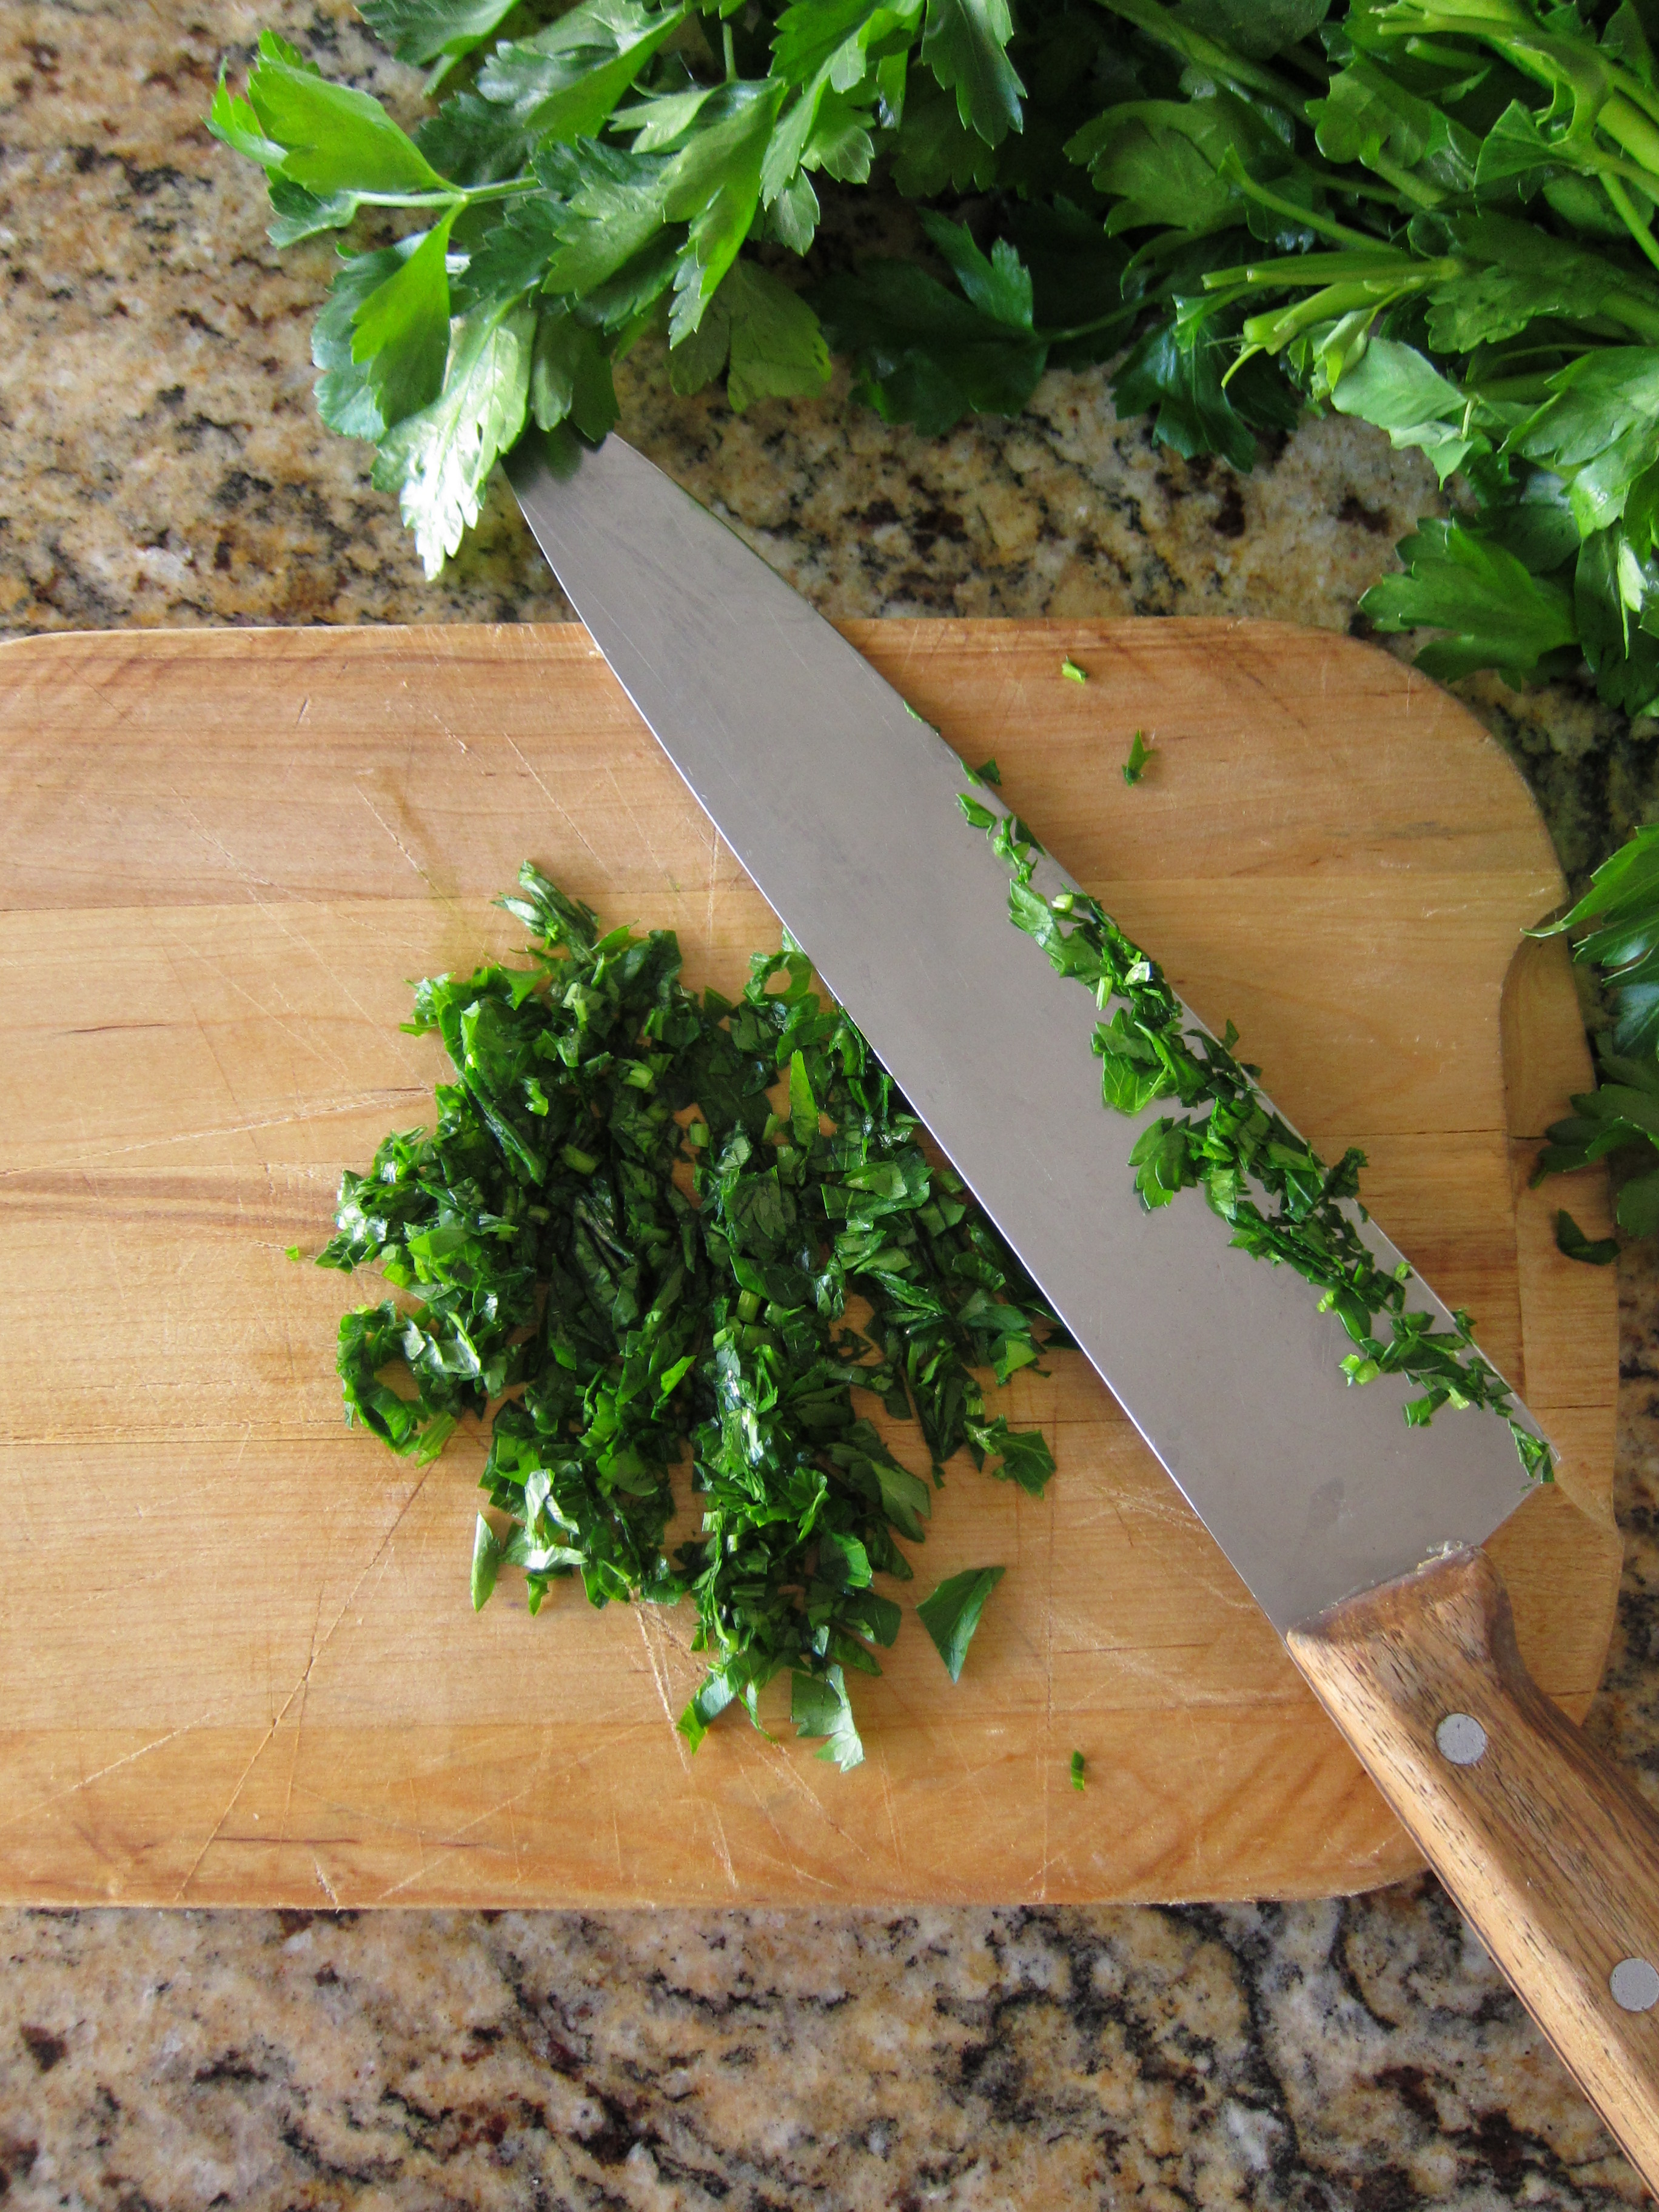
  • small handful of parsley, washed and chopped
  • lemon juice, to taste
  • salt and pepper, to taste

For the salad:

  • 3-4 cups of mixed salad greens* (frisée, raddichio, watercress, arugula, romaine, and/or mesclun), washed and torn
  • 1 English or garden cucumber, sliced into thin long strips
  • 1 medium yellow beet, peeled and thinly sliced
  • half a fennel bulb, thinly sliced
  • ¼ cup fresh mint, washed and torn
  • ¼ cup toasted pistachios
  • nigella seeds, basil seeds, or black sesame seeds for sprinkling (optional)

For the dressing:

  • 2 cloves garlic, smashed and minced
  • juice of 2 lemons
  • 2 Tbs olive oil
  • 1 Tbs tahini paste

To assemble:

1) Combine the cooked lentils with the chopped parsley; season with salt and pepper and a squeeze of lemon juice. Mix and set aside.

2) Combine dressing ingredients; whisk together and set aside.

3) Arrange the salad ingredients on a serving platter, layering as you go along – mixed greens and mint first, then beets, cucumber, and fennel. Add the seasoned lentils on top. Sprinkle with toasted pistachios and seeds (if using). Give the dressing another whisk and drizzle on top. Serve any remaining dressing alongside.

Chopped Parsley

Ingredients - Lentil Tahini Salad

Lentils with Parsley

Lentil Tahini Salad with Fennel

Share this:

  • Tweet
  • Share on Tumblr
Like Loading...

Weeknight Farro Salad

26 Thursday Feb 2015

Posted by julia chews the fat in Lunch & Dinner, Vegetarian

≈ 3 Comments

This one is for days when you trail the sleeve of your favourite, freshly-washed white sweater through a bowl of raw chicken marinating in BBQ sauce; for weeks when your laptop suddenly dies, quite unceremoniously, after six years of dutiful service; for that moment when you come home from work, cold, soaked and exhausted to find a mound of wet mail in your mail box because the flap stayed open on that one day of record-breaking snowfall.

Simply put, this recipe is for days when you have little to no patience, time, energy, or wherewithal to make something for dinner that surpasses boiling a pot of water, or turning the crank of the can opener. Because, frankly, there are days when the idea of cooking with love makes us sick to our stomach. Yes? Yes.

But you’re an able-bodied, responsible adult. So popcorn and a glass of wine for dinner – a third night in a row – feels heinously unjustifiable. You need something that won’t make you feel like the contents of a garbage bag come two hours; something that sustains you, but is enjoyable to eat. I’m here to share a preemptive coup de génie for moments like these (one I borrowed from this post on Molly Wizenberg’s blog Orangette). Earlier in the week, when you’ve got a little time on your hands, cook a batch of farro and store it in the fridge. (For the unacquainted: farro is a sturdy, nutty grain that can be eaten hot or cold, often used in recipes instead of barley or freekah or rice. I buy the Bob’s Red Mill because that’s what the Middle Eastern shop down the street stocks. But you can use any kind you like. (p.s before you have a heart-attack, that online price tag linked above – of $52.75 – is for a 25 lb bag).

Now that you’ve got a batch of pre-cooked farro hanging out in the fridge, all that’s left to do is shred some veg, make a quick dressing and open a can a chickpeas (because, let’s be real – it would’ve been nicer to soak and cook chickpeas from scratch, but it’s a weeknight).

This salad is my kitchen-sink salad – meaning I use whatever seasonal veg on I have on hand, and treat the farro, chickpeas, feta and the dressing as my anchors. In the spring and summer (when the photos below were taken), I might toss in some red endive, asparagus, or watercress. In the fall and winter, I might opt for carrots, beets, arugula or a bit of raw kale. It’s a game of mix-and-match. Use whatever’s in season and whatever you like best. The idea is to get some crunch and colour in there, and some veg that with pair up nicely with the spiky dressing and the creamy feta. This is a don’t-overthink-it salad; a work-week salad; a gift to you on the longest of days.

Enjoy.

Farro

Farro Salad with Veg and Chickpeas (makes about 4 cups) – lightly adapted from Molly Wizenberg’s recipe from Orangette

  • 1 cup farro
  • ½ tsp. salt

For the dressing:

  • 2 Tbsp. fish sauce
  • 3 Tbsp. lime juice
  • 2 Tbsp. brown sugar
  • 6-8 Tbsp. water, to taste
  • 1 garlic clove, minced or pressed

For the salad*:

  • 1 cup chickpeas, either canned (drained and rinsed) or cooked from dried
  • 1 red Belgian endive leaves (or radicchio, or escarole, or watercress, or arugula)
  • 1 carrot, julienned or cut into strips (or beets)
  • a few blanched asparagus, coarsely chopped (or green beans)
  • 1/2 cup feta, coarsely crumbled (or soft goat’s cheese)
  • handful of chopped parsley

In a medium saucepan, cover the farro with cold water and set it aside to soak for 30 minutes. Then drain the farro, put it back into the saucepan, and add 3 cups of cold water and ½ teaspoon salt. Bring to a boil; then reduce the heat to maintain a gentle simmer and cook until tender but still a little chewy (40-45 minutes). When it’s ready, drain it, and either use it while it’s warm or transfer it to a storage container for later use. (Cooked farro will keep for a few days in the fridge.)

To make the dressing, combine the fish sauce, lime juice, 1 tablespoons of the brown sugar, 6 tablespoons of the water, the garlic, and chile in a small bowl. Whisk well. Adjust the seasonings to taste. (Covered and chilled, the dressing will keep for 3-4 days.)

To assemble the salad, put the farro in a wide bowl (if the farro is cold, you might want to warm it a bit. Or you might choose to eat it cold, if that’s your jam.) Add the veg and parsley. Top with a generous amount of crumbled feta. Then drizzle over the dressing and toss to combine.

A note on mouth-breathing: if you’re having this salad at lunch at work, or before a date or at any time right before you’re about to mouth-breathe in the company of human being, do them a favour and have a breath mint or toothbrush at the ready. Armoured with all that raw garlic and fish sauce, this dressing is potent (albeit delicious) stuff.

farro

010

Share this:

  • Tweet
  • Share on Tumblr
Like Loading...

In times like these

04 Sunday Jan 2015

Posted by julia chews the fat in Holidays, Snacking, Vegetarian

≈ 2 Comments

I never thought I’d say it, but I’m glad December’s over. Or, to be even more to the point, I’m glad Christmas is over. It’s really weird seeing those words written down; I’m one of those kooks who starts buying brown kraft paper and earmarking Christmas cookie recipes as early as October. But this year, our family got handed a bit of a raw deal, starting with an emergency hospitalisation that took its toll on everyone – sleepless nights, worry, influenza, laryngitis, day-long headaches, back pain, more worry, endless commutes to the hospital, home and back. (Amid all this, I was in Montreal, then in Kingston, then in Montreal again, baiting and trapping mice in my apartment in between.) Almost every single person in my family was sick at some point, looking and feeling like death warmed over for the better part of three weeks. Having somehow dodged the illness bullet, I tried my best to pick up some of the slack – grocery shopping, cooking, cleaning, laundering. The day-to-day stuff that hangs heavy unless you’re in decent shape. I put together a small Christmas Eve dinner and a New Year’s Eve/Dad’s birthday dinner on the 31st. I made cookie dough. I played Burl Ives. I tried to make Christmas feel like Christmas. But, really, it all just felt discombobulated, lacklustre, weird. Weird having someone you love in the hospital on December 23rd, not knowing if or when they’d get out. Weird seeing your folks run around like chickens with their heads cut off when they should be sitting on the couch, drinking coffee and eating spice cookies. Weird not popping the New Year’s Eve champagne, or making stollen with dad or doing any of the other requisite holiday baking with mom.

Given that everyone was so exhausted that all they could think about was their next nap, it was hard to muster the enthusiasm to make food and eat it. But, perhaps counter-intuitively, I cooked. And cooked. And then cooked some more. Because when everything around me feels chaotic and unhinged, I gravitate towards the kitchen. It gives me a sense of purpose, of focus, a project that can take my mind off things and make me feel constructive – be it slicing onions or rolling dough into symmetrical balls. There’s something meditative about simple tasks in the kitchen like that. Even if no one really had much of an appetite, I felt that keeping something simmering on the stove or baking in the oven was a way to calm the storm and regain a semblance of normalcy, of home, of comfort. It’s my way of trying to be productive and helpful when the people I care about are out of steam; like a lot of people who like to cook, it’s my way of loving.

And so, over Christmas, I kept busy in the kitchen – I made those ginger-molasses cookies, a pot of minestrone, tofu bowls, the vegetarian version of this lasagna, garlic scrambled eggs, two pumpkin pies (which were a disaster, but nevermind), orange zest cranberry sauce, Anthony Bourdain’s porc au lait and hasselback potatoes, a cranberry-ginger upside-down cake, lemon roast chicken and parsnip purée, leek soup and sandwiches, chicken pot pie, tomato jam, and a bunch of salads for when everyone had reached their point of saturation with meat and starch.

With the last couple of days before heading back to work, I’ve been using the post-holiday down time to prep for the weeks to come. (which, looking at that freezing rain hammering down out there, turns out was the right decision.) Part of that prep has been to make stuff that can be tossed in the freezer for busy nights – tomato sauce, eggplant curry, fennel soup – as well as things that are good candidates for work-day snacks.

Which brings me to almond rosemary crisps.

I’ve had them bookmarked for a while now, but having never got a chance to make them, they ended up in my mañana, mañana pile (I suspect you have one too?). But then, a couple of days ago, I dug up the recipe after seeing the pile of dried fruit and nuts – the ones that were meant for holiday baking – languishing on the kitchen counter.

And that, dear friends, was the beginning of the end, because now I can’t stop stuffing my face with them.

Four days into January and they’ve quickly become my favourite thing of 2015. They’re earthy and salty and sweet, and the currants sort of caramelise in the oven, becoming a nice and chewy counterpart to the cracker’s crunch. They’re wispy and delicate and have a Scandinavian vibe about them, in that elegant, (but rustic), delicious (but healthy) kind of way. They’re super simple, but really, really good. And with cheese? Omagad.

I encourage you to make them. No, I implore you to make them. Now. And all through 2015.

—–

On a final note: when it’s all said and done, I do realise how lucky we were to have those short bursts of time together as a family. I’m grateful for playing Tombola on Christmas Eve with grandma, for Frandi’s German mulled wine, for mom’s perfect Christmas tree, for the Scott and Bailey marathon with my ragazzo, for being able to stay in pyjamas all day, for Christmas morning waffles, and for Uncle Pete and Aunt Barb’s incredible turkey dinner. None of us might’ve been in the best shape, but we still managed to pull it together. Sometimes the shake up helps you realise how lucky you actually are.

Thanks for checking in, dear readers. I am, as always, grateful to have you in my life. Here’s to high-jacked Christmases, recovery, love, family, friends and, last but not least, food. Happy 2015 to you and yours. x

Baked crackers - detail

By the way – if you’re worried that making crackers is fussy work, it’s really not. The process is pretty straightforward – combine the wet and dry ingredients, pour into a baking tin, bake, chill, slice, bake again. The end result makes you wonder why you’ve never made crackers before. (and why the heck you’ve spent so much money on Raincoast Crisps.)

Almond Rosemary Crisps (makes about 60) – adapted from Fig and Honey

  • 1 cup plain flour
  • 1 tsp baking soda
  • 1/2 tsp salt
  • 1 cup unsweetened almond milk
  • 1/8 cup brown sugar
  • 1/8 cup honey
  • 1/2 cup currants, soaked in warm water till softened and drained
  • 1/4 cup raw almonds, halved
  • 1/4 cup pumpkin seeds
  • 1/8 cup whole flax seeds
  • 1 tbsp rosemary, chopped

Additional notes:
– the recipe can easily we doubled or tripled (which might be a good idea. They disappear at the speed of light)
– feel free to switch it up: sesame seeds and anise seeds are good alternatives to the flax seeds; raisins are a good replacement for the currants

Directions

Preheat oven to 350°F. Grease 2 mini-loaf tins with a light oil (sunflower, grapeseed or coconut oil)

In a medium bowl, combine the flour, baking soda and salt. Make a well in the centre and add in the almond milk, brown sugar and honey. Fold through until all the flour is incorporated into the liquid. Next add in all of the fruit, nuts, seeds and rosemary and fold until just evenly distributed. Pour batter into the mini-loaf tins and place in the oven.

Loaf batter

Bake for about 25 minutes until the tops are golden brown and a toothpick comes out clean.

Par-baked loaf

Transfer to a cooling rack. Once cooled, transfer loaves to the freezer and leave for about 1 hour.

After the loaves have chilled, preheat the oven to 275°F. Remove the loaves from the freezer and slice as thinly as possible, with a sharp chef’s knife (works better than a serrated knife).

Par-baked crackers

Place the slices in a single layer on a baking sheet and bake in the oven for a further 25-30 minutes until crisp and golden brown, flipping over once halfway.

Baked crackers

Once cooled, the crackers can be stored in an airtight tin. They can be eaten as-is, but pair up really well with cheese – anything from sharp cheddar to Gruyère to chèvre and beyond.

Crackers with cheese

Share this:

  • Tweet
  • Share on Tumblr
Like Loading...

Farewell nights

01 Thursday Jan 2015

Posted by julia chews the fat in Lunch & Dinner, Vegetarian

≈ 1 Comment

What do you do the night before New Year’s Eve, a mere few hours before your man catches his flight for a two-month contract across the country? You settle into the evening with a pair of gin gimlets, some Peter, Paul & Mary and a bowl of feel-good food. (plus a few choice scenes from The Canyons for good measure.)

Hope you’re spending this New Year’s Day with the people you love and the things that make you happiest. See you back here soon, dear readers. xx

Tofu Bowl Prep

Tofu Bowls

Coconut Tofu Bowls (serves 2, plus leftovers) – adapted from Sprouted Kitchen

  • 1 cup brown rice
  • 12 oz. package firm tofu, drained
  • 2 tsp. red chili paste (such as sambal oelek)
  • 1 Tbsp. lime juice
  • 2 tsp. rice wine vinegar
  • 1 tsp. soy sauce
  • 1 Tbsp. fresh grated ginger
  • 3 garlic cloves, pressed
  • 1 piece of lemongrass, minced
  • 1 Tbsp. coconut oil
  • 2 Tbsp. sesame oil
  • 2 cups broccoli, florets and stems sliced thin
  • 2 large carrots, julienned
  • 1/2 cup chopped green onions
  • 1/4 cup chopped fresh cilantro
  • 3/4 cup coconut milk
  • 2 Tbsp. soy sauce, to taste
  • sesame seeds, for garnish
  • 1 avocado, for garnish

Directions
Rinse the rice and cook it (Saveur’s method is my favourite). While the rice is cooking, cut the tofu into cubes and set it on a clean dish towel to drain. In a large bowl, combine sesame oil, chile paste, lime juice, vinegar, ginger, garlic, lemongrass, soy sauce and stir to mix. Add the tofu and stir everything to coat. Set aside to marinate for 20-30 minutes.

Warm the coconut oil in a large skillet over medium high heat. Use a large spoon to scoop out the tofu – leaving some of the marinade behind – and toss into the hot pan, sautéing for about 5 minutes, until lightly browned. Remove tofu from the pan and set aside. Add the remaining marinade to the pan, then add the broccoli and carrot until the broccoli gets a little crisp around the edges; add the coconut milk and cook until bubbling. Stir in the greens onions, cilantro, tofu and toss to combine.

Serve each bowl with a scoop of brown rice, a sprinkling of sesame seeds and a few avocado slices.

Share this:

  • Tweet
  • Share on Tumblr
Like Loading...

City Reprieve

12 Sunday Oct 2014

Posted by julia chews the fat in Food Away From Home, Lunch & Dinner, Vegetarian

≈ Leave a comment

My bus stop to and from work is positioned right off one of Montreal’s busiest highways, the 40. It’s a strip of steel and pavement that moves all day long in inexhaustible waves of blaring horns, blaspheming drivers, exhaust pipes spewing gasoline fumes, and every so often, the crunch of metal-on-metal resulting from a driver eyeing their cell phone instead of the road. It’s a purgatorial feast for the senses, to say the least. But it’s also a daily necessity, getting me to and from my place of work. I try to remember that with convenience comes sacrifice, sticking my nose in a book to distract me from the highway and its noxious offerings. Sometimes, though, it’s a hard beast to ignore.

Not unlike the man behind Whole Larder Love and others of his ilk, I’ve become more sensitive to the drawbacks of city-living. This isn’t say that I intend on becoming a tree-dwelling hermit, or have what it takes to walk around in cold cow muck each morning at the crack of dawn, in a uniform of denim overalls and wellies. But there are days when those things sound much more appealing than ingesting smog and hurrying around with commuters who’ll toss you to the curb if it means getting to the bus faster. Frankly, on those days, real cow muck sounds like the better kind of bullshit.

Since I will likely never become a farmer, or goat-herder, or cultivator, I rely on intermittent opportunities to take a break from the city. Like the one that presented itself out of the blue in late August, when my friend Rose asked if I wanted to spend a three-day weekend on a farm in the Eastern Townships. A three-day escape to the country? Man o man,

sign

me

UP.

It just so happens that Rose’s mum (the lovely and talented, Gwynne Basen) operates a small-scale farm in the hamlet of Dunkin, near Mansonville, Quebec. True to its name, every inch of Abbondanza is plentifully bestrewn with plants and produce – from the keyhole garden overflowing with squash and the colossal heads of cabbage lining the garden path, to the long tendrils of heirloom tomatoes, greenhouse peppers and bright patches of nasturtium flowers, it is a sight to behold. A plant nirvana.

If there was ever an antidote to city-fatigue, this would be it.

garlic

The Friday we arrived, Rose and I busied ourselves prepping produce for the Saturday farmers market. At the kitchen table, we took turns sorting, packing and weighing fresh leaves of kale, spinach, mesclun, as well as different types of Romano, fava, and string beans in a spectrum of colours, ranging from iridescent-purple ones, to slender, aubergine-coloured ones that magically turn green when they’re cooked. Every so often, for, ahem, “quality-control” purposes, we’d sample the mustard and mizuna leaves, letting them warm our mouths with their peppery bite, as we continued to make our way through the mounds of greens laid out on the table.

Once all the produce had been sorted and tucked away for the night, we all sat down with some wine and a pre-dinner plateful of crisp, tempura-battered zucchini blossoms, inspired by Ottolenghi’s recipe and served alongside his (totally brilliant) spicy-sour lime dipping sauce. After dinner, and a couple more glasses of wine, we each sauntered off to bed, falling asleep to the sound of crickets.

The next morning, we packed up the car and headed to the market with Gwynne. Alongside the beans and greens, Rose and I arranged pint-size baskets of heirloom tomatoes and fingerling potatoes, a few heads of lettuce, and twine-bound bundles of carrots, onions and turnips. Local residents came by in batches, chatting with Gwynne and selecting produce to take home. By noon, there was nary a piece of produce left on the table.

Clearly, the locals have good taste.

Back at the farm, I helped with lunch by assembling a quick salad of Gwynne’s heirloom tomatoes, layered with shreds of milky Buffala mozzarella, basil, dill, nasturtium flowers, and sprinkled with crunchy salt flakes and a thin drizzle of olive oil.

We ate it on the porch steps, between two willowy hydrangea bushes fluttering with honeybees. After soaking up the last of the tomato juices from my plate with a heel of crusty bread, I sat there, toes in the sun, my heart filled with gratitude.

It was a weekend of perfect, quiet moments; a weekend of deep, clear breaths and introspective calm; a respite from the smog and the concrete, and an introduction to true farm-to-table living. Gwynne’s gardens and greenhouse are not only stunning, but also a testament to her commitment to real food. It’s thanks to dedicated people like her that we’re reminded of what food should look and taste like, and how something so seemingly simple – the flavour of a perfectly ripe tomato, for instance – can be profoundly enriching.

—–

If you’re interested in visiting the farm, Gwynne offers a variety of workshops – from sustainable gardening practices to stone-wall building. For details, you can visit the site here.

I hope autumn has been good to you, lovely readers. Be well, eat well xx

Stuffed Harvest Squash – serves 2 as a light main, with a side salad

    • 2 medium-sized squash (pattypan work quite well)
    • 1 small onion, finely chopped
    • 1 stalk celery, finely chopped (or 1/4 bulb of fennel)
    • 4-5 leaves of Swiss chard (stems on), finely chopped
    • 2-3 cloves garlic, minced
    • 1 can (or 1 ½ cups cooked) white cannellini beans, rinsed and drained
    • 1 tsp. fresh thyme (stems removed), chopped
    • 1/4 tsp. fresh sage, chopped
    • 1/4 tsp. chili flakes
    • salt and freshly ground pepper to taste

Directions:

1) Place the squash flat side down in a large pot. Add about 1 inch of water, cover, and bring to a boil. Cook for about 8 minutes, until a fork easily pierces the top of the squash. Remove from the pot and set aside to cool.

2) Preheat oven to 375° F. When cool enough to handle, slice off the top of the squash and scoop out the flesh (leaving a wall of about a 1/4-inch of flesh on all sides of the squash). Chop the scooped out flesh coarsely, and set aside.

3) Heat a glug of olive oil in a large skillet on medium-high heat and sauté the onions and celery for about 5 minutes until softened (but not browned); add garlic, diced squash, and remaining seasonings and cook for another 2 minutes. Add the white beans and cook on low heat for about 5 minutes, stirring from time to time.

4) Place the squash in an baking pan or dish. Spoon the stuffing into each shell, packing tightly (don’t worry about over-stuffing). Return the “caps” of the squash back on top and bake for about 20 minutes in the preheated (375° F) oven. Allow to cool for a couple of minutes before serving.

Note: if you have additional stuffing, let it cool, then pop it into the refrigerator. It’ll last a few days and might come in handy for weeknight dinners – reheated with a bit of oil and parmesan, tossed into pasta, or heated up and lightly mashed as a topping for toast.

stuffed squash

stuffed squash

stuffed squash

Share this:

  • Tweet
  • Share on Tumblr
Like Loading...

Learning from Scratch

21 Sunday Sep 2014

Posted by julia chews the fat in Breakfast & Brunch, Cooking For Your Peeps, The Basics, Vegetarian

≈ 2 Comments

Like most kids, my brother and I spent our childhood and pre-teen years pleading for junk food. Fruit Roll-Ups, instant noodles, soda, Corn Pops – we wanted ALL of it. My mother, bearing the brunt of these junk food solicitations (“But everyone at school has them! Come onnnnnnn.”), was often the one who had to give the hard-line “no”. Despite all the begging and pleading (and possibly crying?), she stuck to her guns, filling the cart with items that were far removed from the world of high fructose corn syrup and red dye no.5.

Today, I’m thankful for her resolve. I didn’t know it at the time, but my mom was trying to instill in us the importance of eating well, and more specifically, eating well at home. Apart from the occasional night out or birthday party at the local St-Hubert BBQ (chicken fingers! fries! bright pink dipping sauce!) or Pizza Hut (stuffed-crust Hawaiian! all-you-can-eat ice cream bar!), dinner, lunch and breakfast in our house was largely homemade. It was never something that, as a kid, I considered a luxury; it was just the way things were (plus, I still had my eye on those Fruit Roll-Ups). But as an adult, I look back on that time and realise how inconceivably lucky we were. Boeuf bourgignon, whole roast chicken, roast beef with Yorkshire puddings; hand-rolled perogis, homemade pasta, spanakopita, pilafs, patates dauphinoises; minestrone, split pea, tortellini and French onion soups; coffee cakes, bundt cakes, layered birthday cakes and strudel; sticky baked beans, omelettes, tea biscuits and blueberry pancakes on the weekend. This is just a glimpse of the dozens of different dishes mom has made for us and others over the years. And while all this was considered everyday food in her mind, it goes without saying that we ate like kings.

It shouldn’t be a surprise then to learn that my mom was the one who first introduced me to cooking. She taught me how to make a quick cheat’s buttermilk and wrap fresh herbs in cheescloth to make a bouquet garni. She’s shown me how to stuff and truss a turkey, wrangle a pot roast, whip meringue into stiff peaks, blanch and “shock” vegetables and throw together a killer pancake batter from scratch in two minutes flat. She introduced me to the terms deglaze, dredge, al dente, mirepoix, roux, bain-marie and taught me that the secret to perfect Christmas stuffing is found in a Simon and Garfunkel song. You can still catch her humming it, off-key, while she’s rummaging through the spice rack at Christmastime.

Mom’s always been at ease in the kitchen, whipping around from stovetop to fridge to pantry and back again in a blur of focused energy. She’s been fundamental to my culinary education and, when I call her in the middle of a kitchen meltdown, is still keen to answer my questions about oven temperature, butter conversions, baking alternatives and expiry dates. All the while, she’s encouraged me to be bold in the kitchen and to improvise when a recipe goes awry right before the guests arrive. Most importantly though, she’s shown me how food can be an expression of love, something that becomes so much more when it’s shared.

—–

Another thing my mother has tried to instill in us is the importance of birthdays – to take the time to celebrate them, preferably with a bottle of bubbly or, failing that, a dry martini. And food. There has to be food.

Today I want to take a moment to wish my mum a very happy birthday. We’re never quite sure how you manage to do it all, but thank you for all of it.

Love you with all my heart.

Me & mumMom’s Blueberry Pancakes – makes approx. 10-12

In our house, pancakes were never from a box, but always made from scratch and served with real maple syrup – from a tree, not from Aunt Jemima.

recipepancake prep

1 1/3 cups flour
1 tsp salt
3 tsp baking powder
3 Tbsp sugar
3 Tbsp vegetable oil
1/2 tsp vanilla
1 egg
1 1/4 cup milk
1/3 cup fresh (or frozen) blueberries

Directions

Set a pan on medium heat.

Mix dry ingredients and add the blueberries, tossing them to coat. In a separate bowl, beat the egg; add oil, vanilla and milk to the egg. Make a well in the dry ingredients and slowly add the egg-milk mixture. Stir quickly until the ingredients are just mixed and the batter is still lumpy.

Once the pan is hot, add a lump of butter. When the butter starts to bubble, add ladlefuls of batter to the pan. Cook until little bubbles start to form on the top, then flip.

Note: You can keep the pancakes in a low oven to keep them warm while the others cook.

Blueberry Pancakes Blueberry Pancakes Blueberry Pancakes

Share this:

  • Tweet
  • Share on Tumblr
Like Loading...

Peach Upside Down Cake

06 Saturday Sep 2014

Posted by julia chews the fat in Cooking For Your Peeps, Sweet Tooth, Vegetarian

≈ 3 Comments

It starts to get dark before dinner time; the outdoor pools are officially closed; the local ice cream parlour is readying its “See You Next Year!” sign. These are the annual harbingers that make us want to close our eyes, stick our fingers in our ears and go “la la la la la…I can’t heaaar you”. But, as we know, resistance is futile; whether we like it or not, we just have to suck it up, accept that summer’s days are numbered and put away the tan shorts.

Instead of hyperventilating at the prospect of losing the days of warm sunshine, late sunsets and Bo-bec’s mint chocolate chip, I’ve decided to focus on the last few gems of summer. After working my way through many pints of tiny, sweet blueberries and strawberries from Saint-Jean-sur-Richelieu over the last couple of weeks, I’ve been putting in some time with Ontario peaches, which are not only still available, but also still fragrant and lusciously sweet.

Last weekend, after an afternoon of prepping food for a family barbecue, I noticed that there were a few peaches hanging out in the fruit bowl, verging on overripeness. Figuring that a family barbecue would be a good occasion for cake, I pulled one together with the help of Ina Garten (not the person, but the recipe), with the sole purpose of using up the peaches slowly expiring on my countertop. What emerged was something that far surpassed my expectations – a tender, fluffy upside down cake, crowned with a layer of syrupy peaches. It was delectable. So much much so, that it had my grandmother, brother, and sister-in-law were raving about it for days later. (which, let’s be honest, is supremely gratifying to the home baker.)

Happy end of summer, lovely readers. Be sure to make it a sweet one.

Peach Upside Down Cake

Peach Upside Down Cake – adapted from Ina Garten

  • 3/4 stick unsalted butter, room temperature (plus extra for greasing the dish)
  • 5-6 ripe peaches cut in half, pitted and sliced
  • 1 cup granulated sugar (for the caramel)
  • 3/4 cup granulated sugar (for the cake)
  • 2 large eggs, room temperature
  • 1/3 cup sour cream
  • 1/2 teaspoon grated lemon zest
  • 1 teaspoon pure vanilla extract
  • 1 cup plus 2 tablespoons all-purpose flour
  • 1/2 teaspoon baking powder
  • 1/4 teaspoon kosher salt
  • Confectioners’ sugar

Directions

Preheat the oven to 350 degrees F. Generously butter a 9-inch glass or ceramic pie dish and arrange the peach slices in a circular pattern at the bottom of the dish.

050

Combine 1 cup of the granulated sugar and 1/3 cup water in a small saucepan and cook over medium-high heat until it turns a warm amber colour, about 360 degrees F on a candy thermometer. Swirl the pan but don’t stir. Pour evenly over the peaches. (Be careful not to burn the sugar – or yourself – while doing this. Caramel tends to quick more quickly near the end, so keep a close eye on things.). As it sets, the caramel will stiffen, like candy – don’t worry, it will become syrupy again as the cake bakes in the oven.

062

065

Meanwhile, cream the 6 tablespoons of butter and the remaining 3/4 cup of granulated sugar in the bowl of an electric mixer fitted with the paddle attachment, until light and fluffy. Lower the speed and beat in the eggs one at a time. Add the sour cream, zest, and vanilla and mix until combined. Sift together the flour, baking powder, and salt and, with the mixer on low speed, add it to the butter mixture. Mix only until combined. Pour the cake batter evenly over the peaches.

Batter

Batter

Batter

Bake for 30 to 40 minutes, until a cake tester comes out clean. Cool for 15 minutes, then invert the cake onto a flat plate. If a peach clings to the baking dish, ease it out and place it back in its spot on the top of the cake. Serve warm or at room temperature, dusted with confectioners’ sugar.

Peach Upside Down Cake

Share this:

  • Tweet
  • Share on Tumblr
Like Loading...

Overnight Oatmeal for Late (and Early) Risers

21 Monday Jul 2014

Posted by julia chews the fat in Breakfast & Brunch, Food Away From Home, The Basics, Vegetarian

≈ 5 Comments

Can you see that, dear readers? That cool, steely blue daylight stretching out onto the tablecloth above? That means it’s 6am on a weekday. 6am on a weekday, and I’m up. That’s a WHOLE HOUR AND A QUARTER EARLIER than my alarm.

It’s is a Monday-morning miracle.

When you’re not in the habit of being up this early, there’s this overwhelming sense that you’re the only person on the Earth who’s awake. You’re not quite used to the quiet because living in the city means you’ve become acclimatised to a morning soundtrack of cars honking, people yelling, toddlers crying and two-ton delivery trucks rumbling perilously down potholed streets. Admittedly, it’s a soundtrack that mimics the chaos of my morning routine. I fiddle with the snooze button far too much; I tumble over power cords on my way to the shower and almost systematically end up putting on one item of clothing inside out (yesterday it was a shirt, maybe tomorrow it’ll be underwear! Only Lady Fortuna knows!).

But early mornings like this one are different. I walked slowly to the kitchen. Casually, even. Right now, the only thing within earshot is the muffled sound of coffee brewing in the percolator, punctuated not by the shrill screech of a construction drill, but by the bright chirps of sparrows perched outside. It’s like a scene out of an old Folgers commercial. And it turns out I could live inside a Folgers commercial forever.

Sitting here, sipping coffee between bites of oatmeal, I decide I’ve got a little time to do some computer clean-up. I soon come across a folder of photos marked “Ireland/Berlin 2013” and it dawns on me that one year ago, almost exactly to the day, I was on a plane heading to Ireland for my brother’s wedding. I can hardly believe that it was a whole year ago. The details of those memories are still so vivid.

In the days leading up to the wedding, we stayed on a 17th-century estate owned by the bride’s family – an astonishingly beautiful and meticulously preserved cluster of buildings with guest houses that looked out onto a floral courtyard and green acreage, all of it surrounded by a hand-built stone wall and dense forest. You’d wake up to the sound of starlings and water trickling down the courtyard’s fountain. Afternoons were spent navigating the twisting paths of the forest. Wild deer would come out to graze at dusk. Over dinner, the bride’s uncle would regale us with the estate’s ghost stories and we’d all head to our beds with goosebumps, secretly hoping we’d have our own otherworldly encounter to share at the breakfast table the next morning.

The wedding itself was so fairytale-like, it would put any Martha Stewart magazine to shame. There was a heartfelt ceremony under a big willowy tree; bouquets made with wild flowers from the fields; Celtic dancing and a Viennese waltz; late-night fireworks in the yard and (because my sister-in-law is from Hamburg) elegant, well-dressed Germans everywhere.

The day after the event, my parents and I set out on coastline road-trip that took us from Sligo, to Dingle, down to the Ring of Kerry and Cork, up to Drogheda, through Belfast and all the way the northern-most tip of Ballycastle. We made ascents up treacherously thin, coastline roads that led to the most beautiful vistas – endless stretches of rocky beach, verdant hills dotted with sheep, vibrant pink sunsets, and strings of ancient stone castles that sat soulfully along the landscape. In the mornings, we walked through dewy fields and cobblestoned paths, before heading inside our B&Bs for breakfasts of black tea, Irish soda-bread, freshly-churned butter (oh, the butter), marmalade and warm oatmeal. Sometimes there’d even be a full Irish breakfast waiting for us, complete with fried eggs, bacon rashers, black pudding, a grilled tomato and toasted bread, each slice neatly arranged in a silver toast rack.

Mornings there were quiet and tranquil; they made me feel happy, hopeful, serene and, perhaps more than anything else, settled. All of it was like a dream – the mist, the smell of earth and grass, the mellow baying of barnyard animals.

I wanted to stay forever.

Sneem

—–

Today, on this early Monday morning – without the usual clamour of the city – the gentle magic the Irish countryside doesn’t seem so far away. It’s in the wind and the leaves. And in a quiet breakfast that doesn’t need to be rushed.

Happy (One-Year!) Anniversary to my brother and his bride. Hearts to infinity, plus one. ♥

Hot Oatmeal

A note on the recipe: knowing how my mornings usually devolve into complete bedlam, I made myself a pot of overnight oatmeal. It’s a nice thing to wake up to, particularly if you feel like a chicken with its head cut off between the hours of 7:00 and 9:00. Cold pizza for breakfast can be fun, but trust me, homemade oatmeal is better. One caveat: you MUST MUST MUST use steel-cut oats, nothing else. Otherwise, you’ll end up with nondescript sludge, instead of nice, toothsome, nutty bits of oats. Steel-cut oats are normally a bit of a nuisance as they take 45 minutes to cook (I know, yikes) – but if you use this overnight method you can avoid waiting around for breakfast because it cooks while you sleep. *Poof* Magic!

Overnight Steel-Cut Oats (3-4 servings)

  • 4 cups filtered water
  • 1 cup steel-cut oats
  • 1/4 teaspoon sea salt

Topping option:

  • a handful of quartered strawberries, macerated in maple syrup overnight
  • a handful of smashed pistachios

Directions:
1) In a medium saucepan or Dutch oven, bring the 4 cups of water to a rapid boil.
2) When the water comes to a full boil, pour in the steel cut oats and salt.
3) Give a quick stir and let the oats cook for 1 minute.
4) After one minute, turn off the heat, give the oats a quick stir, cover and then let them sit on the stove overnight. Go catch some well needed zzzz.

The next morning: open the lid and observe the magic of perfectly cooked overnight oatmeal. Oooh ahhh. Bring the oatmeal back up to a simmer, stirring occasionally, until warmed through. There will be a bit of water in the mixture still, but the oats will thicken up as they sit (but if you feel it needs to be thinned out some more, add a little bit of milk or water to the pot). Ladle the oats into a bowl and spoon over the mascerated strawberries and pistachios.

Oatmeal with Strawberries

Oatmeal with Strawberries - detail

Share this:

  • Tweet
  • Share on Tumblr
Like Loading...

Spring Rolls for Heat Waves

02 Wednesday Jul 2014

Posted by julia chews the fat in Lunch & Dinner, The Basics, Vegetarian

≈ Leave a comment

I’m currently sitting at my dining room table, curtains drawn, lights out, with a large jug of iced water by my side and a rotating fan positioned a few short inches from my face. I’ve had three cold showers today and I’m already contemplating a fourth. With the sweltering, muggy heat comes headaches, waves of nausea and the pungent stench of street garbage wafting through the nearest open window. Summer in this city takes no prisoners. No pool? No air-conditioning? You can kiss your good night’s sleep goodbye, along with your desire to do anything else other than spreading out like a starfish on top of your bedsheets with an ice-cold wash cloth draped across your face.

Underwear, of course, is totally optional.

Since there’s no possible way I’m turning on the oven, or boiling or braising anything on a day like today, dinner options will have to be cold and raw, light and fast. Salads can often do the trick, but they can get boring fast and sometimes don’t feel substantial enough. Which brings me to –

SPRING

ROLLS.

Composed of paper-thin rice wrappers filled with crunchy vegetables and cool rice noodles, spring rolls only require very minimal cooking – the vermicelli cook in under three minutes and the rice paper wrappers can be softened with tepid water. All the remaining ingredients can go in raw. The only exception is the sauce, which requires some minor sautéeing. But let me tell you, this sauce is well worth the two minutes you’ll spend next to the stove top. In other words, you can fill your spring rolls with whatever you like, but DO NOT SKIP THE SAUCE. Trust me on this one. You can thank me later when you find yourself using your index finger like a spatula to collect every last drop at the bottom of the bowl.

Spring Rolls with Spicy Cashew Dipping Sauce (serves 4 as a light dinner) – adapted from Sprouted Kitchen

Spring roll filling options:

    • 2 carrots, julienned
    • 1 cucumber, julienned
    • 1 avocado, sliced
    • 1 cup sliced red cabbage
    • cooked vermicelli noodles or sticky rice
    • rice paper wrappers (16 small or 8 large)
    • handful of lettuce and/or sunflower sprouts
    • handful of cilantro and/or mint and/or Thai basil leaves

For the dipping sauce:

      • 1 clove garlic, minced
      • 1/3 cup unsweetened cashew butter
      • 1/2 tbsp mirin sauce (can be substituted with agave nectar)
      • 1/2 tsp tamari or soy sauce
      • 1/4 tsp chili flakes
      • juice of one lime
      • vegetable oil
      • water, as needed

Note: these are just guidelines; feel free to adjust the seasonings to suit your taste

Assembly

Boil about 2 cups of water in a tea kettle. While the water cools, start laying all the fillings on a platter.

To make the sauce: begin by heating a glug of vegetable oil to a frying pan on medium-high heat. Once the oil is hot (but not smoking) add the garlic and fry until fragrant (about 30 seconds). Add the chili flakes and fry another 20 seconds or so, taking care not to burn the garlic and chili. Reduce heat to medium-low and add the cashew butter, mirin, tamari and whisk together, adding water one tablespoon at a time until it is thin enough to be used as a dipping sauce. Add the lime juice and whisk to combine. Adjust seasonings if needed. Serve warm with the rolls.

To assemble: pour the water from the kettle (it should be tepid now) into a large, flat bowl. Lay one rice paper wrapper at a time in the water and allow to soak for about 20 seconds to soften. Transfer to a clean, damp dish towel and begin layering the ingredients in the centre of the wrapper, starting with the lettuce, then the noodles or rice, then the veg, then the herbs. Leave a bit of room at the bottom for wrapping, but feel free to allow the veg to stick out at the top. Fold the bottom of the wrapper upwards, toward the centre, roll the left flap snugly over all the filling an continue rolling until you’ve arrived at something that resembles a spring roll. Repeat with remaining wrappers and fillings.

fillings

assembly

assembly

finished spring rolls

Share this:

  • Tweet
  • Share on Tumblr
Like Loading...

Dream Waffles, Come Rescue Me

11 Wednesday Jun 2014

Posted by julia chews the fat in Breakfast & Brunch, Cooking For Your Peeps, Sweet Tooth, The Basics, Vegetarian

≈ Leave a comment

Of all the things I could have predicted about my young adult life, having recurring dreams about waffles would not have been one of the things on my radar. And yet, this is where I find myself, at 32, dreaming (literally, not figuratively) about breakfast food.

I guess things could be worse.

It all began about three months ago, when I had a dream I was making waffles on a beach. Then, a week later, there was another about waffles at my old high school; a few days after that, I dreamt I was eating them in Paris, curbside, with friends (because apparently I have Parisian friends now?). I woke up from that last one bleary-eyed, thinking why can’t dreams be real life??, then rolled over, closed my eyes and hoped that I could somehow lucid-dream myself into eating more waffles by the Seine.

According to the Interweb (where, of course, all accurate, reliable, trustworthy information resides) having recurring dreams about waffles is not exactly a good thing. But because I believe that dreams have a more visceral connection to what’s going on in our minds and bodies (because not only do I have imaginary Parisian friends, I’m also a hippie now?), I came to the conclusion that I probably just really wanted waffles – stacked high, with a generous slick of maple syrup across the top. So, the next available weekend, I made a point of honouring my demented breakfast dreams by scouring the neighbourhood for the perfect waffle.

After looking through the menus of a few places, I soon discovered that finding some standard, no frills waffles in this town is capital H Hard. Today’s brunch venues (complete with the requisite distressed-wood tables, exposed light bulbs and waiters with perfectly groomed handlebar moustaches) serve waffles that tend to be a bit too, er, hip…including varieties that are egg-less (oh boy this should be fun), Red Velvet-flavoured (ick), or lacquered in a weird, lavender-infused syrup (double ick).

It seems that the basic, trad waffle has been comically adulterated by the bourgeois bohemian crowd well-intentioned entrepreneurs of this city. All I wanted was a simple, straight-forward waffle. No fancy distractions. Just a really good, crispy, golden syrup-receptacle. After coming up empty, I spent the next couple of weeks asking myself – and anyone who would listen – where are all the freaking real-deal waffles at? 

All that whining turned out to be beneficial, because on my birthday – lo and behold – I was gifted a WAFFLE MAKER. Yes – a machine with which I can make waffles WHENEVER I WANT. It seems like an insane prospect. And I will, without a doubt, become a hazard to myself in the process. But HOLY MACKEREL. WAFFLES. SORRY, BUT I FEEL THAT CAPS LOCKS ARE THE ONLY WAY TO FULLY CONVEY MY EXCITEMENT. That, and exclamation marks. Because…WAFFLES !!!!!!

Without an ounce of shame, I willl proudly admit that I’ve had waffles every single weekend since. The novelty having not fully worn off, I still get stupid-excited about pouring the batter onto the iron, closing down the top and waiting for the indicator light to turn green. It’s totally magical, even if they’re super easy to make. It’s the kind of food that makes you want to wear a feathered boa to breakfast and sing this Mariah classic at the top of your lungs, replacing the lyric “lover” with “waffle”.

Or, that just might be me.

waffle - detail

A quick note: These are not to be mistaken for belgian-style gaufres. These are decidedly US of A-style waffles – reminiscent of the thin, crispy, golden waffles of your Eggo youth. Only better, because they didn’t come out of a sad box from the freezer.

Epic Buttermilk Waffles (makes 6) – recipe from the Aretha Frankensteins restaurant in Chattanooga, TN

3/4 cup all-purpose flour
1/4 cup cornstarch
1/2 teaspoon baking powder
1/4 teaspoon baking soda
1/2 teaspoon salt
1 cup buttermilk*
1/3 cup vegetable oil
1 egg
1 1/2 teaspoons sugar
3/4 teaspoon pure (natural) vanilla extract
Maple syrup, for serving

* genius trick for making quick buttermilk (courtesy of my mom): add about 1 tsp of white vinegar to nearly 1 cup of milk. Ta da!

Directions

In a medium bowl, combine the flour, cornstarch, baking powder, baking soda, and salt; mix well. Add the milk, vegetable oil, egg, sugar and vanilla and mix well. Let the batter sit for about 30 minutes.

Preheat a waffle iron. No need to grease it – the oil in the batter will allow the waffle to release easily. Follow the machine’s cooking directions. Serve immediately with syrup and any other accompaniments you see fit.

waffle - pure
waffle - berries

Share this:

  • Tweet
  • Share on Tumblr
Like Loading...
← Older posts
Newer posts →

Facebook

Facebook

Instagram

No Instagram images were found.

Recent Posts

  • Layers and Rows
  • Finding Buoyancy
  • February
  • Wednesday
  • Cross My Heart, Miso

Archives

  • May 2017
  • April 2017
  • February 2017
  • December 2016
  • November 2016
  • September 2016
  • August 2016
  • July 2016
  • June 2016
  • May 2016
  • April 2016
  • March 2016
  • February 2016
  • January 2016
  • December 2015
  • November 2015
  • October 2015
  • September 2015
  • August 2015
  • July 2015
  • June 2015
  • May 2015
  • April 2015
  • March 2015
  • February 2015
  • January 2015
  • December 2014
  • November 2014
  • October 2014
  • September 2014
  • August 2014
  • July 2014
  • June 2014
  • May 2014
  • April 2014
  • March 2014
  • February 2014
  • January 2014
  • December 2013
  • October 2013
  • September 2013
  • August 2013
  • July 2013
  • June 2013
  • May 2013
  • April 2013
  • March 2013
  • February 2013
  • January 2013
  • December 2012
  • November 2012
  • October 2012
  • September 2012
  • August 2012
  • July 2012
  • June 2012
  • May 2012
  • April 2012
  • March 2012
  • February 2012

Categories

  • Beverage
  • Breakfast & Brunch
  • Condiments
  • Cooking For Your Peeps
  • Cooking Solo
  • Cooking with Nonna
  • Food Away From Home
  • Food Writing
  • Holidays
  • Intro
  • Lunch & Dinner
  • Snacking
  • Soups
  • Sweet Tooth
  • The Basics
  • Vegetarian

Enter your email address to follow this blog and receive notifications of new posts by email.

Join 82 other subscribers

Blog at WordPress.com.

  • Subscribe Subscribed
    • julia chews the fat
    • Join 82 other subscribers
    • Already have a WordPress.com account? Log in now.
    • julia chews the fat
    • Subscribe Subscribed
    • Sign up
    • Log in
    • Report this content
    • View site in Reader
    • Manage subscriptions
    • Collapse this bar
 

Loading Comments...
 

    %d