• Home
  • About

julia chews the fat

julia chews the fat

Category Archives: Cooking For Your Peeps

Brisket Chili of the Gods

01 Monday Dec 2014

Posted by julia chews the fat in Cooking For Your Peeps, Lunch & Dinner, The Basics

≈ 3 Comments

Is there something that you’ve made over and over again, only to one day realise that there was a far superior version hanging out there, waiting on the sidelines to be discovered? Allow me to introduce you to brisket chili, friends – the chili recipe to end all chili recipes.

I think it’s safe to say that most of us north of the Mexican border think of chili con carne as a simmered concoction of minced beef, red kidney beans, tomatoes, some veg (usually onion, carrot, celery, bell pepper), Mexican chili powder (which isn’t really Mexican at all), topped with sour cream and grated cheddar. Now, I want you to rid all of that from your mind. Throw it away. You don’t need it anymore. You don’t need chili with little nubs of overcooked minced meat bobbing around in a non-descript bath of tomatoey vegetables. Because now you have brisket chili – lovely, smoky, spicy, silky brisket chili – and by Jove, there is no turning back.

Beef brisket

Brisket Chili (serves 6) – adapted from Jamie Oliver

Note: the chili needs to simmer for a good 4-4.5 hours, so make sure to plan accordingly.

  • 1.5 kg best-quality beef brisket
  • 250g grams cooked Romano beans (or 1 x 19oz can)
  • 1 large cinnamon stick
  • 1 Tbsp ground cumin
  • 1 Tbsp smoked paprika
  • 1 heaped Tbsp dried oregano
  • 2 fresh bay leaves
  • 2 red peppers
  • 2 yellow peppers
  • 1 x 28oz can chopped tomatoes
  • about 1/2 L beef stock
  • 2-3 red chipotle chiles in adobo, chopped
  • 1-2 chile peppers (jalapeño or habañero), de-seeded and chopped
  • 2 red onions, finely sliced
  • 1 Tbsp tomato paste
  • coarse salt and black pepper
  • olive oil
  • Red wine vinegar
  • ½ bunch coriander, chopped
  • Soft tortillas, Greek-style yoghurt, avocado* and/or green salad, to serve

*you can also make a quick guacamole to serve on top, by mashing up a couple of ripe avocados, and adding some finely grated red onion, the juice of a lime and some chopped coriander, along with a pinch of salt. **the chili freezes really well, so don’t bother cutting down the recipe if you’re less than 6 people. Make a whole batch and freeze the rest.

Directions:

Place the beef on a board and score one side. Combine the cumin, paprika and oregano and rub into the cuts in the beef. Season well with coarse salt and black pepper, drizzle over a little olive oil and brown the brisket well in a large pot or Dutch oven over a high heat.

021 Brisket with spicesOnce the outside is browned, remove the brisket from the pot and set aside. There should still be some residual oils at the bottom of the pot, which you’ll use to sautée the onion, etc, so keep it. But discard any bits of seasoning that looks like it’ll burn if cooked further (I use a slotted spoon to fish them out).

Reduce the heat to medium high and add the onion and garlic, sautéeing them in the leftover pan fats until translucent. Place the bay leaves, cinnamon stick, red and yellow peppers, tomatoes, beef stock, beans and tomato paste into the pot and bring to the boil. Then add the chiles and the brisket to the pot; cover and leave to simmer for 4–4½ hours.

Gently pull the beef apart using 2 forks. Remove the bay leaves and cinnamon stick; add a little vinegar to brighten up the flavour, add the coriander and adjust the seasoning. Serve with avocado (or guacamole), tortillas, yoghurt and/or a green salad.

Brisket chili Brisket chili with avocado

Share this:

  • Tweet
  • Share on Tumblr

Like this:

Like Loading...

Chocolate Cake for Cheat Days

19 Wednesday Nov 2014

Posted by julia chews the fat in Cooking For Your Peeps, Sweet Tooth

≈ Leave a comment

I’ve always had a strained relationship with self-imposed dietary restrictions. I’m not the girl who’s likely to order the salad without a side, or the guest who’ll forgo the birthday cake. That said, I do think how and what each of us eats is a deeply personal choice. (It should go without saying that having that choice is a veritable luxury, considering how many people don’t have a choice when it comes to how and what they eat. But that’s another topic all together.) Ultimately, I don’t think there is a right way, or a wrong way of eating. Culture, upbringing, ethics, genetics, economics and personal preferences will in large part dictate our predilections for certain foods. The things I choose might not be the same as you, but as far as I’m concerned, that is A-ok.

Except, it seems, if you happen to be my boyfriend. And it’s pie season.

Roughly a month ago, the man in my life announced that he was adopting a diet – one based on a set of principles derived from this book. It’s essentially a high-protein, slow-carb regimen, where gluten is eliminated and sugars are kept to a bare minimum, replaced in large part by vegetables, meat, eggs, lentils and beans. Any grains (bread, flour, pasta, rice, corn, quinoa, farro, oats), fruit, alcohol, dairy, juice, sugars, and vegetables with a high glycemic index (potatoes, squash, beets, turnips) are not invited to the kitchen table. There’s certainly a lot more to it, but that’s the gist.

For someone who spends a lot of her free time reading, researching and talking about food, this announcement aroused the kind of visceral reaction you might expect.

10367607_10152767445700351_5293473938993278157_n

Despite the fact that this wasn’t something he was imposing on me, it still put me in a bit of a tailspin. What will we eat? How will we eat? Will our meals be separate? What if I want to put a drizzle of honey in the salad dressing? And so on and so forth. Something that had always represented sustenance, creativity, sharing and fun was suddenly reduced to its most basic parts – fuel and abstention, caloric intake and glycemic rates, “good” foods and “bad” foods. Given that I’ve never dreamed of using “food” and “metabolic absorption rate” in the same sentence, it was clear there was an immediate philosophical disconnect between me and this diet, something that manifested itself in quiet resistance from the sidelines as he measured his beans and popped his potassium pills. While I tried to see things in perspective and mitigate my apprehensions, it quickly came to my attention that I was, in fact, a card-carrying member of the Diet Debbie Downer Society, a shitty place to be when you want to be supportive of your partner who, for his part, is just trying to do something positive.

That was four weeks ago. From where I stand now, I can tell you this: it’s been an eye-opening process, one that, you’ll be happy to know, has been devoid of any of the catastrophic repercussions I’d initially imagined. It’s made me reflect on dietary choices and values, and the interconnectedness of the two. It’s forced me to confront and take stock of my own prejudices and approaches to food, and – perhaps not surprisingly – it’s also solidified some of my core beliefs. While I’m still working out some of the kinks – balancing my own beliefs and being supportive of his – I’ve begun to see things in a different light. I’m proud of his efforts and for taking on a challenge he believes in. We might not always be on the same page when it comes to this diet, but we’ve reached a rhythm.

To maintain our respective sanities, part of that rhythm includes something called CHEAT DAY, the one day a week when the diet is put on pause and he gets to eat whatever the hell he wants – the bread, the cheese, the sugar, the beer…any and all of it. He, very wisely, designated Saturday as “cheat day”, which means, amongst other things, Saturday can be chocolate cake day. Dense, boosy, debaucherous, chocolate cake day.

Hallelujah.

cake slice

Chocolate Bourbon Cake (makes one 9×5-inch loaf + smaller one) – adapted from Nigella Lawson’s How to Be a Domestic Goddess

Note: the recipe here uses dark chocolate instead of cocoa powder, creating a cake that is moist and dense at the centre, gently petering out to a lighter crumb on the outside. It might not be the prettiest confection on the block, but it’s a good back-pocket recipe to have in your repertoire. It’s rich, but not heavy; sweet, but not overly so. The coffee and booze hum along nicely in the background – barely perceptible, but still there, taking things from PG to PG-13. The cake is great on its own (and a perfect companion to tea or coffee), but would also be nice with a glaze or frosting, should you feel so inclined.

Ingredients
1 cup soft unsalted butter
1 2/3 cup dark brown sugar
1 1/3 cup all-purpose flour
1 teaspoon baking soda
1 teaspoon sea salt (such as Maldon or Fleur de sel)
2 large eggs
1 tablespoon vanilla extract
4 ounces bittersweet chocolate, melted using a bain marie
2 tablespoons bourbon
1 cup freshly brewed coffee

cake ingredients

Directions

Note: The key to that lovely, fudgey interior is baking time – take care not to overbake.

1) Preheat the oven at 375°F. Line a 9×5-inch loaf pan with parchment paper (no need to cut it to make it fit – the excess paper can spill over the sides). Do the same thing with a smaller loaf pan (or butter a muffin tin).

2) Cream the butter and sugar with electric hand-held mixer (a wooden spoon works too).

3) Meanwhile, whisk together the flour, baking soda and salt. Set aside.
Add the eggs and vanilla to the butter-sugar mixture and beat until combined.
Next, fold in the melted and slightly cooled chocolate, taking care to blend well but being careful not to overbeat. Add the bourbon and mix to combine.

4) Next, gently add the flour mixture alternately spoon by spoon with the coffee until you have a smooth and fairly liquid batter.

cake batter

5) Pour into the lined loaf pan, being sure to leave about an inch from the rim, so that the batter doesn’t overflow as it bakes. Pour the excess into the smaller prepared pan. Bake 30 minutes. (at this point, the smaller pan can be removed). Turn the oven down to 325 degrees and continue to cook for another 10-15 minutes. The cake will still be a bit moist inside, so an inserted cake tester or skewer won’t come out completely clean. Allow to cool completely before turning it out onto a cooling rack. (The texture gets even better if the cake has had a day to rest.)

cake slice cut

Share this:

  • Tweet
  • Share on Tumblr

Like this:

Like Loading...

Pizza Party

06 Thursday Nov 2014

Posted by julia chews the fat in Cooking For Your Peeps, Lunch & Dinner

≈ 7 Comments

It feels weird typing the word party, seeing as I’ve spent the better part of the last five days wrapped in a comforter giving myself sinus massages (as sexy as it sounds) and mouth-breathing my way through a string of bad nights’ sleep. It smells of menthol throat lozenges and tiger balm, and the windows have steamed up from all the bathing, de-congesting and water-boiling going on. It’s a real mess over here. And let me tell you – just in case there was any doubt – there’s

no

party

in sight.

On the up side, I got to have popcorn for dinner last night. And between my migrations from the bed to the couch and back, I’ve made a considerable dent in that book my brother gave me, alongside a handful of Toast of London episodes. The perks of being sick are slim, but if popcorn for dinner and a moustached Matt Berry are included in the deal, I’ll certainly take them.

But let’s return to the title of this post, which makes no sense now that I’ve written two paragraphs about being indisposed, laying on the couch. Here’s what you need to know:  prior to feeling like total hell, I’d planned on sharing couple of pizza recipes with you. I’d like to make good on that plan. Because I like you. And I think you would agree that having more pizza in your life can’t possibly be a bad thing. The three you see below were made for a small pizza party we threw for my mom on her birthday. Contrary to our regular family get-togethers, where, without fail, we end up soiling every pot and pan in the cupboard, my aim was to do something simple and pared-down. In other words, with minimal use of kitchen tools and involving tasks that I could easily delegate to my close of kin. (except mom – she shouldn’t have to lift a finger on her birthday, unless she’s lifting her pinky to sip a martini. I think she would agree.)

Below you’ll find two pizza recipes – one veggie, one not. While both use onions, their flavours are worlds apart – in one recipe they’re caramelised beforehand and in the other, they’re thrown on raw. The recipe for the crust is not included because, to preserve my sanity, I bought the dough. (if you live in Quebec, Au pain doré sells good quality dough in little, round, frozen portions.) Since there are very few players involved in these pies, I must emphasise – as your resident food snob – that the quality of the ingredients is paramount. If you’re at the store, hovering over the cheese counter, hesitating between Parmigiano-Reggiano and a cheaper knock-off, allow me to be the voice of reason to shake you out of your stupor: QUIT BEING A DOLT AND BUY THE GOOD STUFF. When it comes to Parmesan, it’s just not worth screwing around. Besides, it’s not that much more expensive when you think about it. And a thin dusting of the good stuff will make all the difference in terms of flavour. Your pizza will return the favour by being drop-dead delicious.

One thing before you scroll down to the recipes: they might seem long and daunting, but they really aren’t. I promise. There’s a good dose of slicing, chopping and grating involved, but nothing that your assigned delegates (an unsuspecting brother or sister-in-law) can’t handle. Supply them with a glass of wine ahead of time and they’ll most certainly oblige. Also – the caramelised onions and tomato sauce can be made in advance, so keep that in mind.

Ok, now go channel your inner pizzaiolo and start spinning out some pizza pies, lovely readers. (and repeat after me: Parmigiano-Reggiano, Parmigiano-Reggiano, Parmigiano-Reggiano…)

mise en place pizza pizza + salad

Prepping pizza dough: if you’re using frozen dough, it will generally need about 8 hours to defrost/rise. It’s not a big deal, just remember to pull the dough out of the freezer ahead of time to let it thaw and rise. To ensure a crisp crust all the way through, my mom’s trick is to par-bake the dough. Here are the steps:

1) Preheat the oven to 400°F and lightly oil & flour a circular, 14″ pizza tray.

2) Lift up the dough and work it a little around your fists. No need to work the dough as ferociously as these guys, just enough to form a small, flat disc.

3) Put the disc of dough at the centre of the baking tray and work it outwards, until it reaches the edges. Try to make the edges a little thicker than the centre.

4) Place the pizza tray in the oven and bake the dough until golden, flipping once halfway through (10 mins total).

Fontina, Fennel and Onion Pizza – makes ones 14” pie

– about 1 lb pizza dough, thawed if frozen
– 1/2 bulb of fennel, finely sliced (reserve some of the fronds for garnish)
– 4 oz. fontina cheese, grated (about 1/2 cup)
– about 1/4 cup finely grated Parmigiano-Reggiano (I like to use a microplane)
– good quality olive oil (i.e the best you can afford)
– balsamic vinegar to serve (optional)

For the caramelised onions:
– 1 medium yellow onion, finely sliced
– 1 red onion, finely sliced
– knob of butter
– splash of olive oil
– pinch of sugar
– pinch of salt
– splash of vermouth (optional)

To make the onions (this can be done up to 2 days ahead): set a large pan on medium-high heat. Add the butter and oil. Once the butter gets nice and foamy, add the onions and stir to coat. Sweat the onions; once they start to become soft and transluscent (about 2 minutes), turn down the heat to medium, add the pinch of sugar and salt. Stir and allow to caramelise slowly, stirring occasionally (about 20-30 minutes). Once the onions are dark and caramelised, add a splash of vermouth and allow the liquid to evaporate completely. Store at room temperature if serving soon after, or store in the refrigerator for up to 2 days (p.s this stuff is great on pasta, crostini, in sandwiches, on eggs…so go nuts with the leftovers.)

Making the pizza:

Spread a layer of the caramelised onions on the pre-baked pizza crust (which is still on its baking tray); add the parmesan, fennel and fontina; drizzle with a little bit of olive oil. Bake in a 400°F oven for about 20 minutes, or until the cheese is golden and bubbling. Remove from the oven and finish with a thin drizzle of balsamic vinegar. Garnish with reserved fennel fronds and serve.

Escarole Bacon Pizza – makes ones 14” pie

– about 1 lb pizza dough, thawed if frozen
– 3/4 cup-1 cup homemade tomato sauce (click here a quick one)
– 1 red onion, finely sliced
– 1 clove garlic, pressed or finely chopped
– 3 cups escarole, roughly chopped
– 6 slices bacon, cooked until just crisp and roughly chopped
– about 1/2 cup finely grated Parmigiano-Reggiano (I like to use a microplane)
– good quality olive oil (i.e the best you can afford)

Making the pizza:

Spread a layer of the tomato sauce on the pre-baked crust (which is still on its baking tray) and half of the parmesan; add the garlic, red onion slices, bacon, escarole and the other half of the parmesan; drizzle with a little bit of olive oil. Bake in a 400°F oven for about 20 minutes, or until the escarole has wilted and the cheese is toasty. Serve straight away.

Share this:

  • Tweet
  • Share on Tumblr

Like this:

Like Loading...

Learning from Scratch

21 Sunday Sep 2014

Posted by julia chews the fat in Breakfast & Brunch, Cooking For Your Peeps, The Basics, Vegetarian

≈ 2 Comments

Like most kids, my brother and I spent our childhood and pre-teen years pleading for junk food. Fruit Roll-Ups, instant noodles, soda, Corn Pops – we wanted ALL of it. My mother, bearing the brunt of these junk food solicitations (“But everyone at school has them! Come onnnnnnn.”), was often the one who had to give the hard-line “no”. Despite all the begging and pleading (and possibly crying?), she stuck to her guns, filling the cart with items that were far removed from the world of high fructose corn syrup and red dye no.5.

Today, I’m thankful for her resolve. I didn’t know it at the time, but my mom was trying to instill in us the importance of eating well, and more specifically, eating well at home. Apart from the occasional night out or birthday party at the local St-Hubert BBQ (chicken fingers! fries! bright pink dipping sauce!) or Pizza Hut (stuffed-crust Hawaiian! all-you-can-eat ice cream bar!), dinner, lunch and breakfast in our house was largely homemade. It was never something that, as a kid, I considered a luxury; it was just the way things were (plus, I still had my eye on those Fruit Roll-Ups). But as an adult, I look back on that time and realise how inconceivably lucky we were. Boeuf bourgignon, whole roast chicken, roast beef with Yorkshire puddings; hand-rolled perogis, homemade pasta, spanakopita, pilafs, patates dauphinoises; minestrone, split pea, tortellini and French onion soups; coffee cakes, bundt cakes, layered birthday cakes and strudel; sticky baked beans, omelettes, tea biscuits and blueberry pancakes on the weekend. This is just a glimpse of the dozens of different dishes mom has made for us and others over the years. And while all this was considered everyday food in her mind, it goes without saying that we ate like kings.

It shouldn’t be a surprise then to learn that my mom was the one who first introduced me to cooking. She taught me how to make a quick cheat’s buttermilk and wrap fresh herbs in cheescloth to make a bouquet garni. She’s shown me how to stuff and truss a turkey, wrangle a pot roast, whip meringue into stiff peaks, blanch and “shock” vegetables and throw together a killer pancake batter from scratch in two minutes flat. She introduced me to the terms deglaze, dredge, al dente, mirepoix, roux, bain-marie and taught me that the secret to perfect Christmas stuffing is found in a Simon and Garfunkel song. You can still catch her humming it, off-key, while she’s rummaging through the spice rack at Christmastime.

Mom’s always been at ease in the kitchen, whipping around from stovetop to fridge to pantry and back again in a blur of focused energy. She’s been fundamental to my culinary education and, when I call her in the middle of a kitchen meltdown, is still keen to answer my questions about oven temperature, butter conversions, baking alternatives and expiry dates. All the while, she’s encouraged me to be bold in the kitchen and to improvise when a recipe goes awry right before the guests arrive. Most importantly though, she’s shown me how food can be an expression of love, something that becomes so much more when it’s shared.

—–

Another thing my mother has tried to instill in us is the importance of birthdays – to take the time to celebrate them, preferably with a bottle of bubbly or, failing that, a dry martini. And food. There has to be food.

Today I want to take a moment to wish my mum a very happy birthday. We’re never quite sure how you manage to do it all, but thank you for all of it.

Love you with all my heart.

Me & mumMom’s Blueberry Pancakes – makes approx. 10-12

In our house, pancakes were never from a box, but always made from scratch and served with real maple syrup – from a tree, not from Aunt Jemima.

recipepancake prep

1 1/3 cups flour
1 tsp salt
3 tsp baking powder
3 Tbsp sugar
3 Tbsp vegetable oil
1/2 tsp vanilla
1 egg
1 1/4 cup milk
1/3 cup fresh (or frozen) blueberries

Directions

Set a pan on medium heat.

Mix dry ingredients and add the blueberries, tossing them to coat. In a separate bowl, beat the egg; add oil, vanilla and milk to the egg. Make a well in the dry ingredients and slowly add the egg-milk mixture. Stir quickly until the ingredients are just mixed and the batter is still lumpy.

Once the pan is hot, add a lump of butter. When the butter starts to bubble, add ladlefuls of batter to the pan. Cook until little bubbles start to form on the top, then flip.

Note: You can keep the pancakes in a low oven to keep them warm while the others cook.

Blueberry Pancakes Blueberry Pancakes Blueberry Pancakes

Share this:

  • Tweet
  • Share on Tumblr

Like this:

Like Loading...

Peach Upside Down Cake

06 Saturday Sep 2014

Posted by julia chews the fat in Cooking For Your Peeps, Sweet Tooth, Vegetarian

≈ 3 Comments

It starts to get dark before dinner time; the outdoor pools are officially closed; the local ice cream parlour is readying its “See You Next Year!” sign. These are the annual harbingers that make us want to close our eyes, stick our fingers in our ears and go “la la la la la…I can’t heaaar you”. But, as we know, resistance is futile; whether we like it or not, we just have to suck it up, accept that summer’s days are numbered and put away the tan shorts.

Instead of hyperventilating at the prospect of losing the days of warm sunshine, late sunsets and Bo-bec’s mint chocolate chip, I’ve decided to focus on the last few gems of summer. After working my way through many pints of tiny, sweet blueberries and strawberries from Saint-Jean-sur-Richelieu over the last couple of weeks, I’ve been putting in some time with Ontario peaches, which are not only still available, but also still fragrant and lusciously sweet.

Last weekend, after an afternoon of prepping food for a family barbecue, I noticed that there were a few peaches hanging out in the fruit bowl, verging on overripeness. Figuring that a family barbecue would be a good occasion for cake, I pulled one together with the help of Ina Garten (not the person, but the recipe), with the sole purpose of using up the peaches slowly expiring on my countertop. What emerged was something that far surpassed my expectations – a tender, fluffy upside down cake, crowned with a layer of syrupy peaches. It was delectable. So much much so, that it had my grandmother, brother, and sister-in-law were raving about it for days later. (which, let’s be honest, is supremely gratifying to the home baker.)

Happy end of summer, lovely readers. Be sure to make it a sweet one.

Peach Upside Down Cake

Peach Upside Down Cake – adapted from Ina Garten

  • 3/4 stick unsalted butter, room temperature (plus extra for greasing the dish)
  • 5-6 ripe peaches cut in half, pitted and sliced
  • 1 cup granulated sugar (for the caramel)
  • 3/4 cup granulated sugar (for the cake)
  • 2 large eggs, room temperature
  • 1/3 cup sour cream
  • 1/2 teaspoon grated lemon zest
  • 1 teaspoon pure vanilla extract
  • 1 cup plus 2 tablespoons all-purpose flour
  • 1/2 teaspoon baking powder
  • 1/4 teaspoon kosher salt
  • Confectioners’ sugar

Directions

Preheat the oven to 350 degrees F. Generously butter a 9-inch glass or ceramic pie dish and arrange the peach slices in a circular pattern at the bottom of the dish.

050

Combine 1 cup of the granulated sugar and 1/3 cup water in a small saucepan and cook over medium-high heat until it turns a warm amber colour, about 360 degrees F on a candy thermometer. Swirl the pan but don’t stir. Pour evenly over the peaches. (Be careful not to burn the sugar – or yourself – while doing this. Caramel tends to quick more quickly near the end, so keep a close eye on things.). As it sets, the caramel will stiffen, like candy – don’t worry, it will become syrupy again as the cake bakes in the oven.

062

065

Meanwhile, cream the 6 tablespoons of butter and the remaining 3/4 cup of granulated sugar in the bowl of an electric mixer fitted with the paddle attachment, until light and fluffy. Lower the speed and beat in the eggs one at a time. Add the sour cream, zest, and vanilla and mix until combined. Sift together the flour, baking powder, and salt and, with the mixer on low speed, add it to the butter mixture. Mix only until combined. Pour the cake batter evenly over the peaches.

Batter

Batter

Batter

Bake for 30 to 40 minutes, until a cake tester comes out clean. Cool for 15 minutes, then invert the cake onto a flat plate. If a peach clings to the baking dish, ease it out and place it back in its spot on the top of the cake. Serve warm or at room temperature, dusted with confectioners’ sugar.

Peach Upside Down Cake

Share this:

  • Tweet
  • Share on Tumblr

Like this:

Like Loading...

Mr. Van De’s Amaranth Leaves & Some Stupidly Delicious Noodles

20 Wednesday Aug 2014

Posted by julia chews the fat in Cooking For Your Peeps, Cooking Solo, Lunch & Dinner

≈ 4 Comments

Amaranth leavesIn case you’re wondering, these are amaranth leaves. They’re cultivated from a bushy, wild-looking super plant that grows grains, flowers and leafy greens. Until a couple of weekends ago, this would’ve looked like nothing more than a tousled mess of purple and green to me. But then I met a man by the name of Van De, who, amongst other things, taught me a thing or two about amaranth.

I’d like you to meet him.

Mr. Van De operates a small kiosk – two flip-out tables worth – at the Atwater food market. For the record, I’ll be quick to say that Atwater is not my go-to hunting ground for food. Demographic shifts have caused its products to become more expensive, fancier, chi chi. You can buy overpriced chutneys from England or artisanal squid-ink noodles from Sardinia or pineapples shipped all the way from Costa Rica. I’d much rather have rows of produce, piled high in front of ruddy vendors with dirt under their fingernails hawking their wares, and usually gravitate towards markets that are raucous and a little rough around the edges – places where you can hear belly-laughs and vendors yelling and old ladies bargaining; places where people of different colours, sizes and tax brackets mingle in the same space.

Ultimately, I’m there for the show as much as I’m there for the food.

In an ideal world, markets are places where you can also have a chat with the producers – the ones who’ve had their hands in the muck, so to speak. It might sound clichéed, but in my romantic ideals of what a good food market should be, its shining star is the producer who knows their product inside and out and is eager to cut you off a slice.

And this brings us back to Mr.Van De, because Van De is that kind of producer. It’s what makes him the MVP of Produce at the Atwater market – a place I rarely visit, until a few Sundays ago, when I had to pick up bread for a family get-together and Atwater was the closest spot. While I carefully dodged the droves of manicured ladies, I came across Van De’s little kiosk – his tables were laid out in front of a beat-up van with its doors flung open, exposing large vats of leafy produce. He’s literally selling stuff out of the back of his truck. Who IS this guy? I’d never seen him before, but I liked him already.

As it turns out, Van De specialises in Asian vegetables and sprouts, which he grows, without the use of pesticides, just 25 km outside the city. Stacks of bitter melon, pennywort, amaranth leaves, Vietnamese celery and watercress are laid out beside eachother in self-serve bins. It was like being at a candy store for grown-ups. When he saw me eyeing some bright green sprouts, he picked some out of the bin for me to try. Tenez, madame, essayez. Intensely bitter, but also nicely acidic and grassy, I later found out that out that they were rau đắng, an herb that looks like sunflower sprouts and is used mainly in Vietnamese soups and sautées. When I ask for small bag, he’s quick to inform me that they’re to be eaten in small quantities, preferably in the evening. This is a bit of a wink-wink, nod-nod moment, where he’s hoping I’ll catch his drift. But I don’t, and ask him why I have to be so careful. The word escapes him, so instead he begins gesticulating around his abdomen in a downward motion that can only be interpreted to mean that these tiny sprouts have powerful laxative properties. He looks me square in the eye, and with a wide grin asks, “Vous comprenez?” (Do you understand?). I nod appreciatively.

Mr. Van De – he looks out for you.

One additional advantage to Van De’s produce – the cherry on the sundae – is that it’s dirt cheap. I don’t remember exactly how much I paid for my sprouts and greens, but if I think it was something like 1$/100g. And when he saw how excited I was with all my new loot, he went to the back of his truck and returned with two generous handful of amaranth leaves, adding them into my bag free of charge. He didn’t say a word about it; he just smiled.

—–

That extra handful of amaranth leaves ended up in the recipe below, even if I knew nothing about amaranth before this chance meeting with Van De. I just thought they looked interesting (which, because I’m nuts, always seems like reason enough to buy a food item. Ask me about that time I bought that bulb of jicama that sat on my counter for two weeks). So once I got home, I wasn’t really sure what to do with them, aside from spending an inordinate amount of time ogling their purply-green complexion. Mr. Van De suggested adding them to a broth for a simple Vietnamese soup, or blanching them in salted water to serve as a side dish along with rice and meat, which sounded nice. But I remembered a Thai-style noodle recipe I’d had my eye on from Mandy Lee’s Lady and Pups. It’s basically a saucy, spicy noodle dish made with rendered pork fat, crispy pork belly, bits of browned chicken, fried shallots and a bunch of curry seasonings, bound together with coconut milk to create a flavourful, salty-sweet slurry. The recipe itself doesn’t call for amaranth leaves, but after tasting them and finding that they were a little like spinach (with a slightly deeper flavour), I figured it couldn’t hurt to toss in a few chopped leaves into the sauce.

This is the kind of food that makes you go back for seconds (or thirds…) even when you feel you’re about to burst at the midriff. It’s saucy, slurpy, addictive, diet-annihilating food. Don’t be surprised if you make involuntary grunting noises while shovelling every last bite into your gob. I suspect Mr. Van De would approve.

Khao-Soi-Style Noodles with Mr. Van De’s Amaranth Leaves – adapted from Lady and Pups

The rendered pork fat (makes for 2-3 servings – you can freeze any leftovers):

  • 130 grams of pork fat-slab (ask your butcher)
  • 4-5 shallots, finely sliced
  • 1 head of garlic, finely minced
  • 1/2 tsp of salt
  • 1/2 tsp of ground white pepper

The curry + noodles (for 1 large serving):

  • 1 large handfuls of dried rice vermicelli (thick-cut)
  • 2 tbsp of the reserved pork fat
  • 80 grams of ground chicken
  • 1 tbsp of Thai yellow curry paste
  • 3/4 cup of coconut milk
  • 1/4 cup of chicken stock
  • 1 tbsp of fish sauce
  • 2 tsp of soy sauce
  • 1 tsp of grated ginger
  • 1/2 tsp of sugar
  • 1/2 tsp of curry powder
  • 1/4 tsp of freshly ground black pepper
  • 1 tbsp of finely chopped cilantro
  • 1 handful of amaranth leaves, chopped (can be substituted with spinach)

The garnishes:

    • pork crackling + fried shallots/garlic (see recipe above)
    • handful of Thai basil, torn into pieces
    • lime wedges
    • sambal olek

Making the pork crackling + rendering the fat:  Freeze the pork fat-slab until hardened (2 hours +). Cut into small diced pieces. Set a non-stick skillet or wok over medium heat and cook the diced pork fat until it has rendered out all its fat and becomes crispy and golden browned. Drain it through a fine sieve over a bowl, collecting the rendered fat. Season the pork crackling with salt and white pepper.

Rendered bacon

Return the pork fat to the skillet (about 1/2 cup) over medium-low heat, and add the sliced shallots.  Stir frequently and fry the shallots slowly until they are dehydrated, and turn medium-golden browned (about 10 mins). Drain them through a fine sieve, over a bowl, again collecting the rendered fat.  Season the fried shallots with salt and white pepper.

Return the pork fat to the skillet over medium-low heat.  Now add the minced garlic and repeat the same process. Drain the garlic as soon as they turn lightly-golden browned (3 mins). Season with salt and white pepper, and mix the seasoned pork crackling, fried shallots and garlic together.  Reserve the pork fat.

To make the noodles:  Bring a large pot of water to boil for the vermicelli.

Heat 2 tbsp of the reserved pork fat in a pot over medium-high heat.  Brown the ground chicken, then add the Thai yellow curry paste and cook for about 30 seconds.  Add all the seasonings and turn the heat down to medium-low, and cook until the mixture has reduced a little and thickened slightly (about 5 mins).  Add the amaranth leaves (or spinach) and cook 1-2 minutes or until just wilted (they will reduce substantially in size). Add the chopped cilantro and stir to combine.

Curry

Cook the vermicelli according to package-instructions. Rinse the noodles under cold water and drain well. Transfer to the pan with the curry mixture (which is still on medium-low heat). Toss to coat the noodles with the sauce and heat through.

Cooking noodles

Top with 3 tbsp of the pork crackling + fried shallots/garlic and torn Thai basil leaves.  Squeeze lime over all of it, stir, and shove generous forkfuls (or chopstickfuls) into your mouth.

Spicy noodles

Share this:

  • Tweet
  • Share on Tumblr

Like this:

Like Loading...

Rhubarb Fever

28 Saturday Jun 2014

Posted by julia chews the fat in Breakfast & Brunch, Cooking For Your Peeps, Sweet Tooth, The Basics

≈ Leave a comment

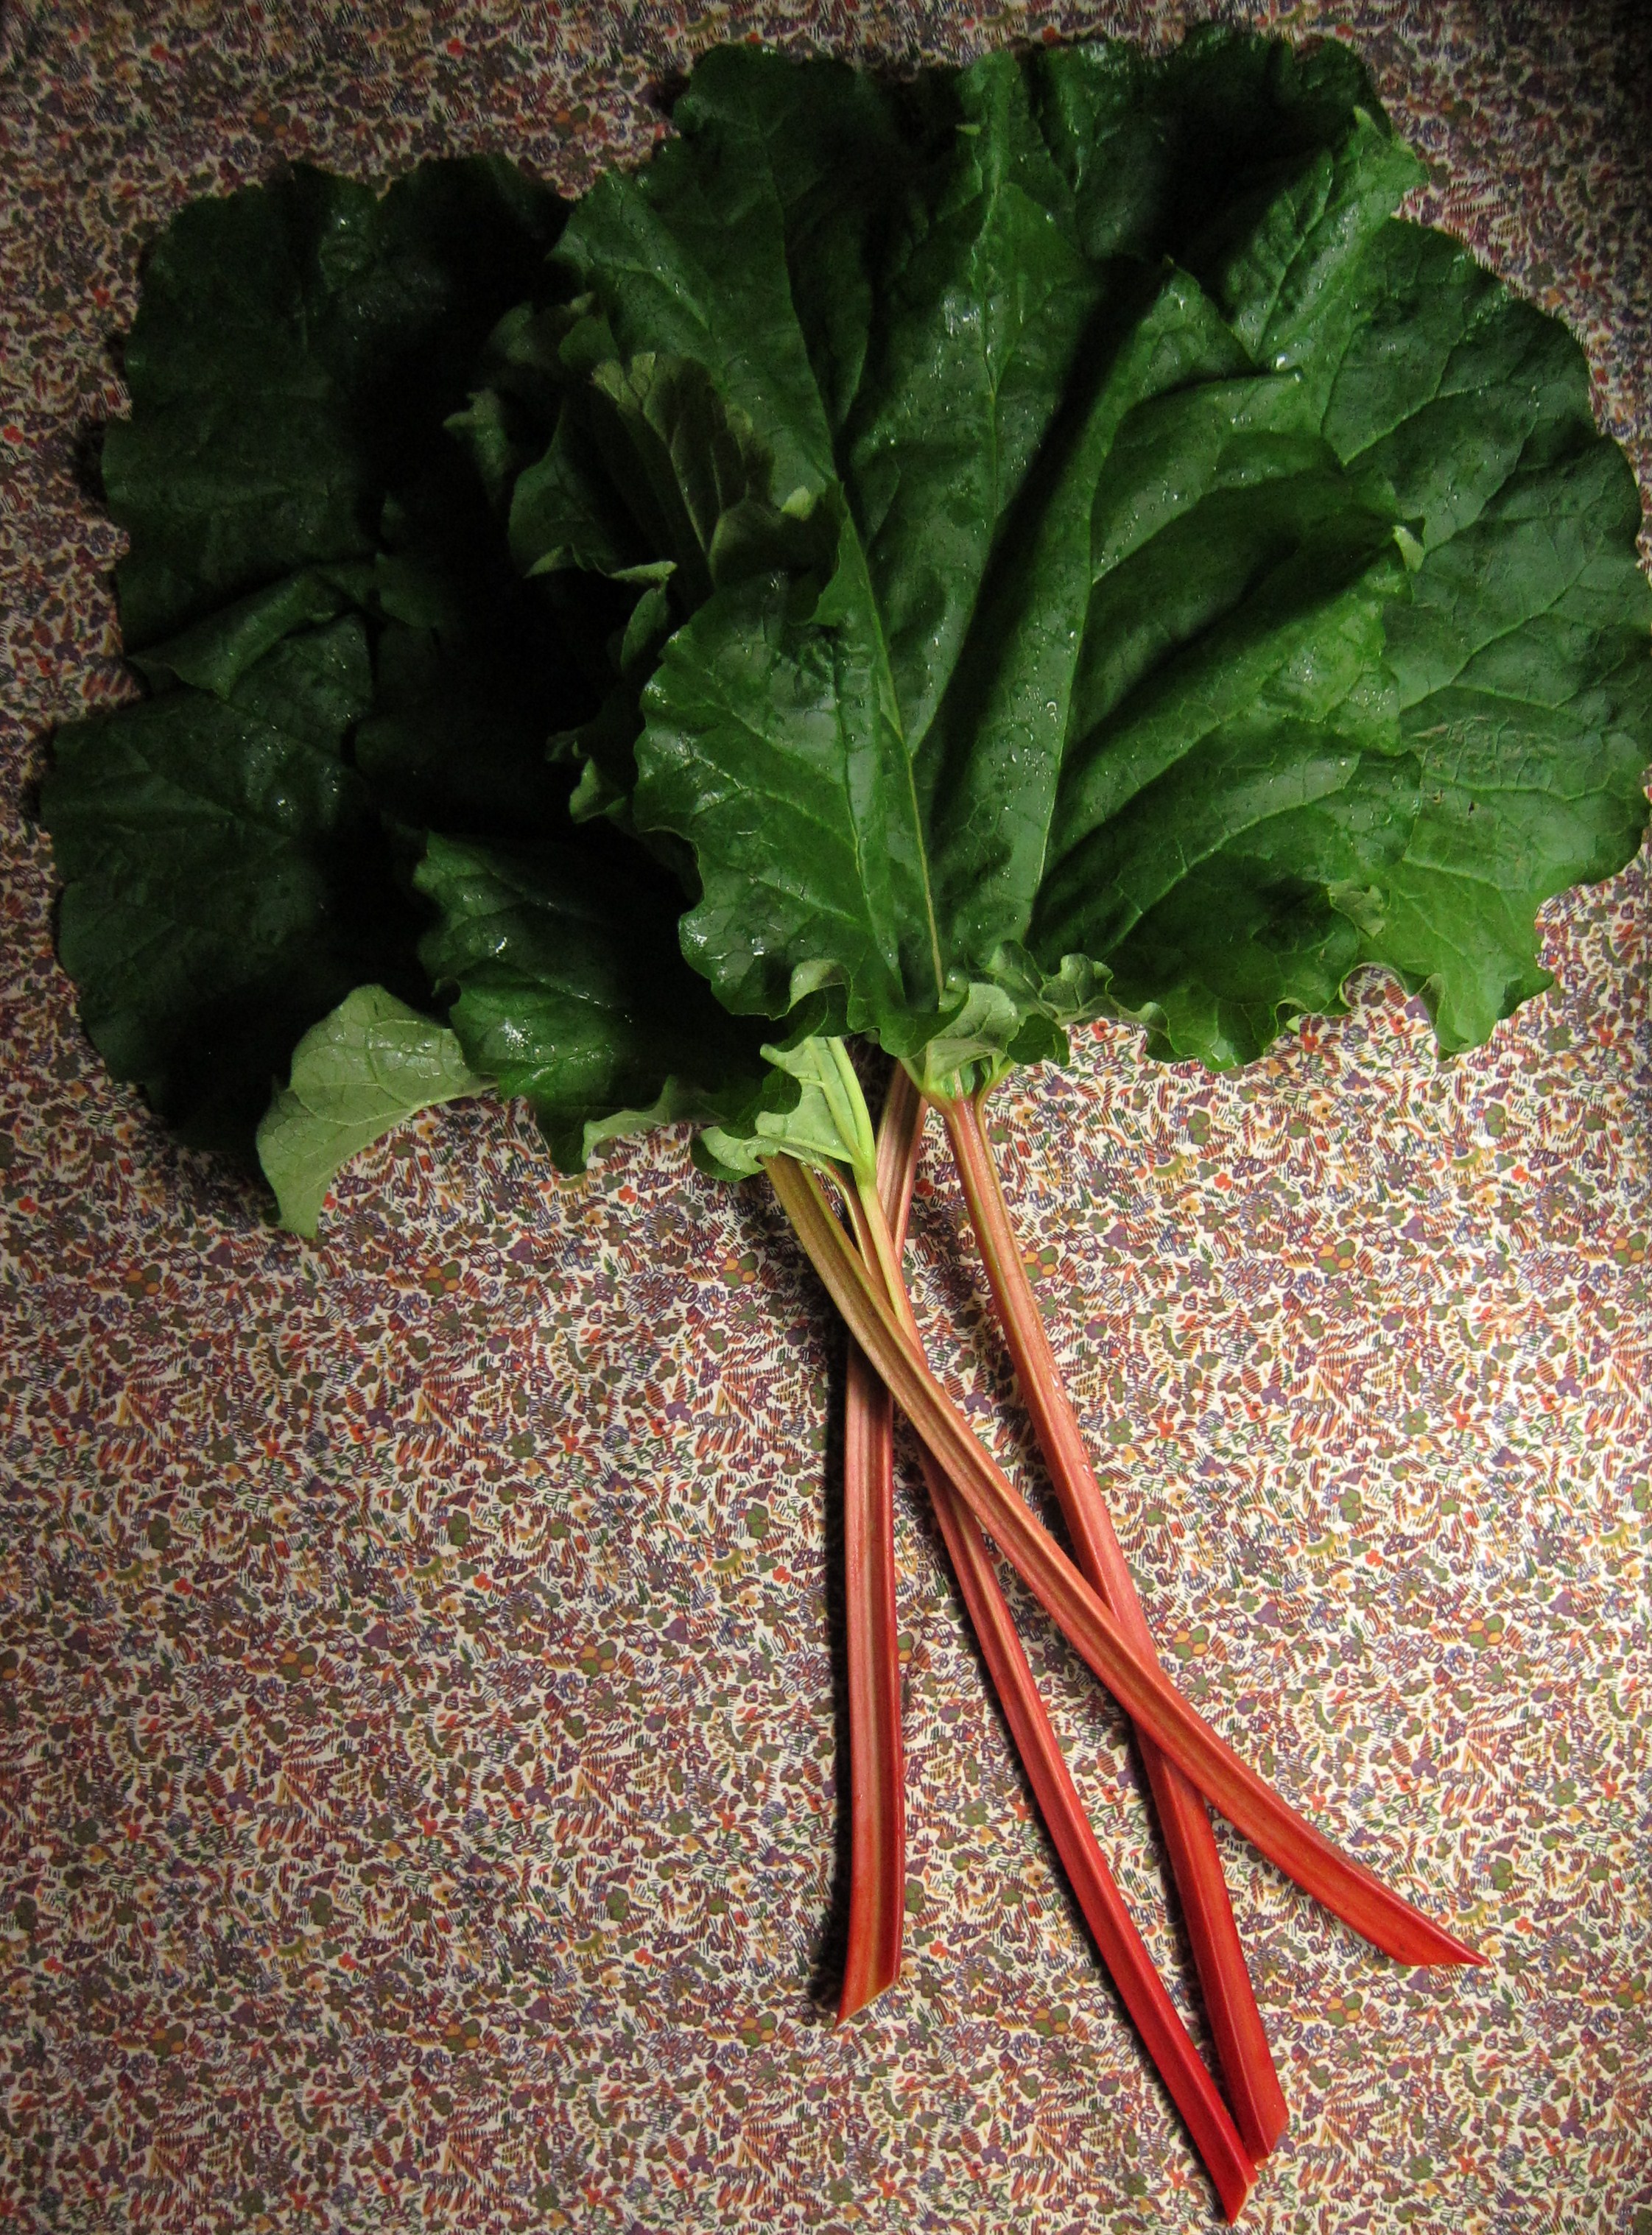
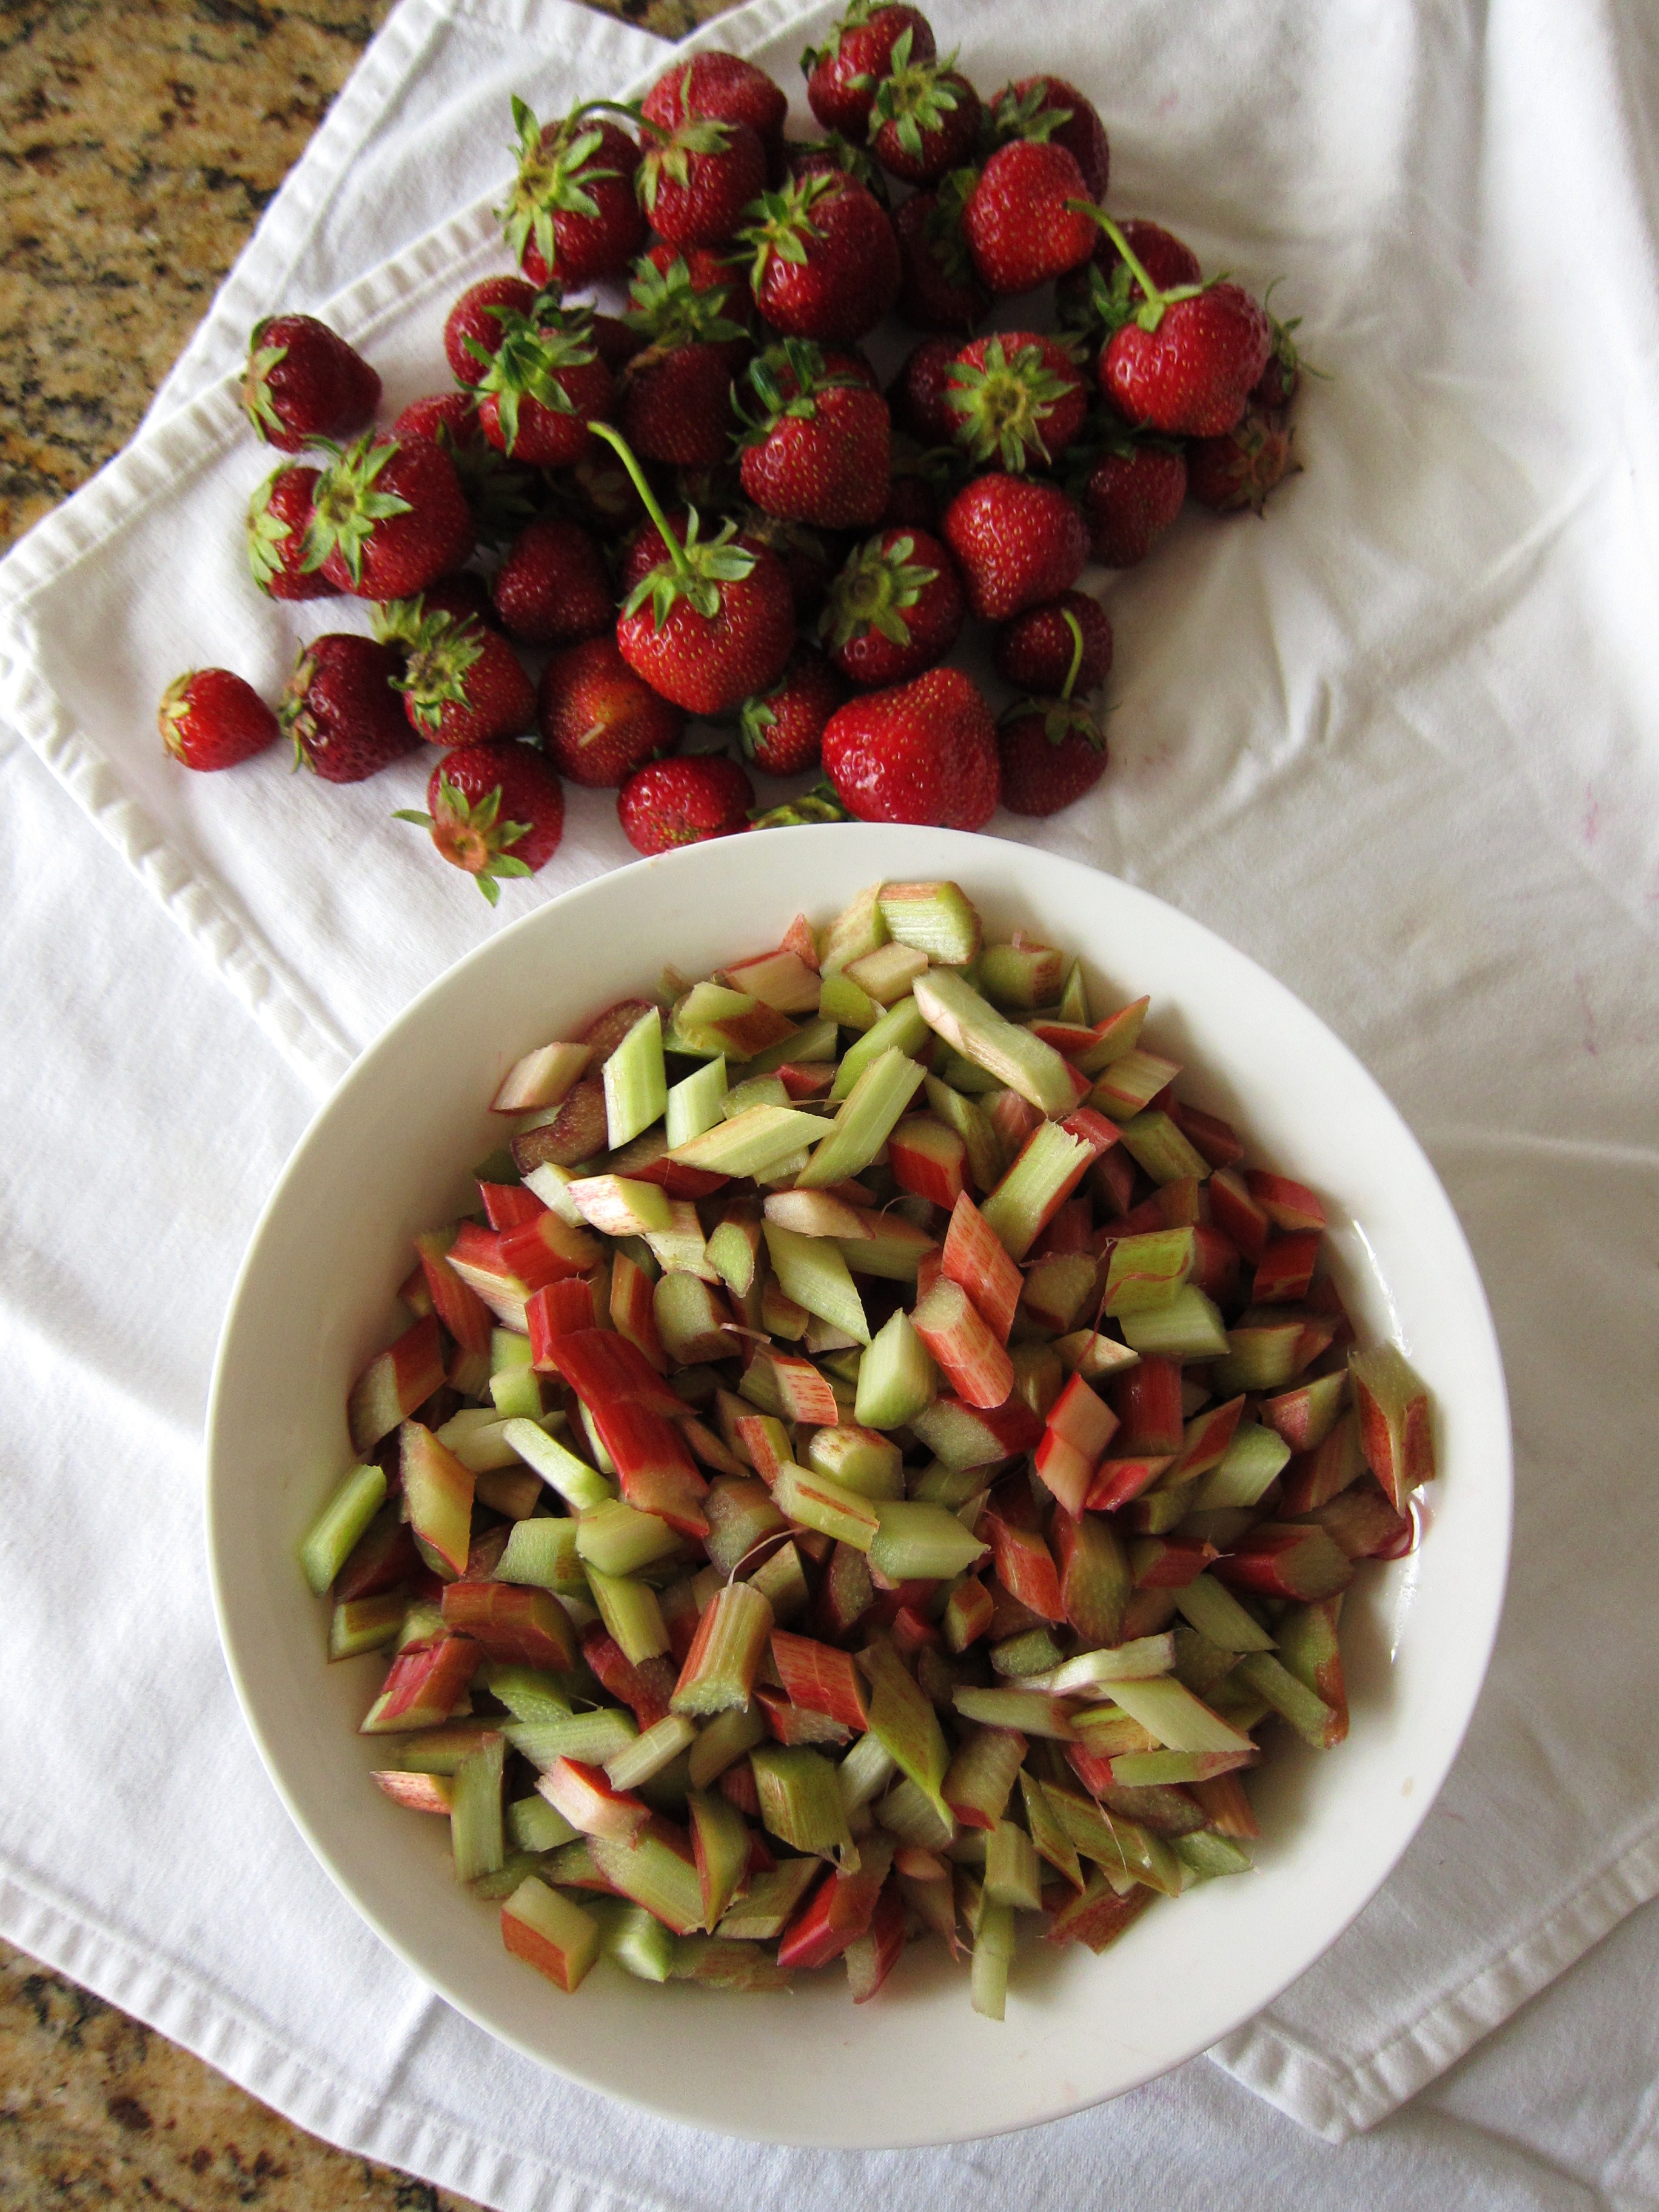
I was supposed to be sharing a cashew dipping sauce with you today. A really good one, at that. But rhubarb stole the limelight this week, showing up all over the place with its shockingly pink stems and massive, lush leaves fanning out like the feathers on a cabaret dancer. You can’t possibly say no to a vegetable that reminds you of a cabaret dancer, can you? I certainly can’t. Pretty rhubarb makes me go weak in the knees.

Rhubarb - naked

Like most things that only appear seasonally, rhubarb is one of those precious items you need to swipe up when you can, for however long you can. It’s appearance is sudden and ephemeral, only lasting a few weeks at the market in early summer. Then, the show’s over. The cabaret dancer goes home to rest until next year. It’s a fleeting affair, but all that more rewarding because of it. Knowing that you only have a small window of opportunity to enjoy rhubarb makes it a special, if not coveted, ingredient. This summer, I’ve been able to lay my hands on a considerable amount of home-grown rhubarb – some from the garden of my mom’s friend (hellooo, Lynn!) and some extracted from the little courtyard that sits between my building and the next one over. None of my neighbours seemed interested in it, so I helped myself to a few stalks. We’ll call it minimal urban landscaping.

Rhubarb plant 
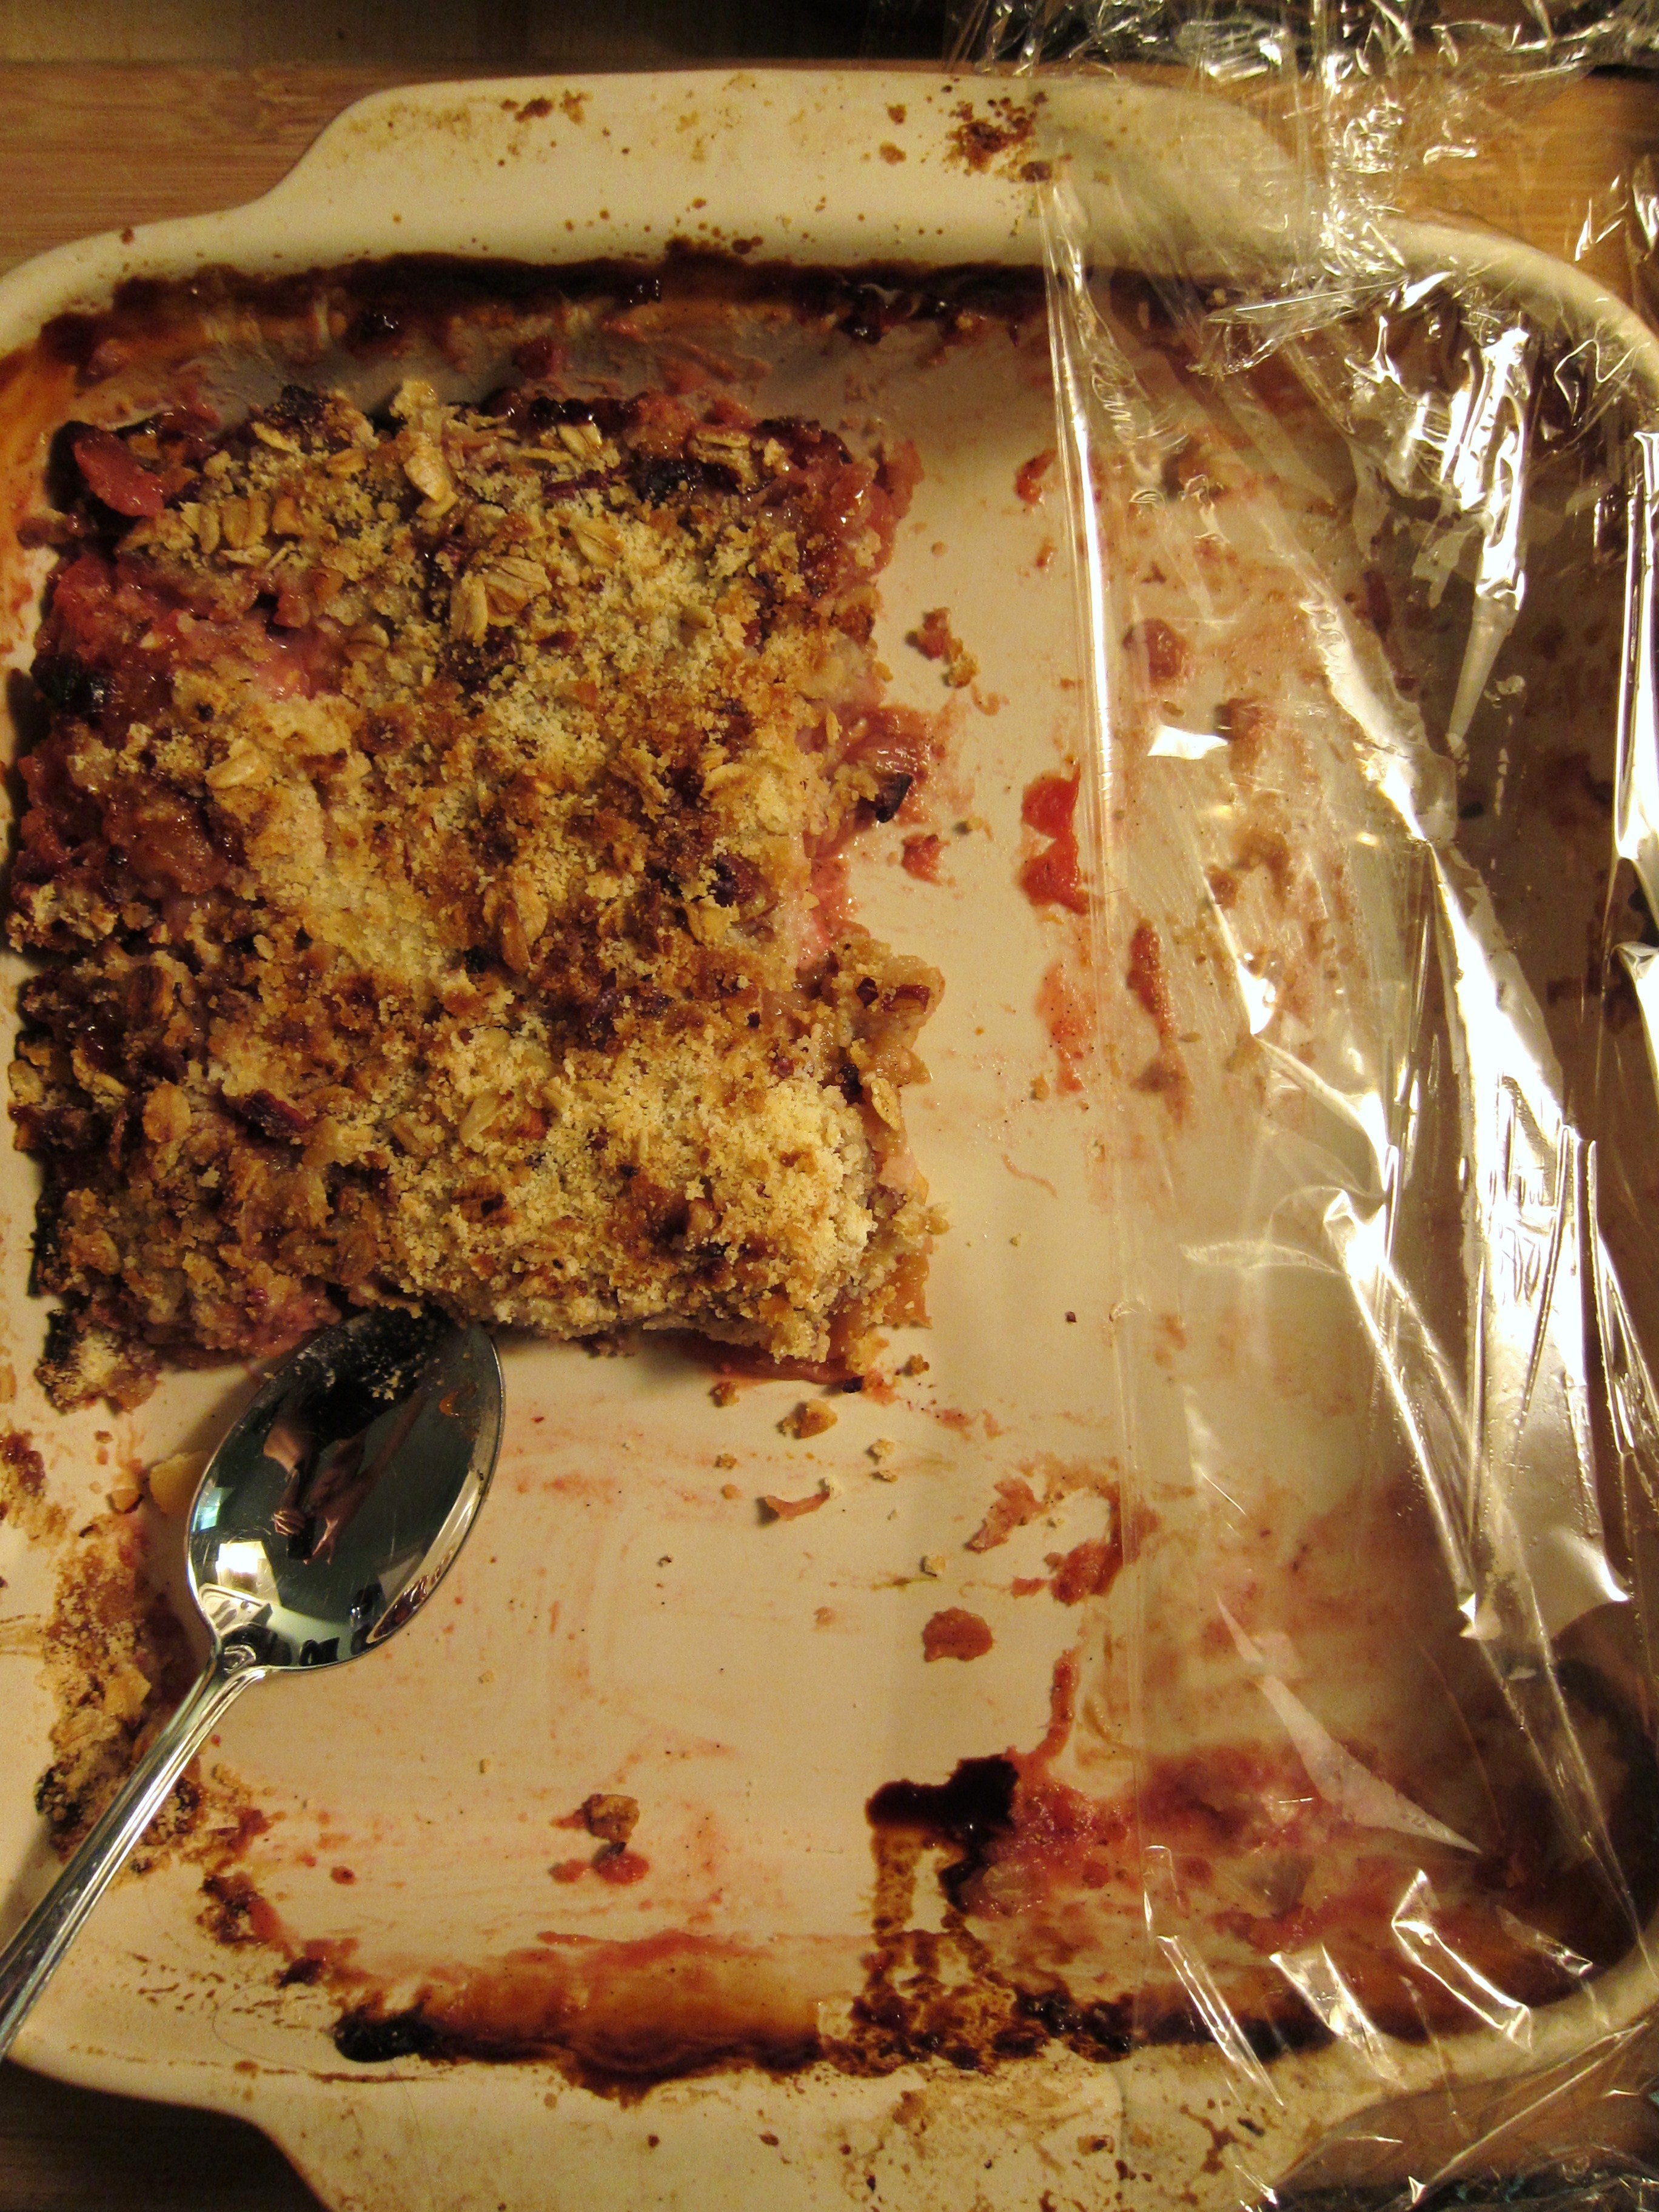
I did the first thing we all do with fresh rhubarb and made a crisp, one complete with the requisite strawberries, oats, walnuts and brown sugar. Nothing spectacular or exciting, but the fruit got nice and jammy after a long slow bake in the oven, blistering at the edges and spilling out at the sides. Crisps aren’t generally the most interesting of desserts, but I still make them from time to time. And when I get that first, still-warm mouthful of sweet-tart fruit with those crunchy, buttery oats, I’m reminded of how good crisps really are. Good in that wholesome, familiar, tuck-you-into-bed kind of way.

Rhubarb crisp

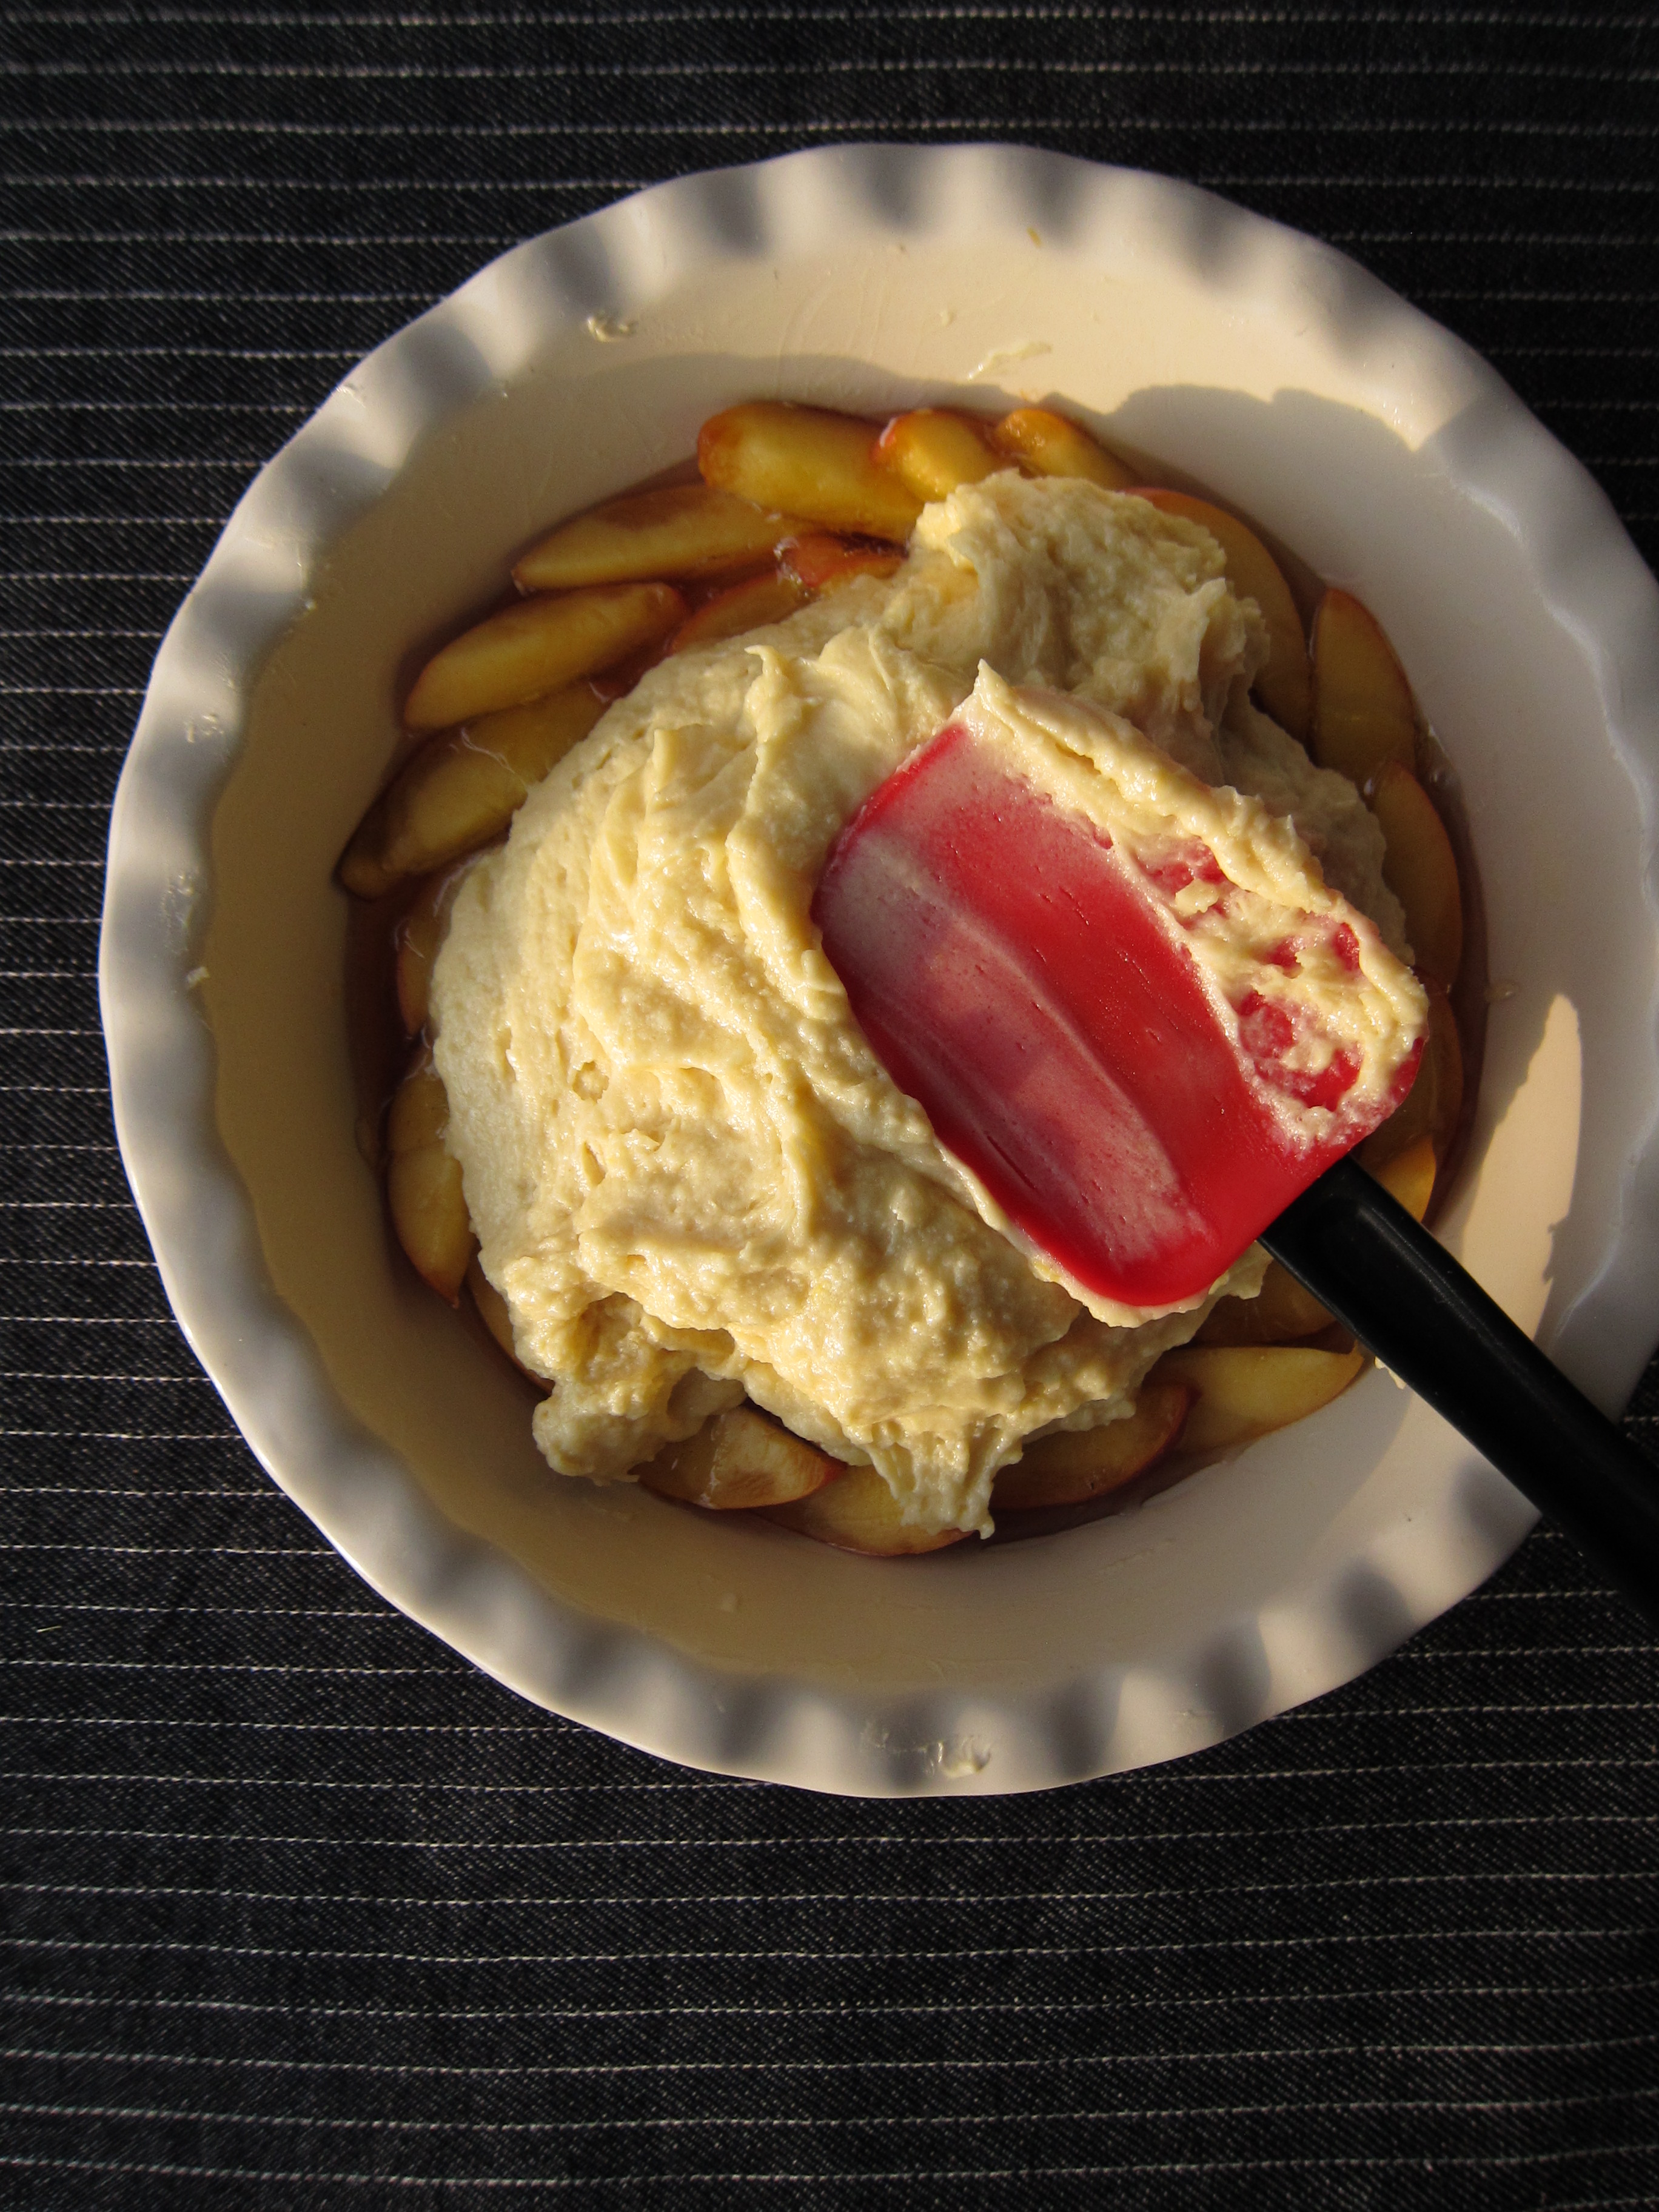
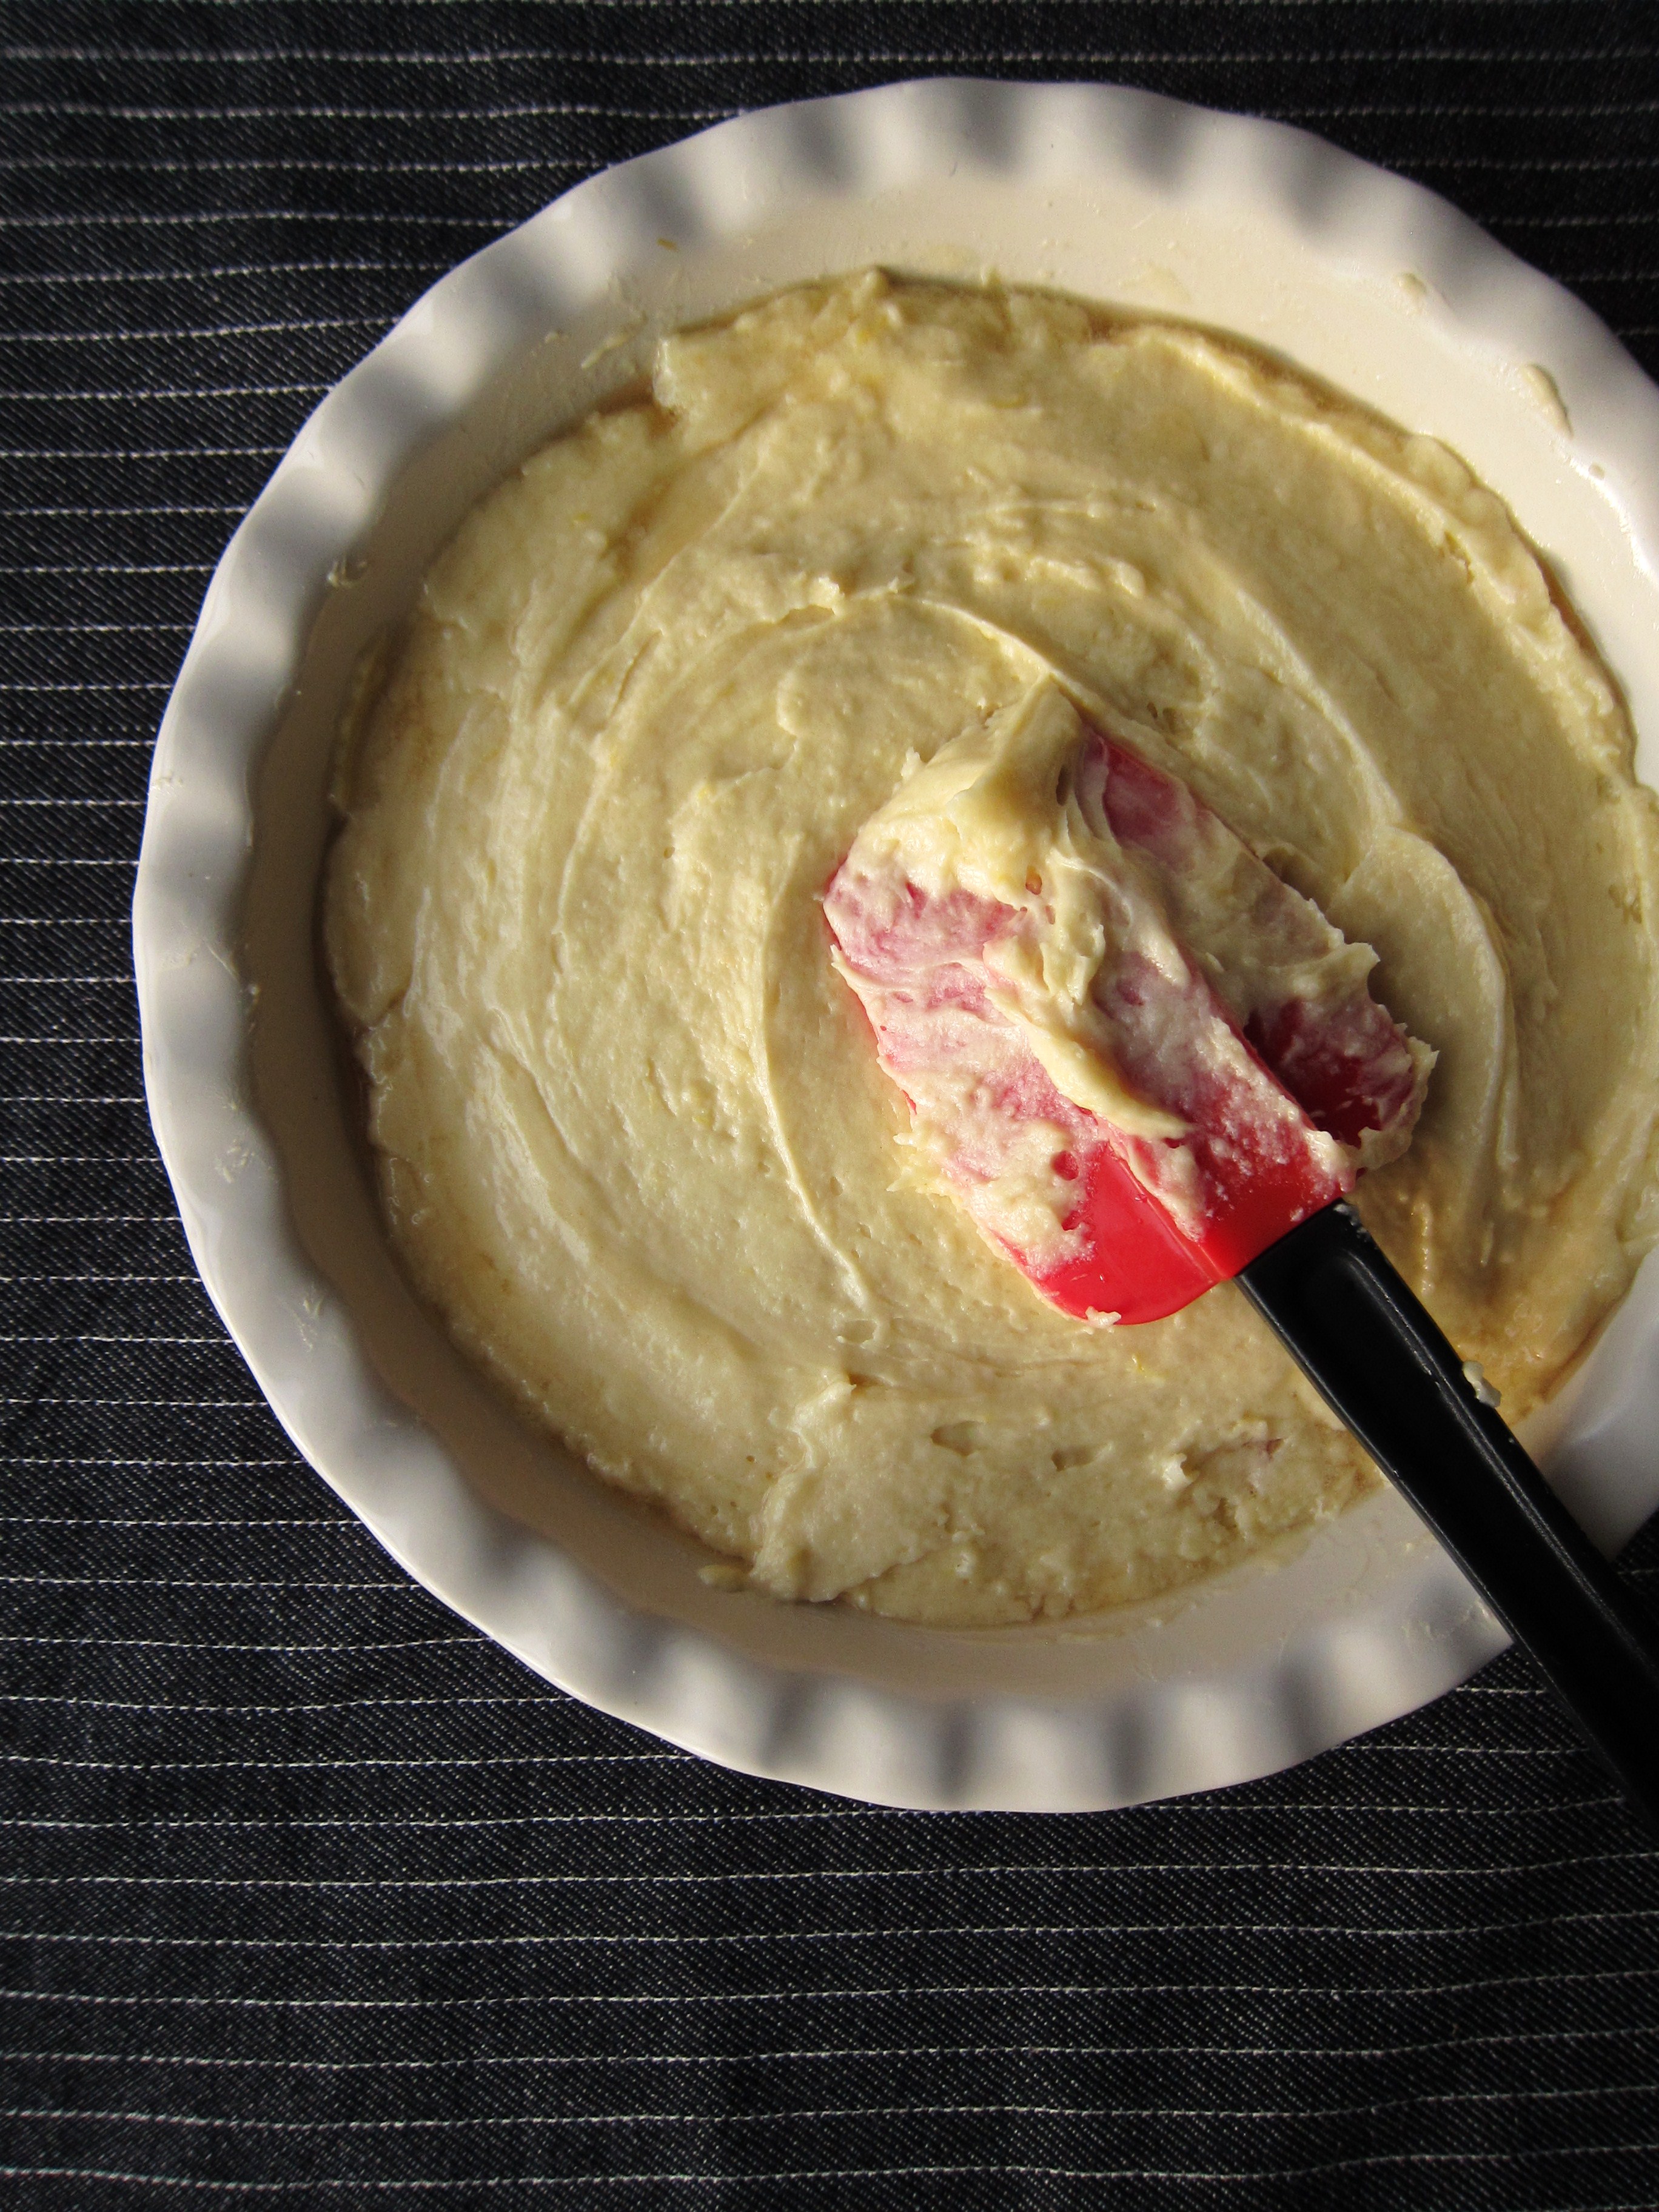
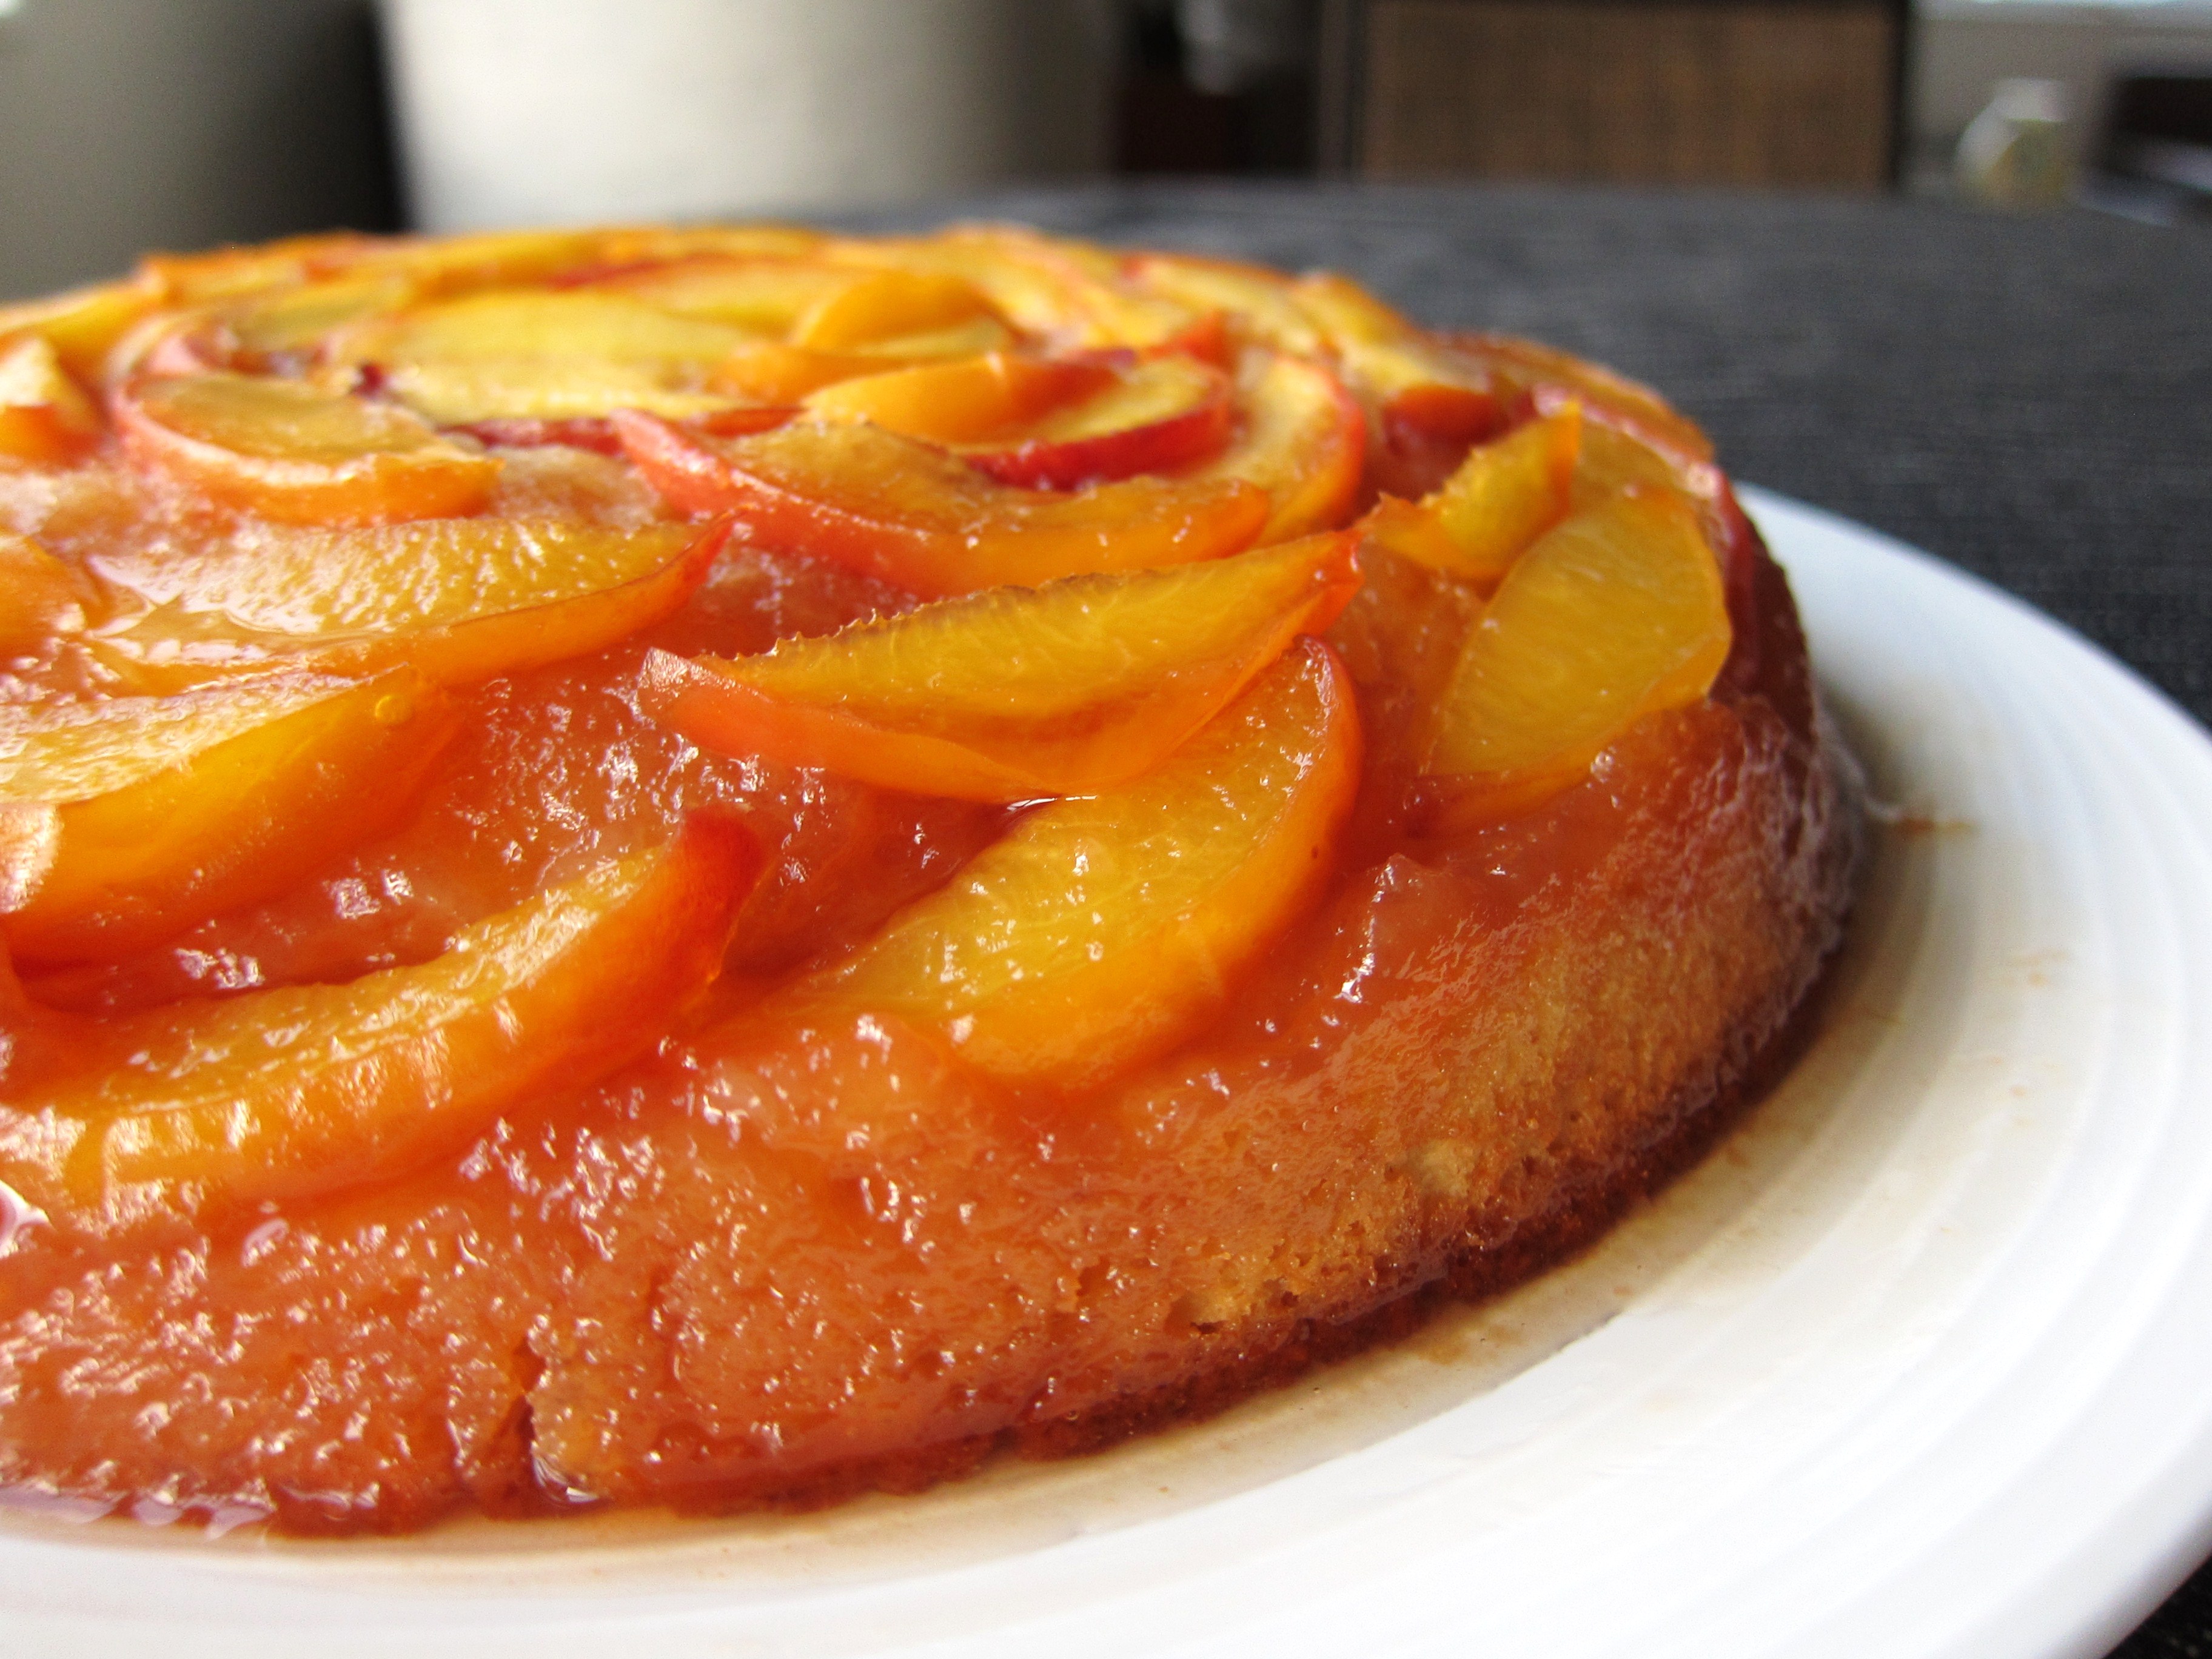
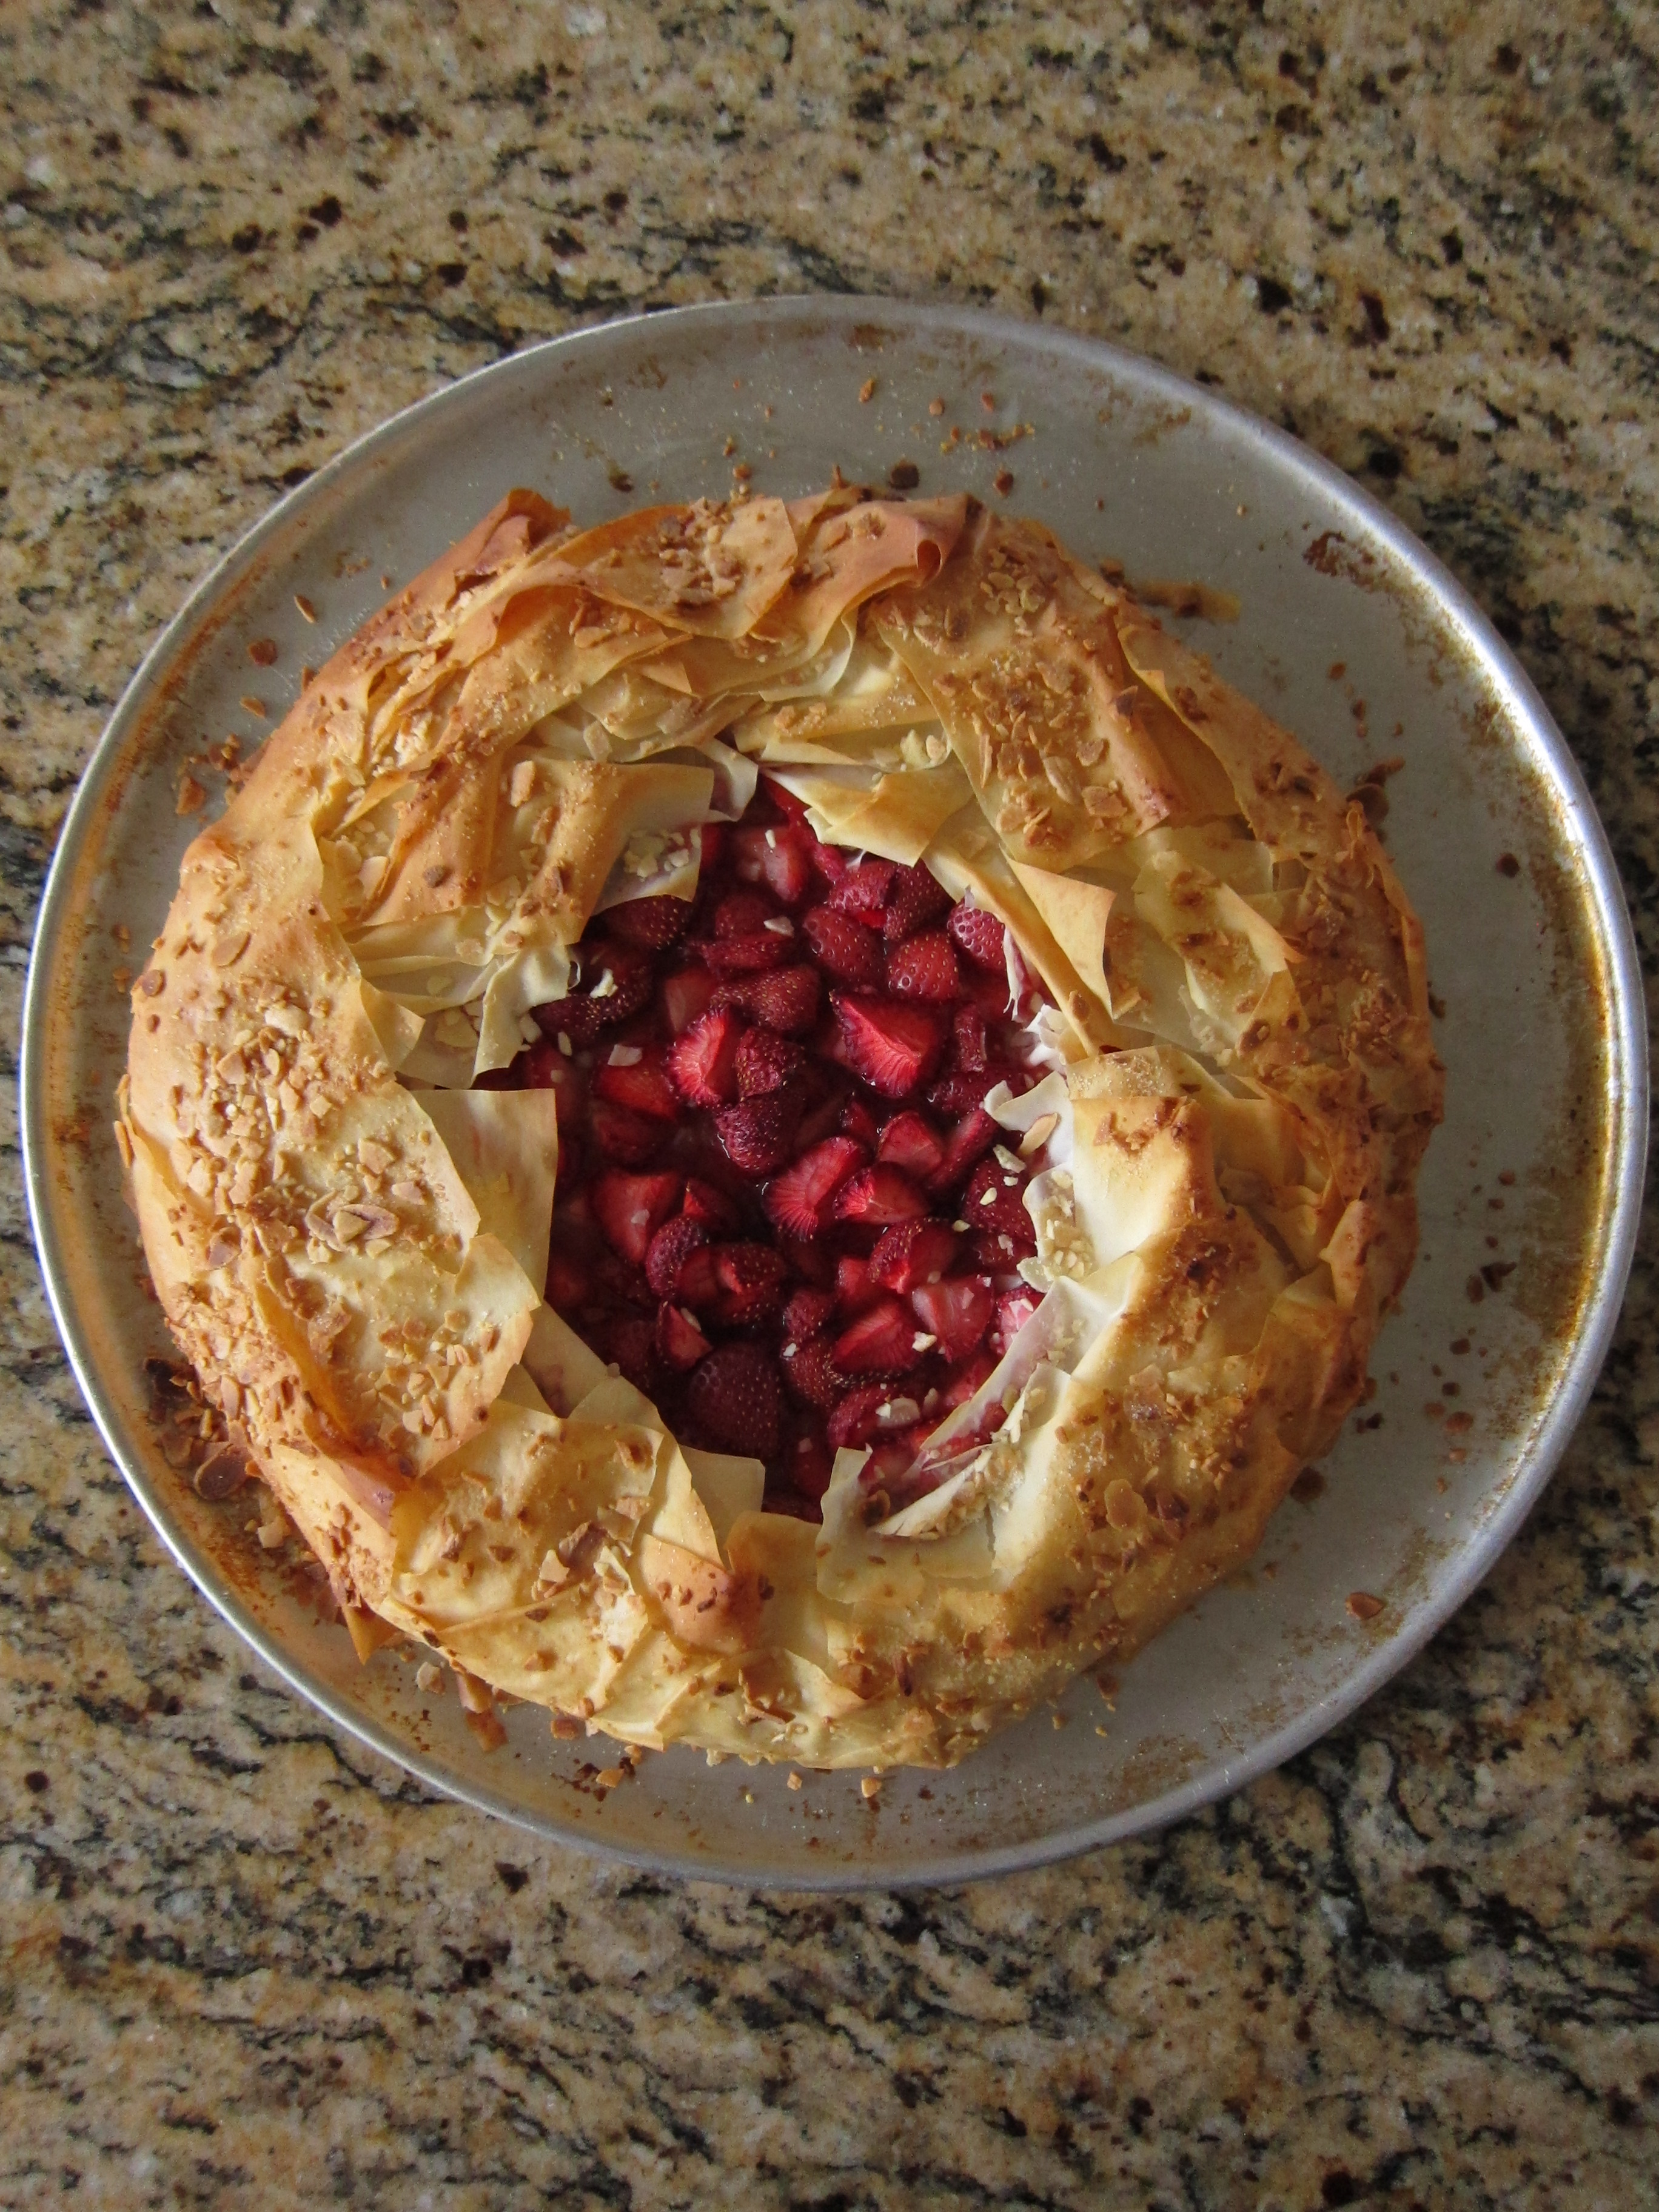
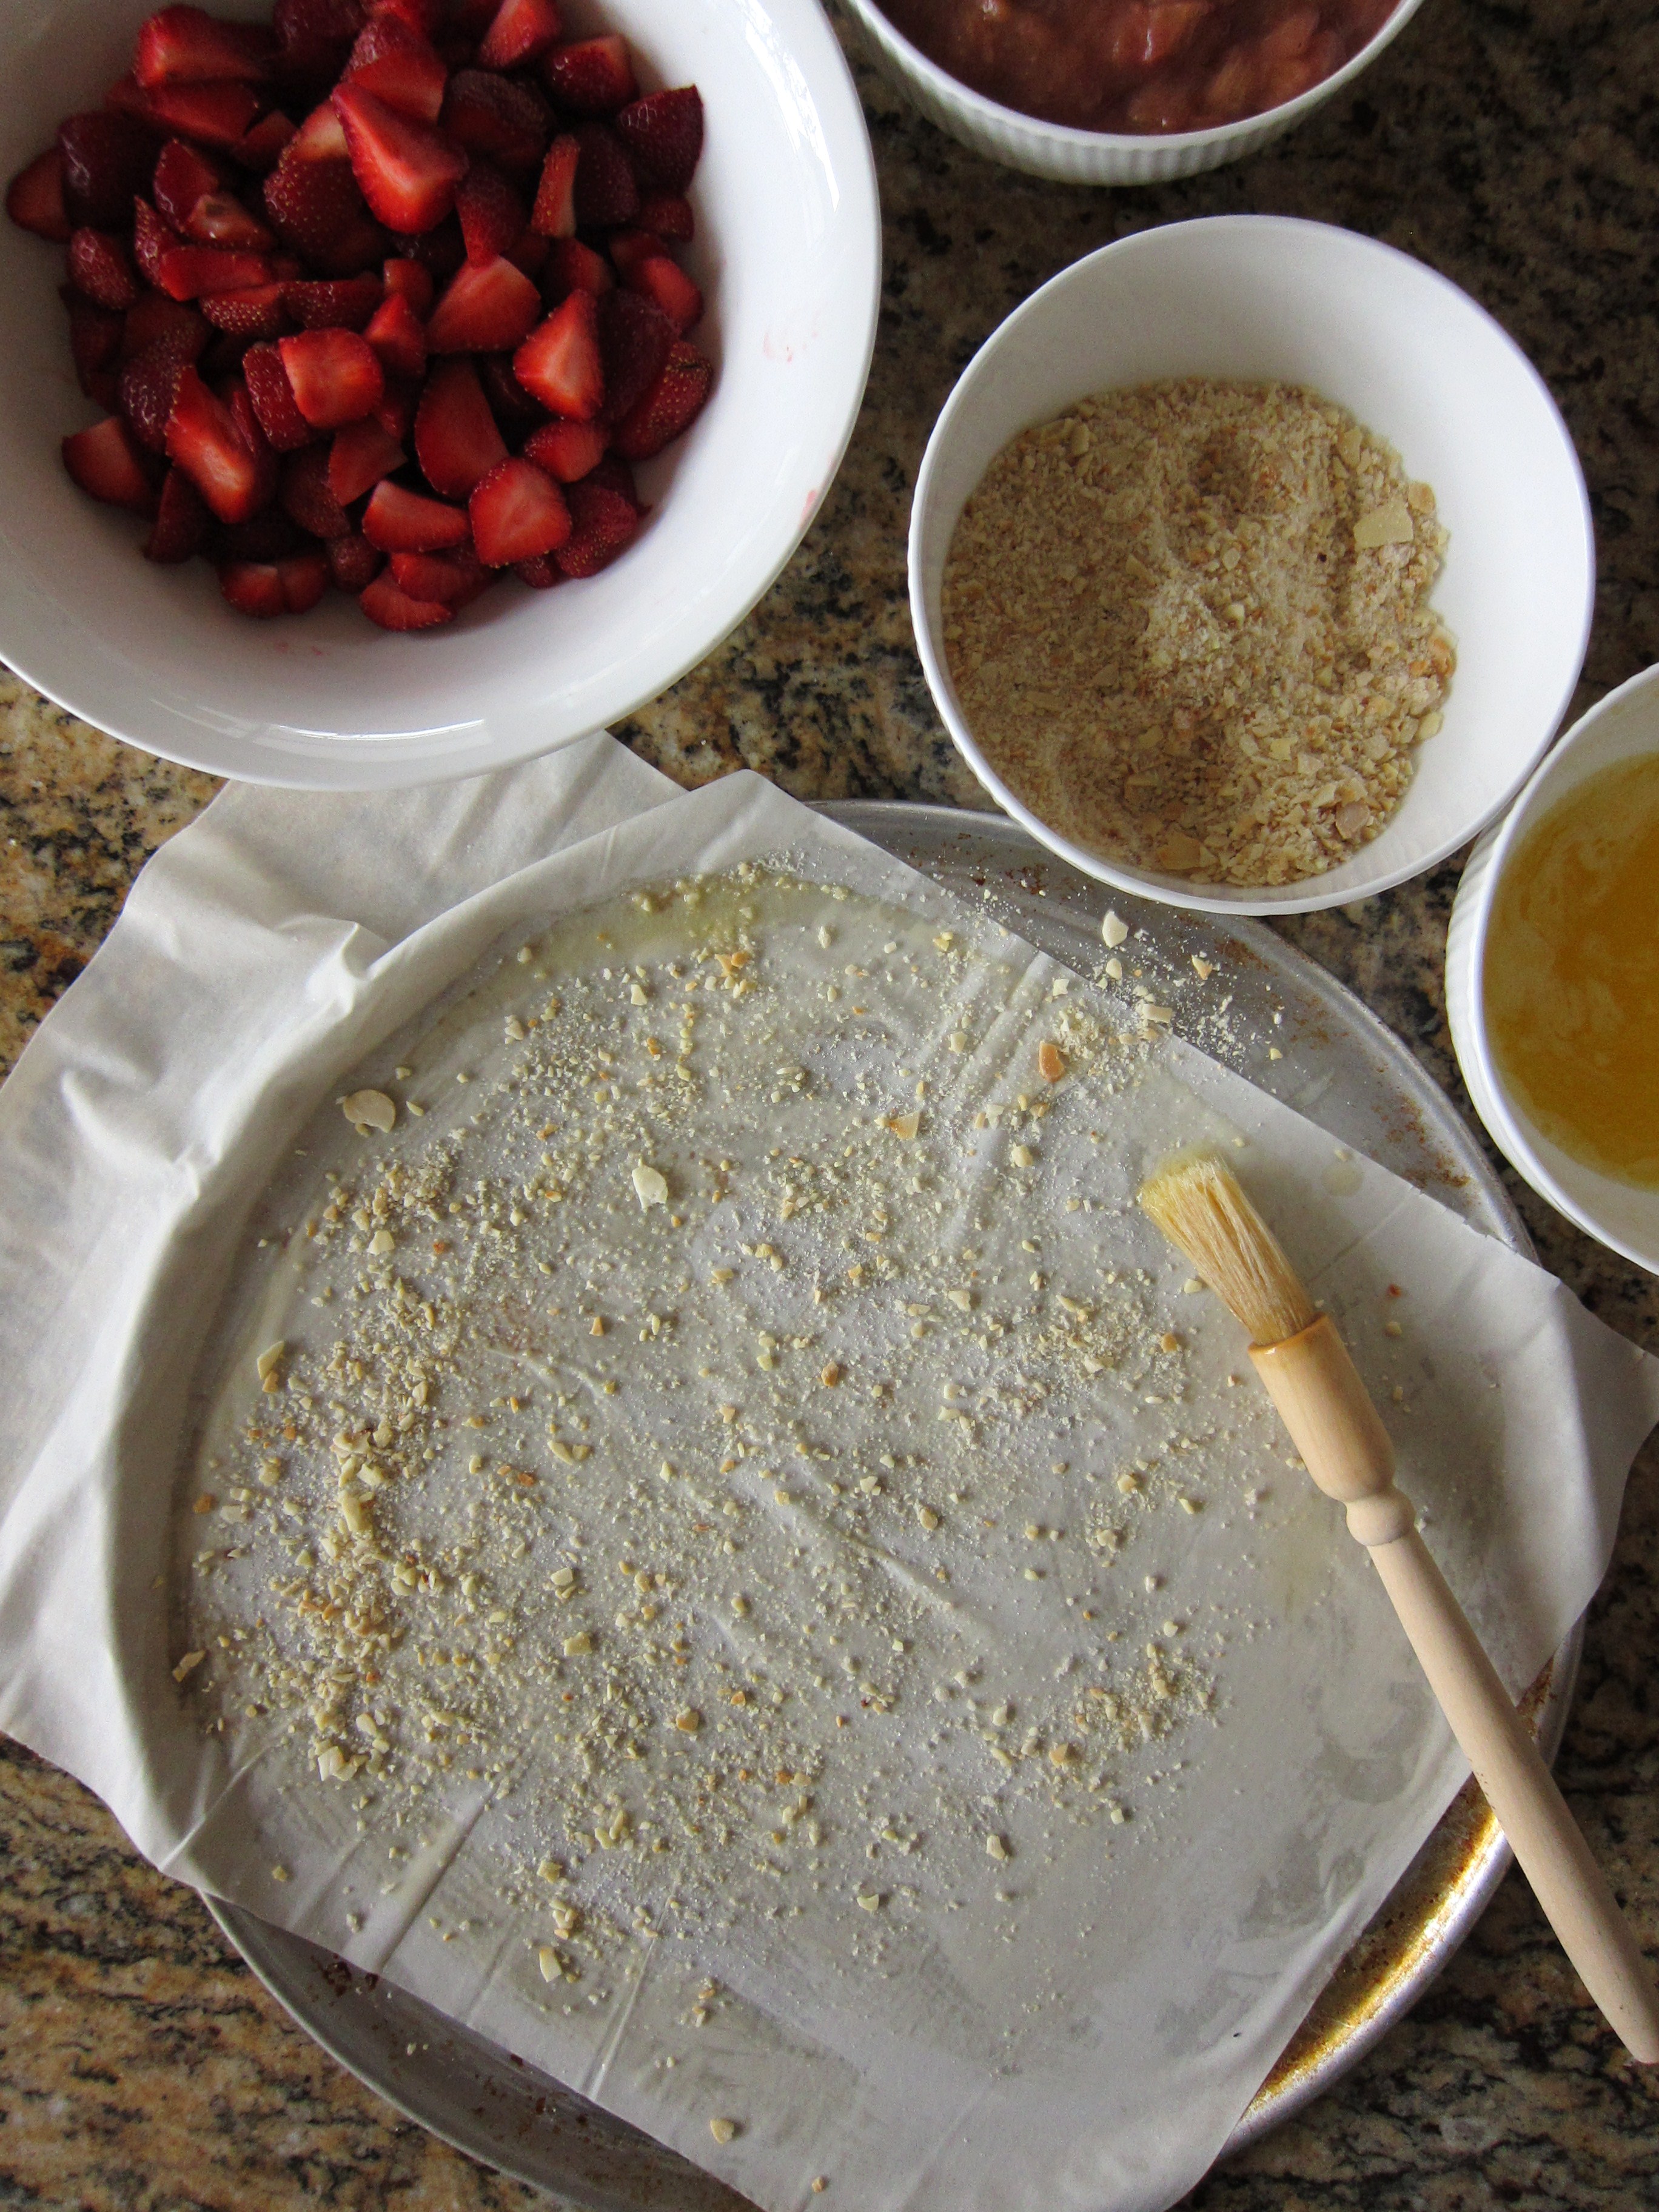
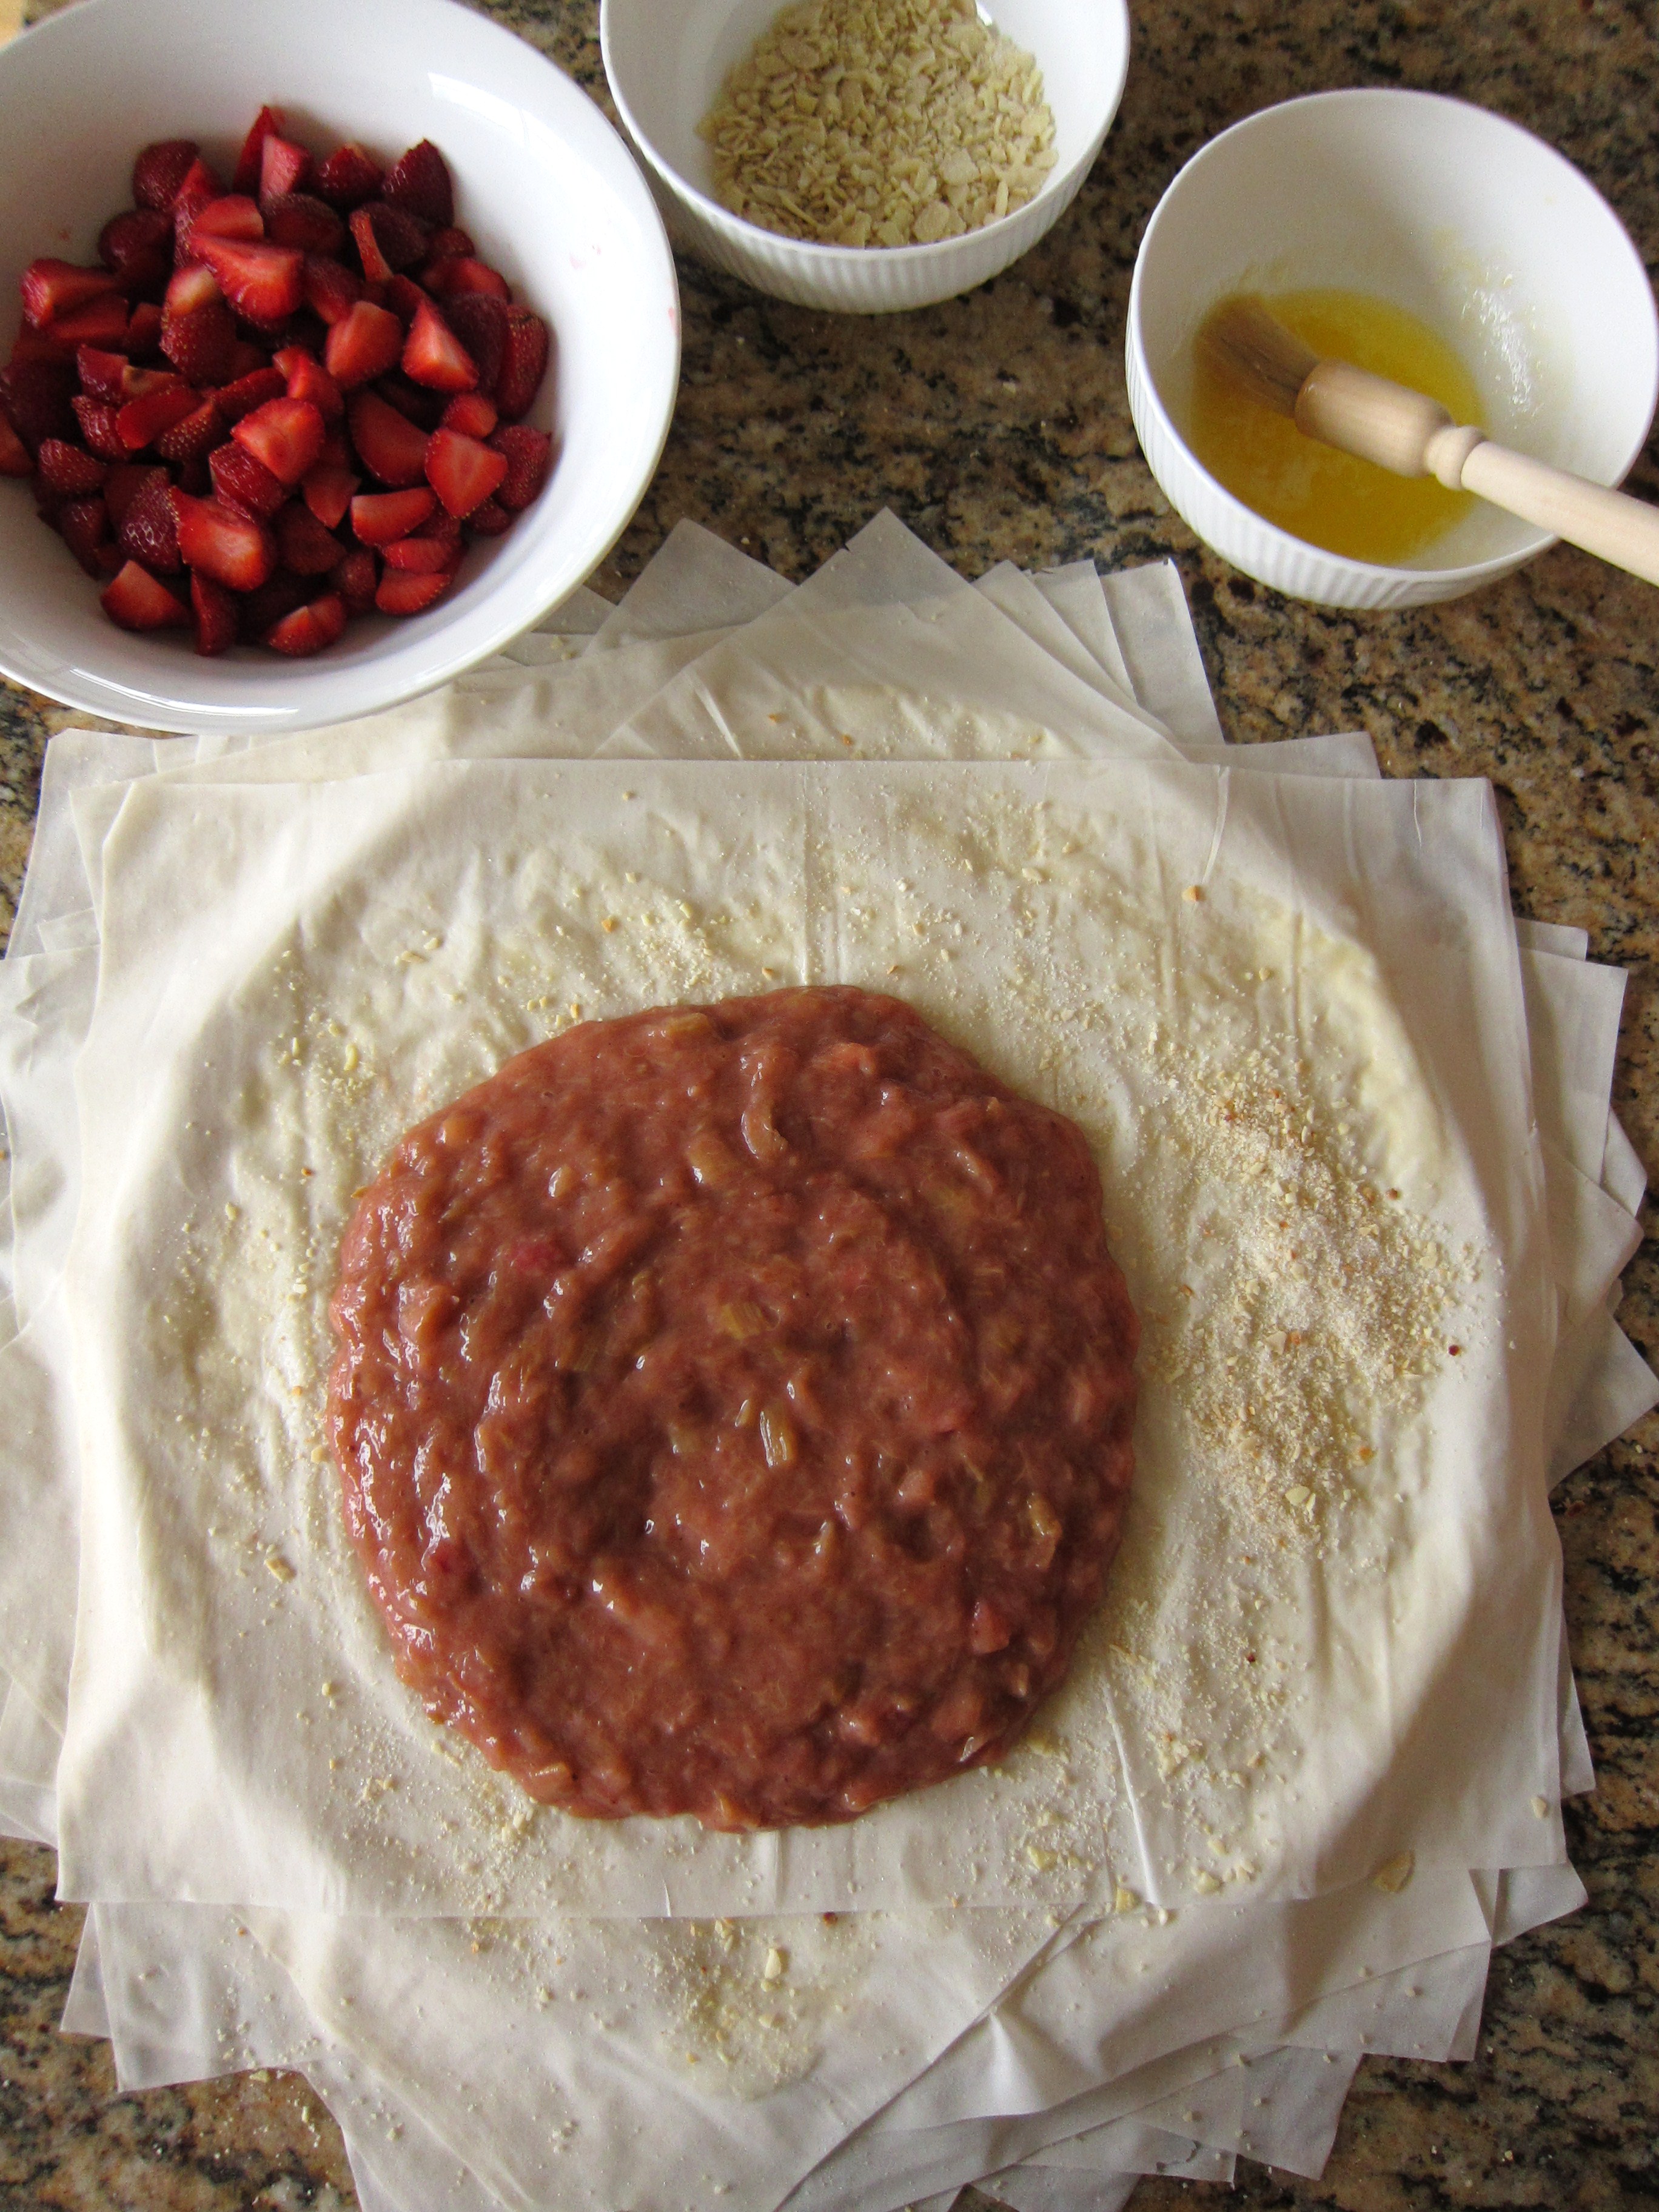
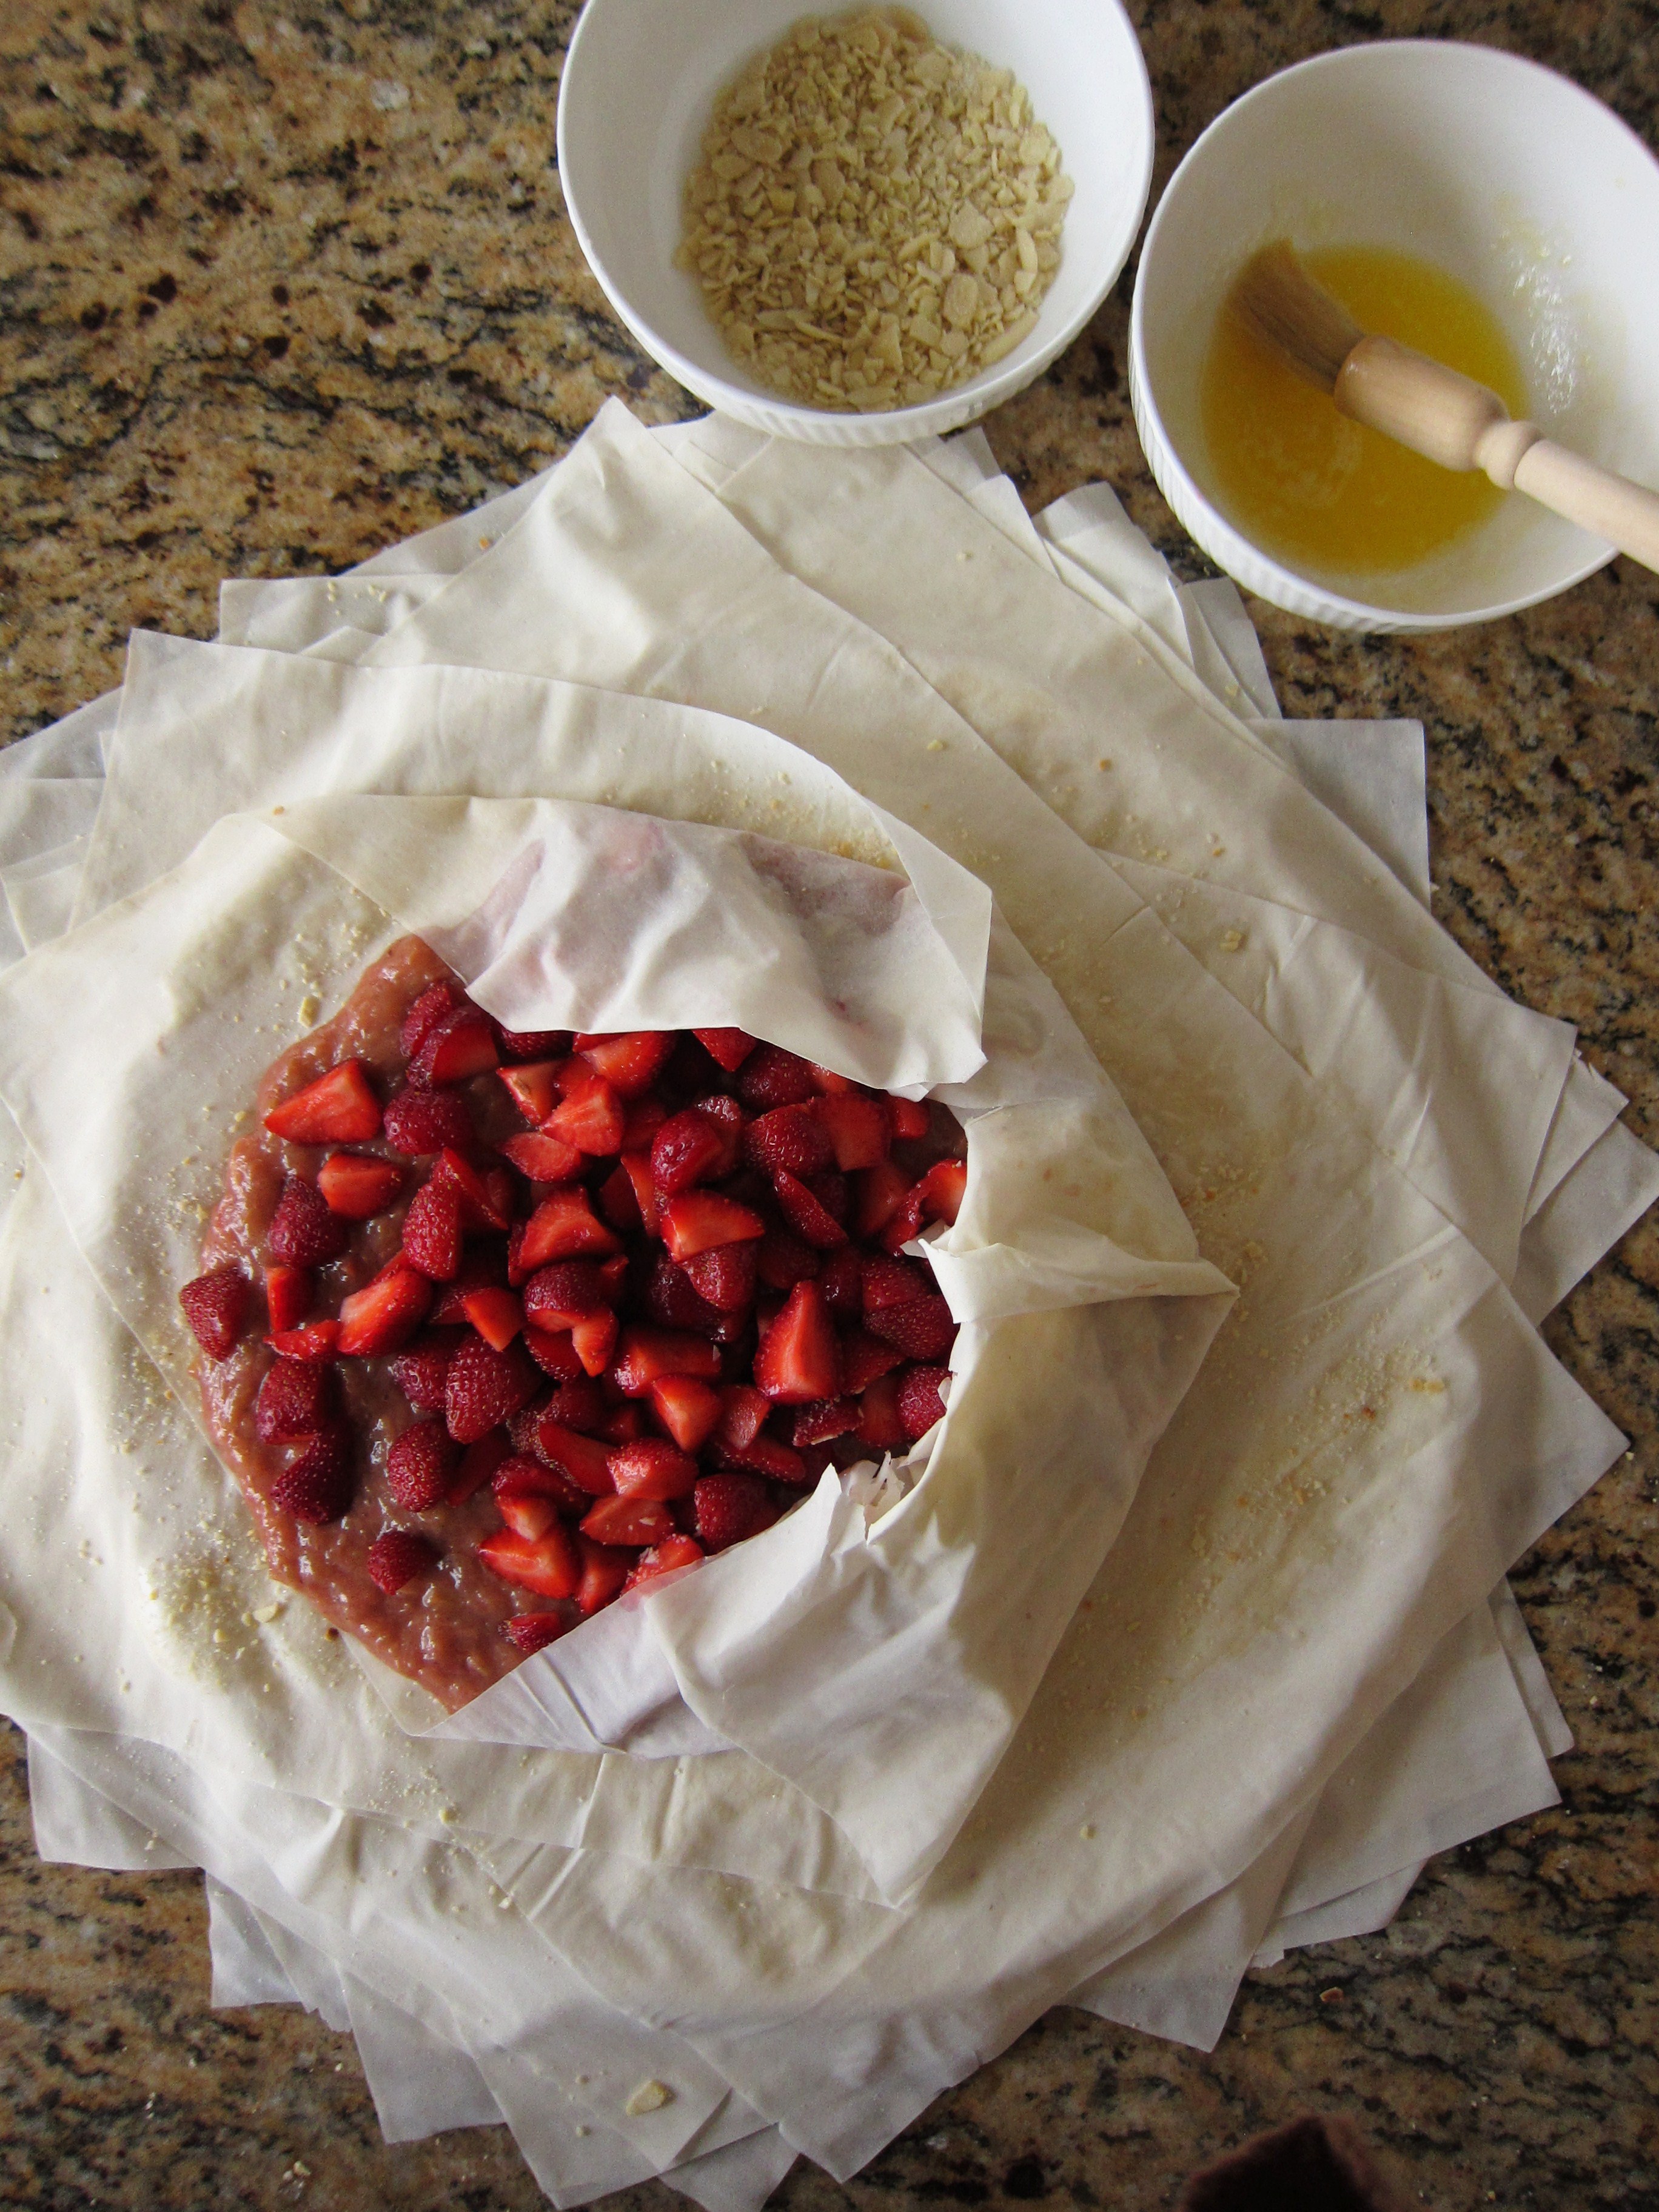
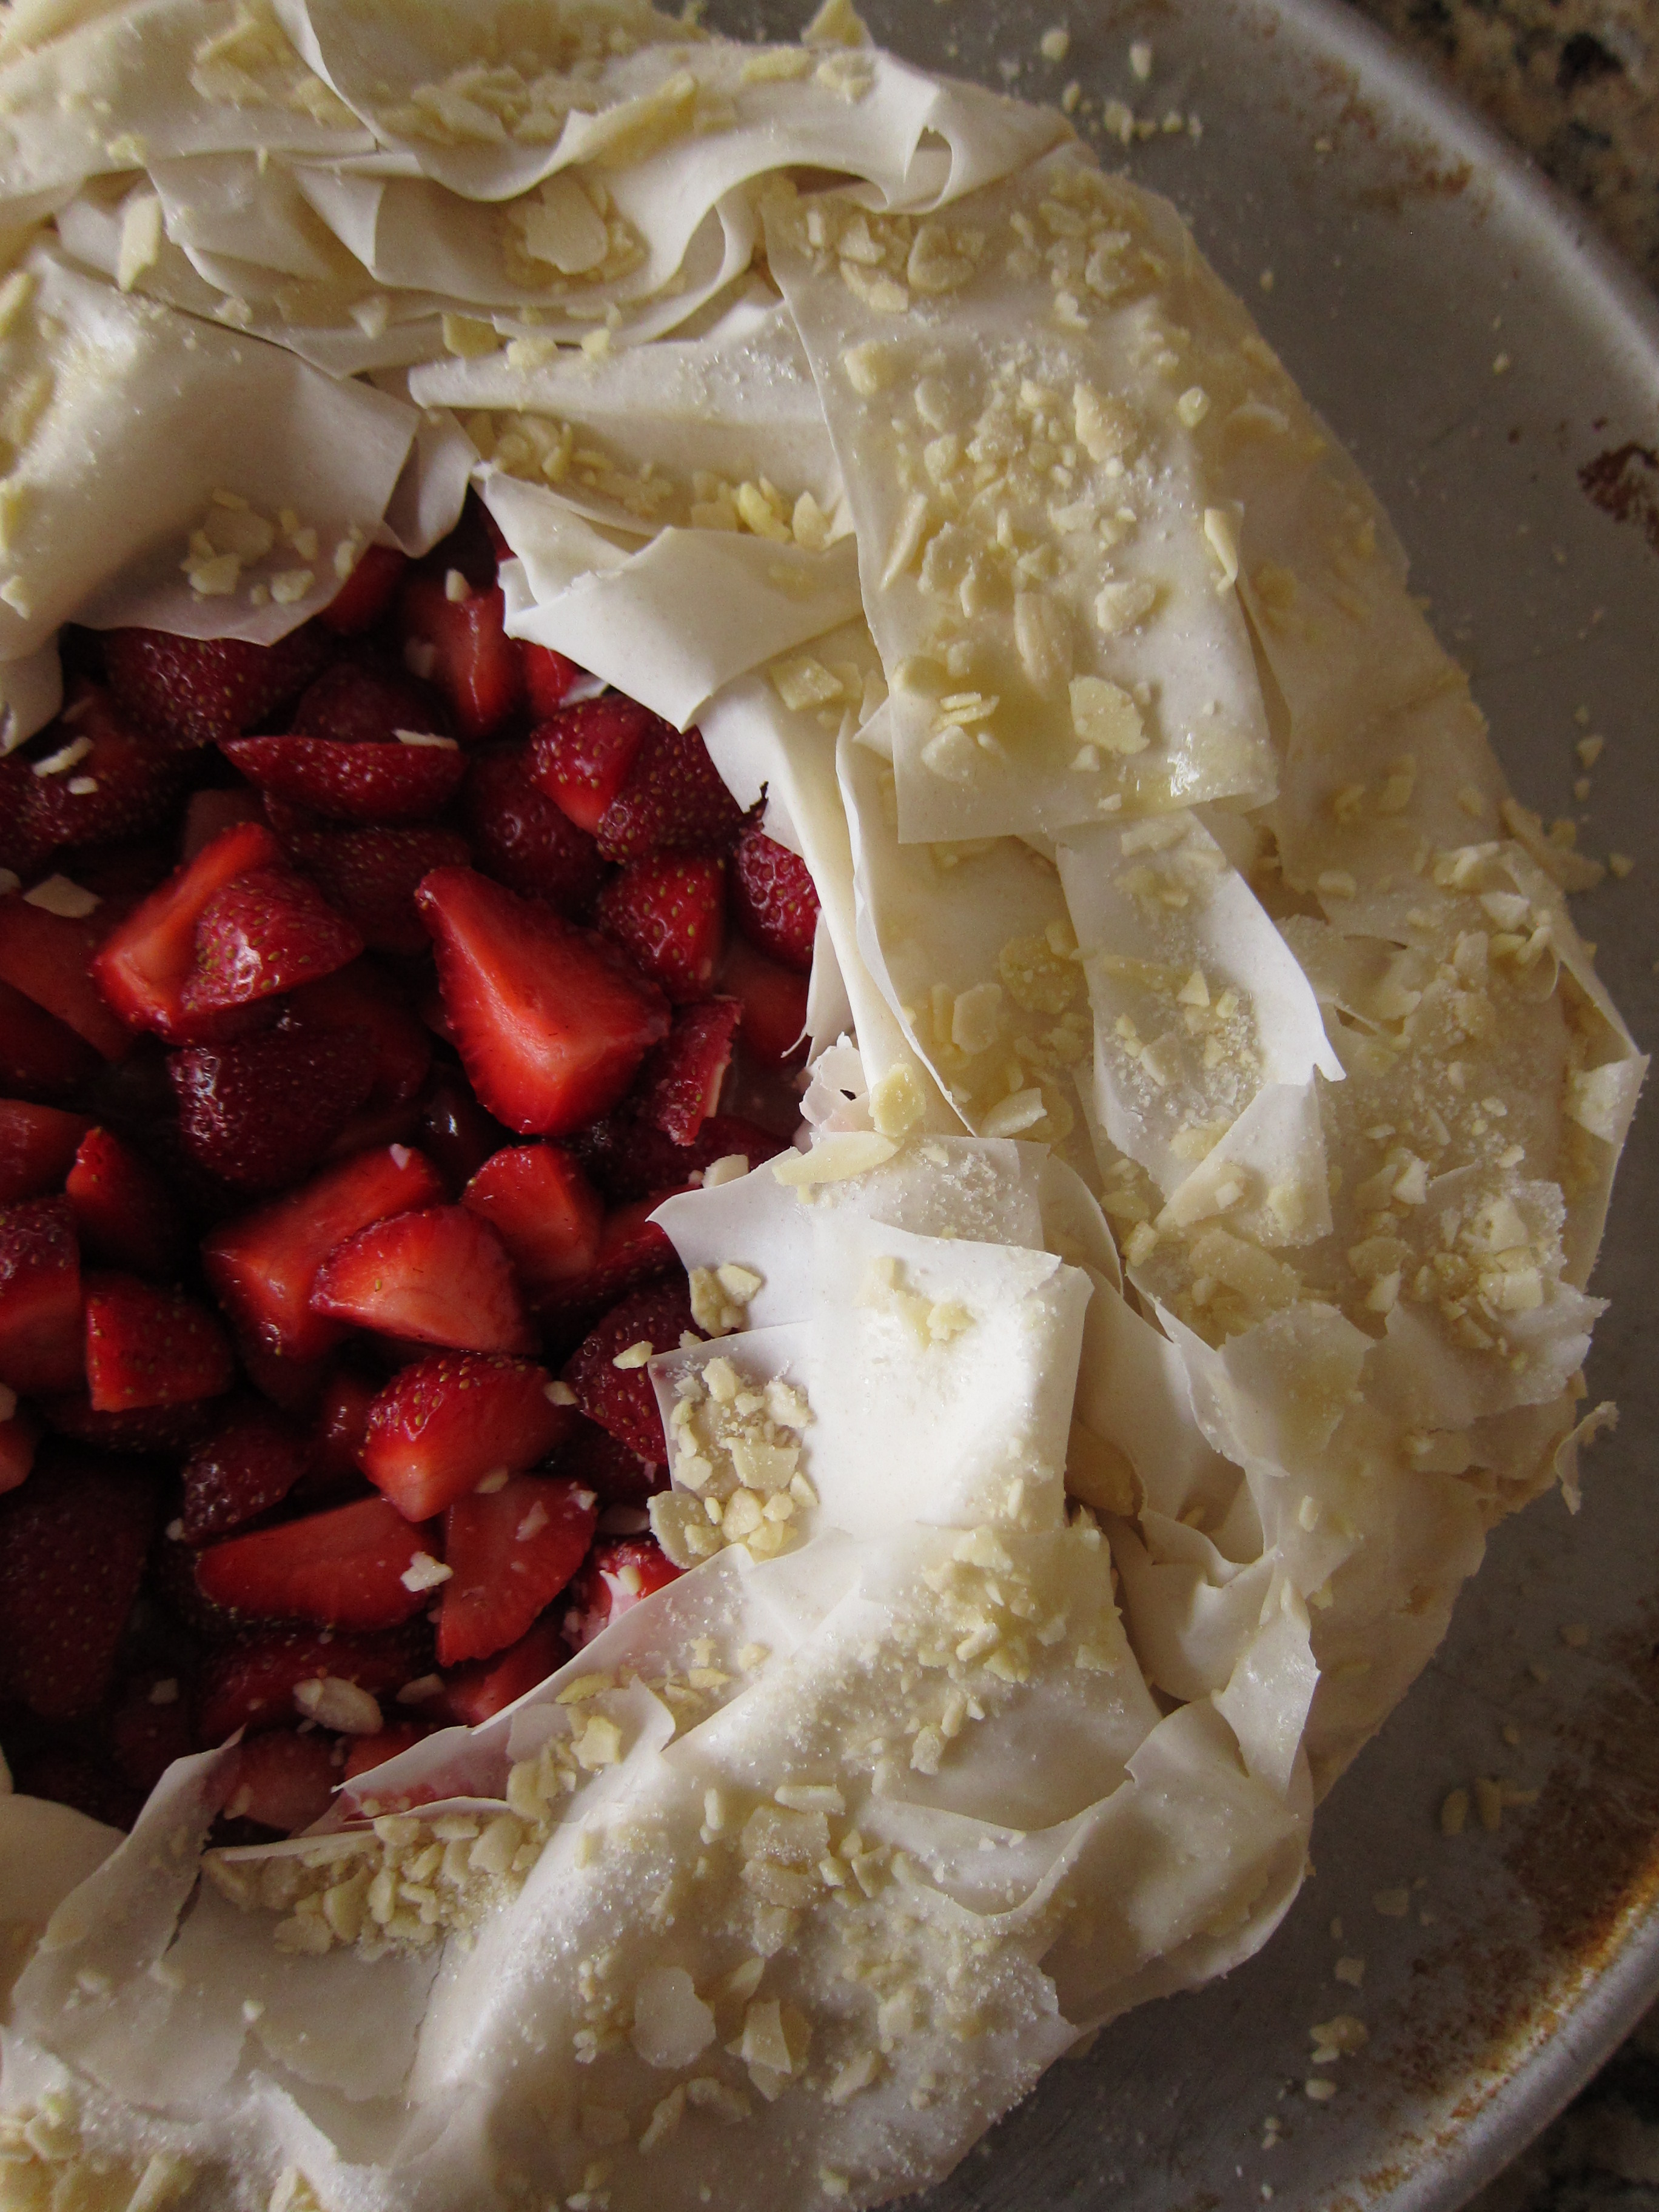
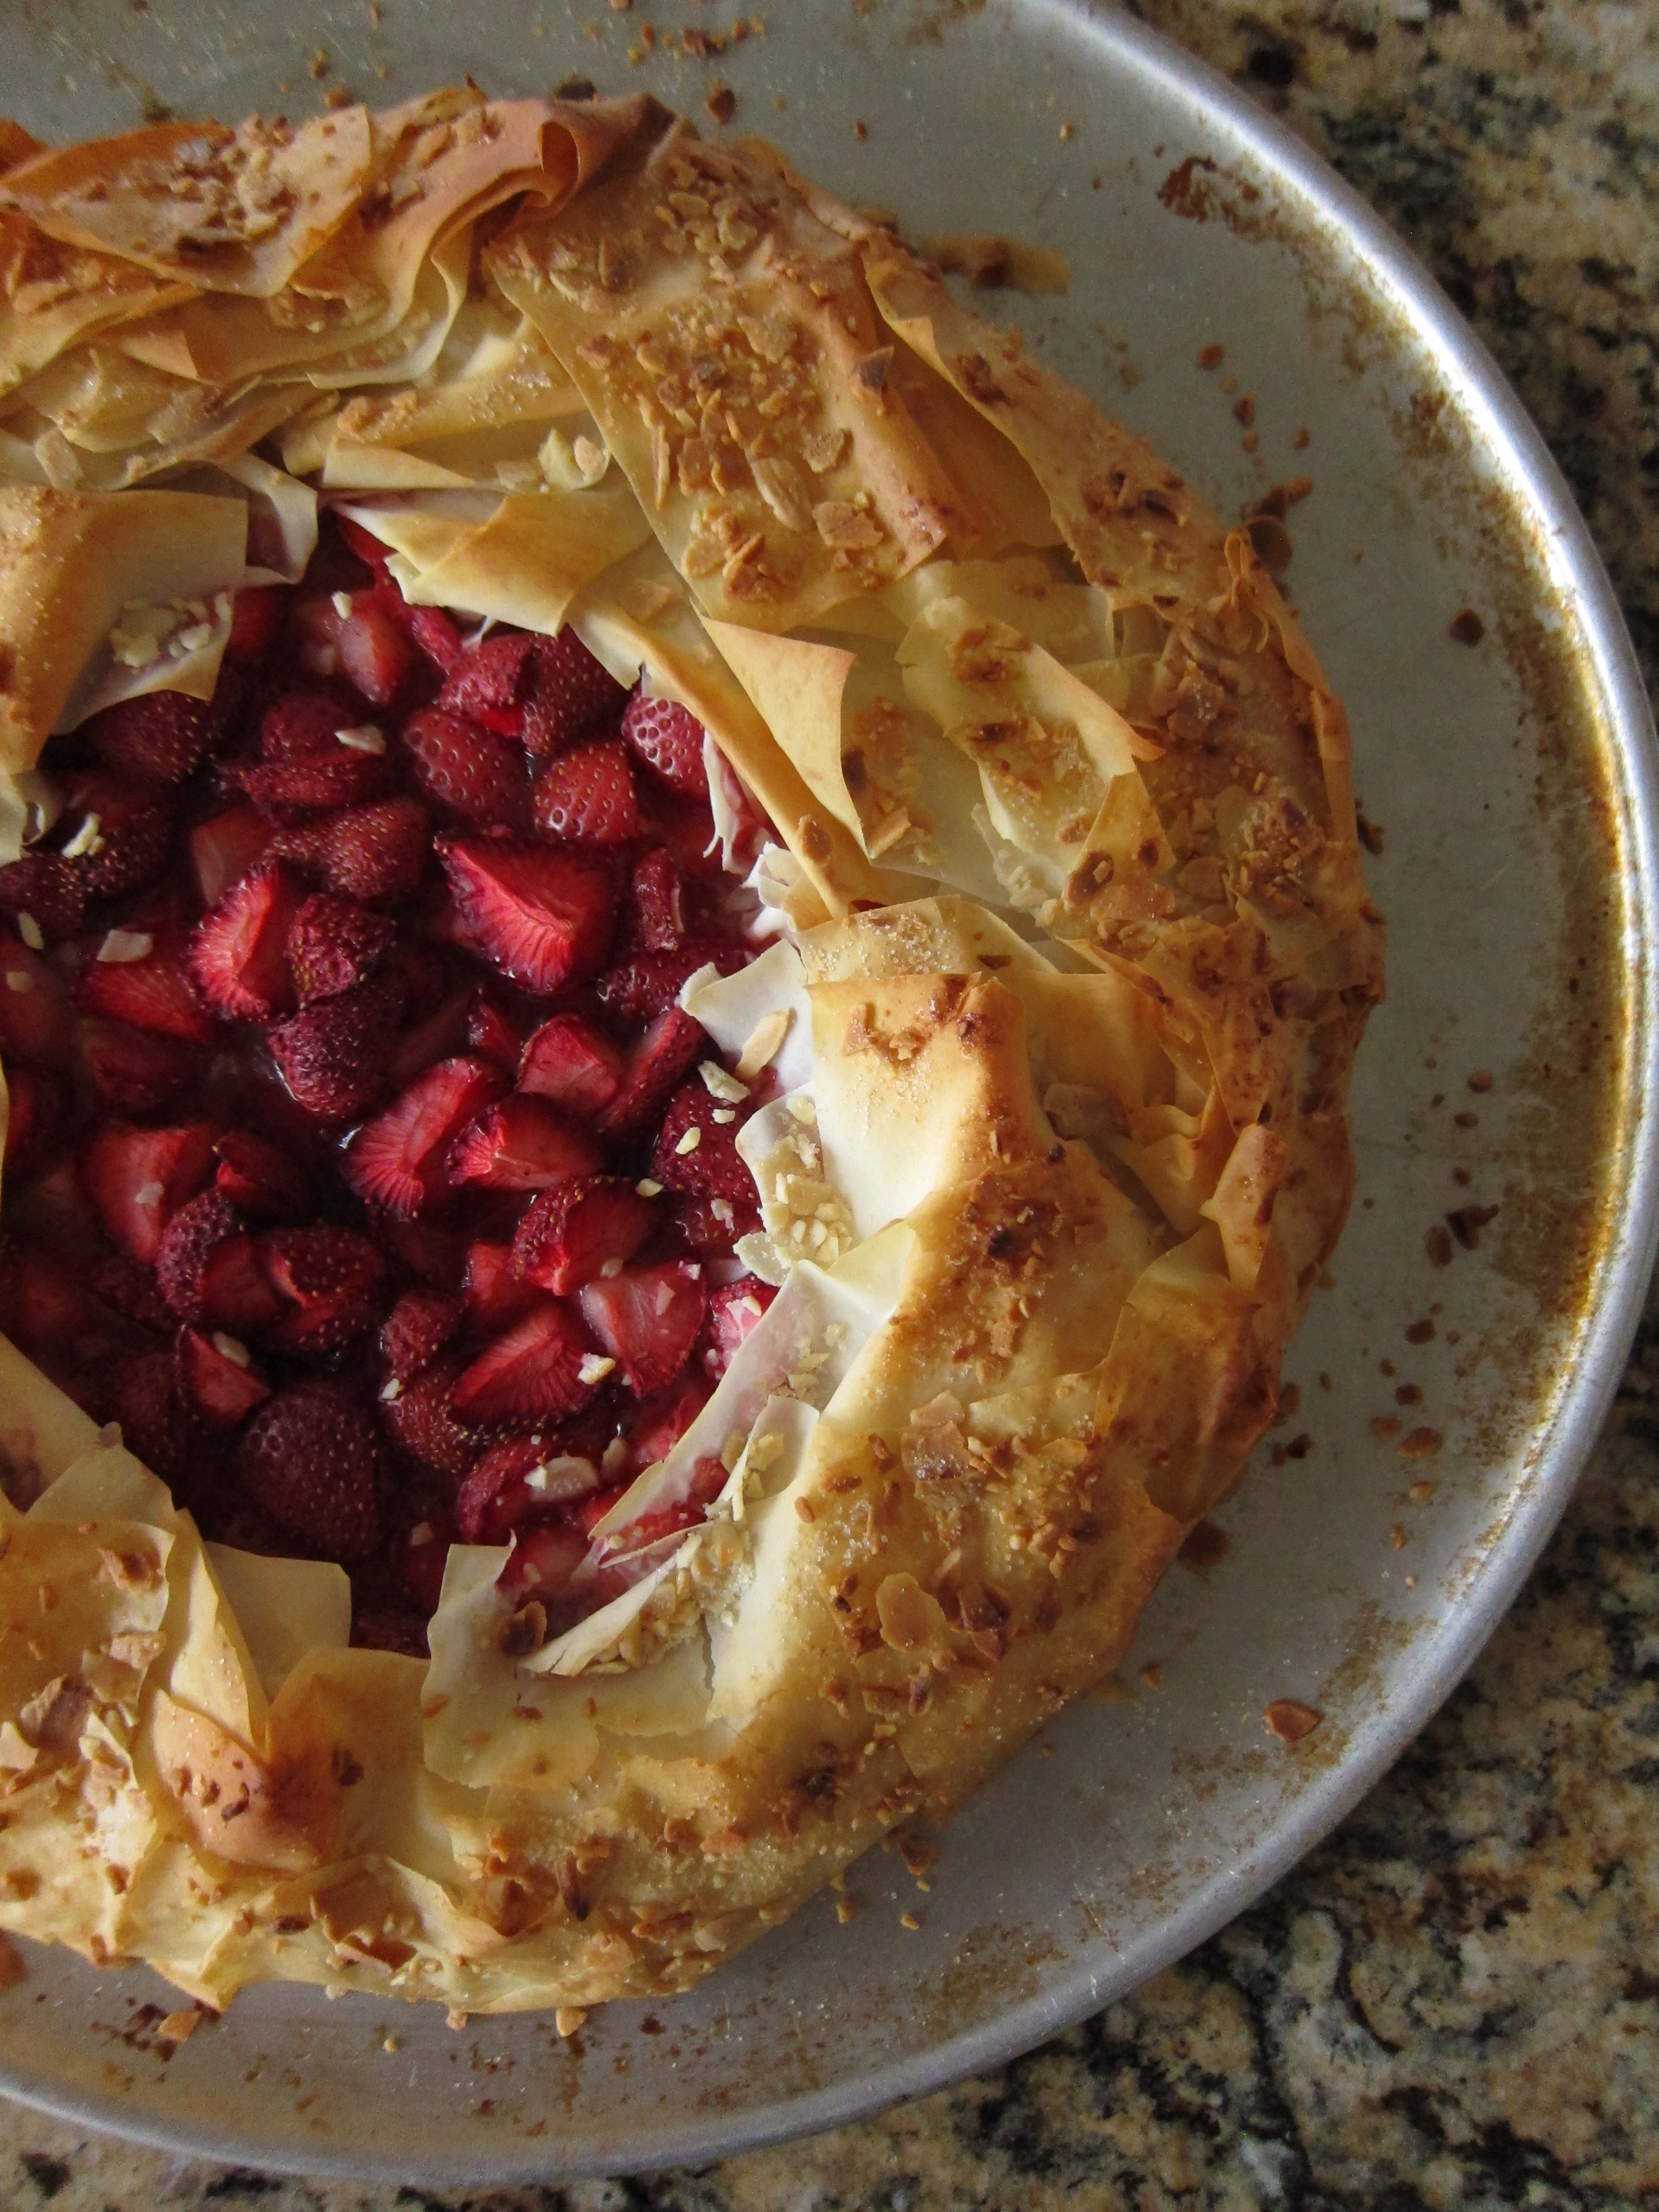
But because you’ve likely made a million crisps in your lifetime, and because I ate all of mine and forgot the measurements, there won’t be a crisp recipe here. Sorry. You’ll have to wing that one. There are, however, two other rhubarb recipes I can share with you, simply for the fact that I took notes and didn’t shove the whole thing in my face before taking photos. The first is a riff on a free-form crostata, where a quick rhubarb compote is topped with fresh strawberries, then wrapped in several layers of phyllo dough that have been sprinkled with crushed almonds and brushed with melted butter. There’s a bit of cinnamon, nutmeg and orange zest in there too, giving it both a bit of warmth (from the spices) and brightness (from the zest). And just when you start to think the whole thing is going taste like Christmas, there are those glorious, lightly cooked strawberries that crown the top, reminding you it’s summer. While there’s nothing groundbreaking about putting together strawberry and rhubarb, they do hum along quite nicely together and kick into peak season around the same time, making them a solid pair for balmy summer days. The use of phyllo here is nice too – it’s light and crispy and helps you avoid getting your hands mangled in a big wad of dough on a hot summer night.

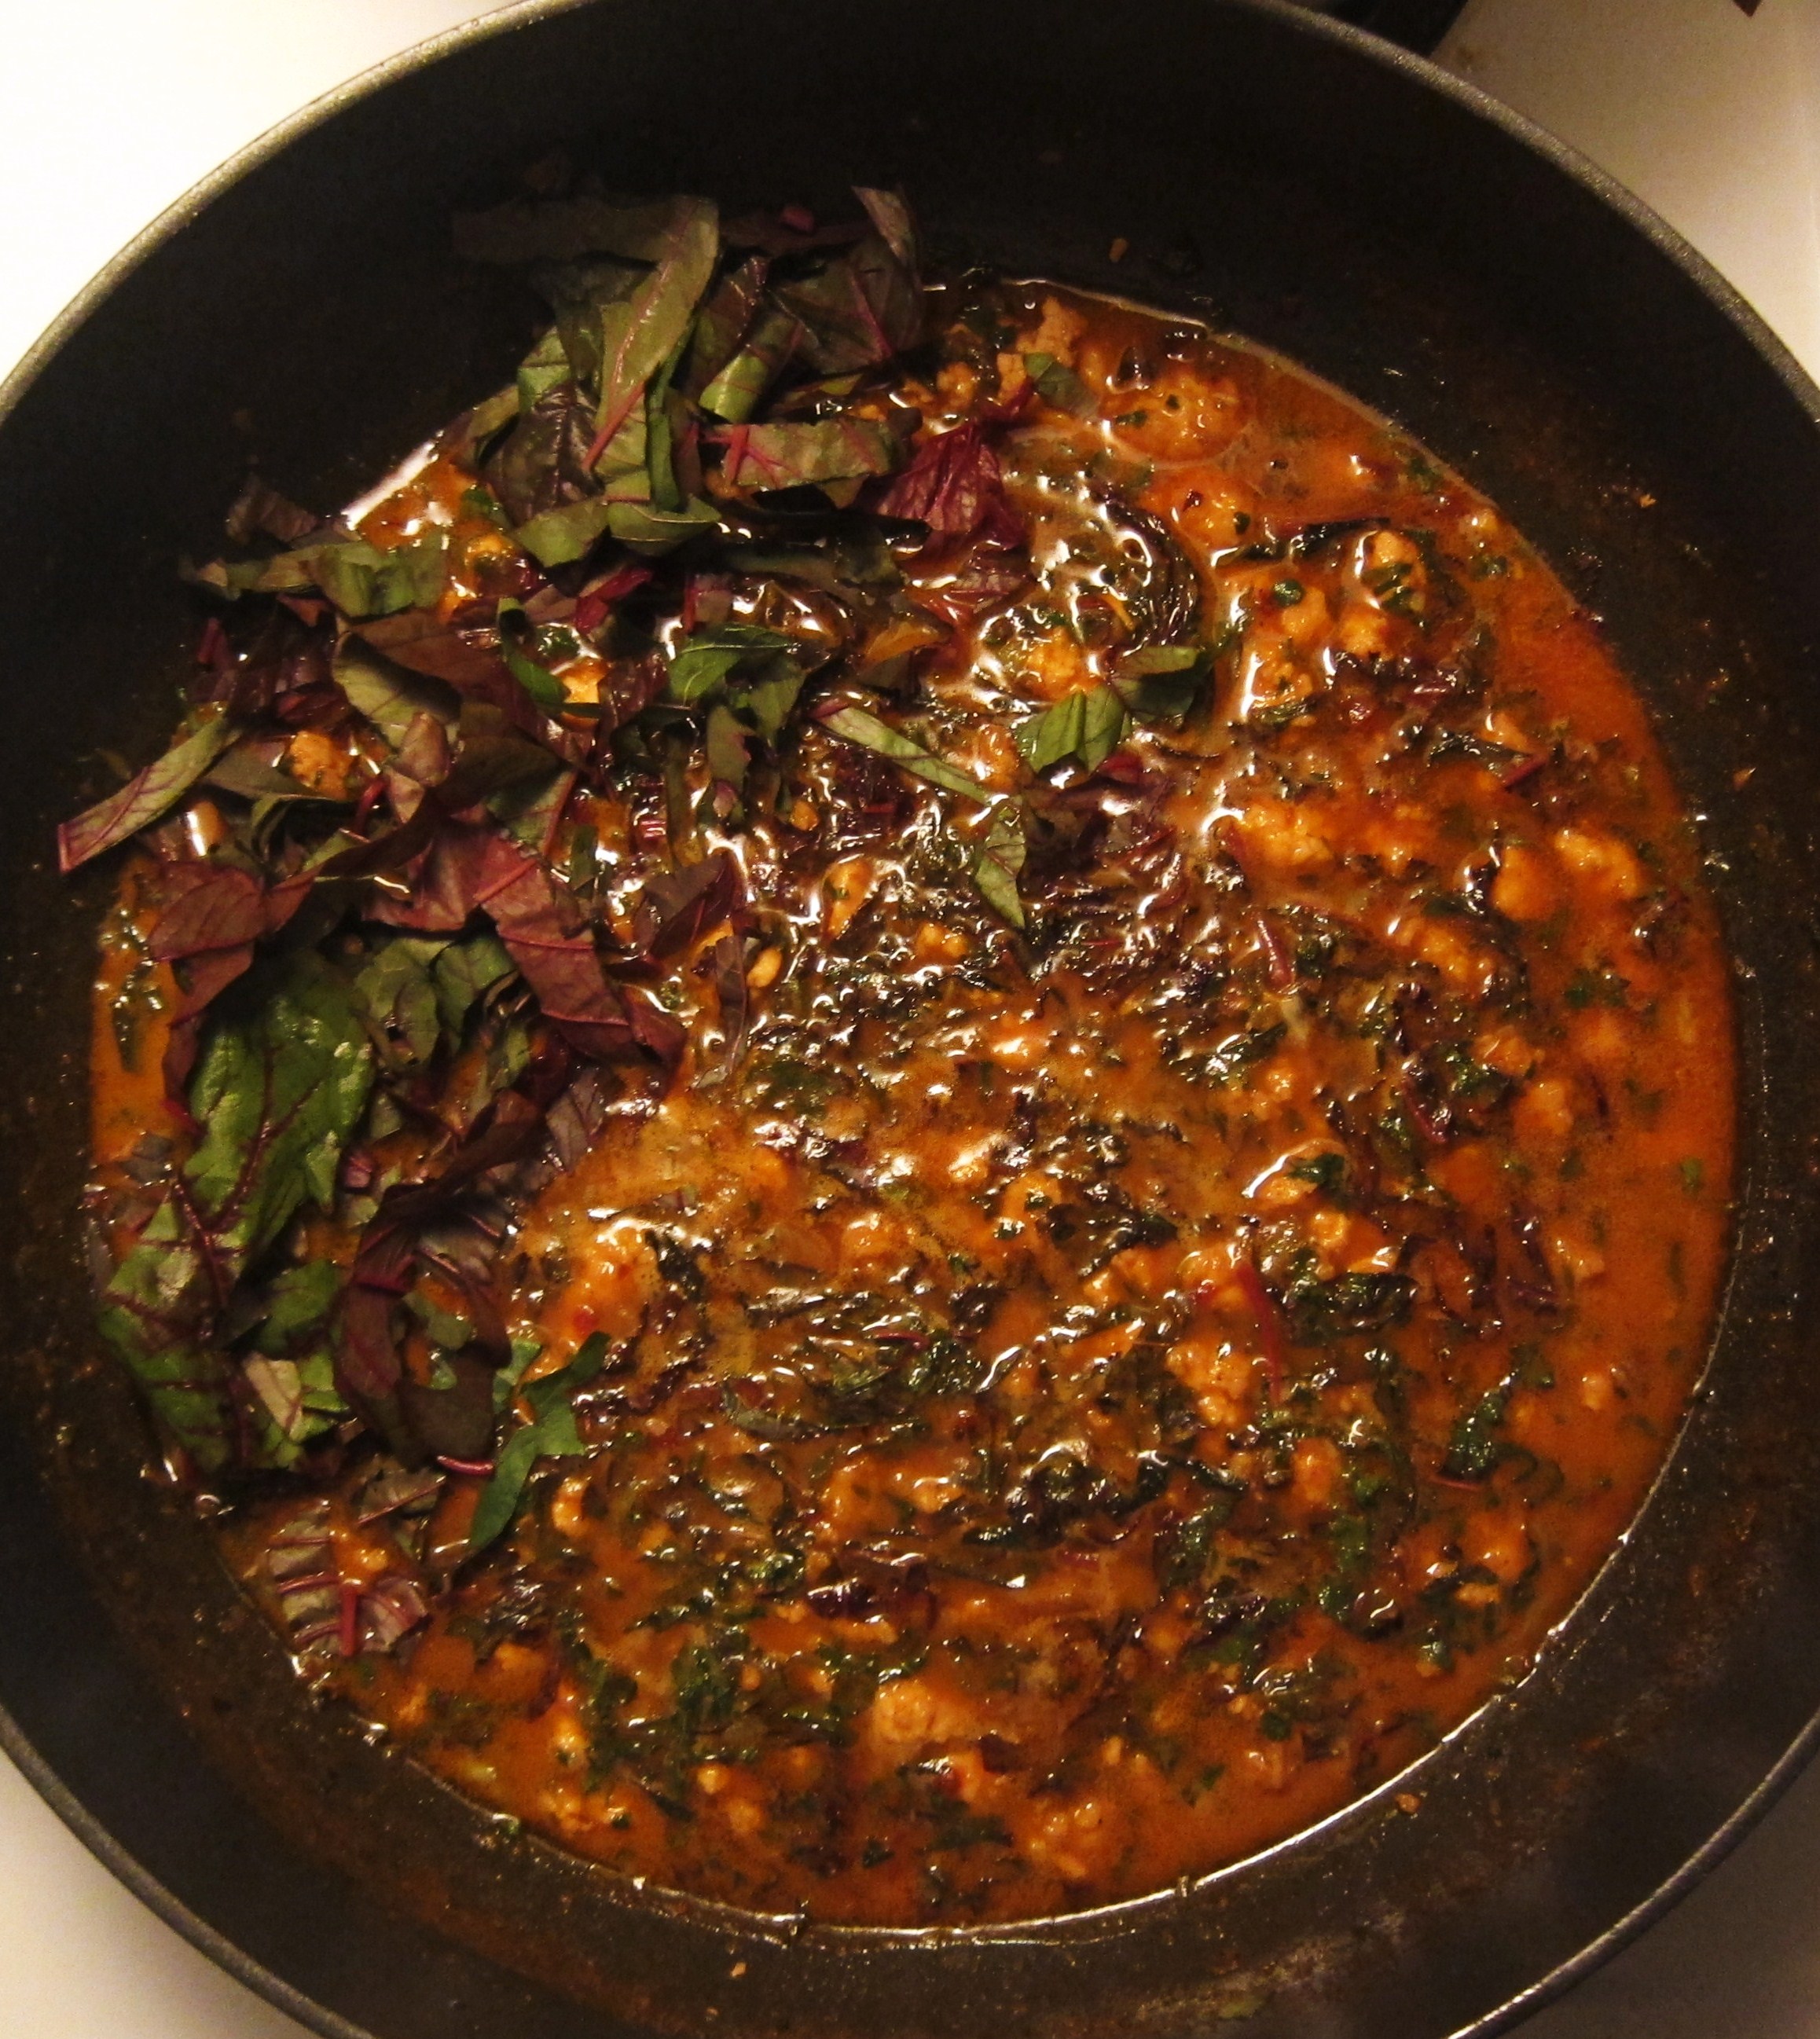
The second is a savoury dish, where rhubarb is stewed on the stove top, then used as a braising base for chicken pieces. When the whole thing’s cooked, the stewed rhubarb mixture becomes the serving sauce. It’s from a New York Times recipe that I bookmarked and went digging for once I realized I’d barely made a dent in that stockpile of fresh rhubarb in my fridge. It’s a surprising recipe and one that hits the right notes – the tartness of rhubarb works well with the neutral flavours of the chicken and the addition of shallots, thyme and white wine give the sauce a very French-countryside vibe, which is always lovely. It’s definitely worth trying, especially if you’re bored with the idea of using rhubarb for something sweet. Remember, though, that since stewed rhubarb loses its pinkish hue and turns a colour closer to beige, it’s a good idea to sprinkle some vibrant garnishes (fresh thyme, sliced scallions) over top. Dress up the cabaret dancer, so to speak. Whatever you end up doing, go get yourself some rhubarb already! GO! Do it before it’s all gone and you find yourself on the kitchen floor crying big fat tears of regret. (Ok, I’m exaggerating. But still, go!)

Note to rhubarb virgins: here’s a nifty site I found covering all aspects of rhubarb, including rhubarb poison information (don’t eat the leaves!):

http://www.rhubarbinfo.com/

062

Strawberry Rhubarb Phyllo Crostata (serves 8-10) – adapted from Canadian Living

Ingredients:

  • 1/2 cup finely chopped toasted almonds
  • 1/3 cup dry breadcrumbs (panko works well too)
  • 2 tbsp granulated sugar
  • 14 sheets phyllo pastry
  • 3/4 cup butter, melted

For the Filling:

  • 6 cups chopped rhubarb
  • 1 tsp vanilla extract
  • 1/2 tsp grated orange rind
  • 1/2 tsp cinnamon
  • 1/4 tsp ground nutmeg
  • 1/4 tsp ground cloves
  • 1/2 cup granulated sugar
  • 2 tbsp all-purpose flour
  • 2 cups quartered (or halved) strawberries

Rhubarb and strawberries Strawberries - detail Chopped rhubarb - detail Chopped rhubarb and strawberries Directions: To prepare the filling: Place rhubarb, vanilla, orange rind, cinnamon, nutmeg and cloves in a pot to simmer over medium heat. Stir sugar with flour; stir into rhubarb mixture and cook, stirring often, until thickened (about 5 minutes). Let cool completely. (Can be made ahead and refrigerated for up to 3 days.)

Stewing rhubarb and spices

In small bowl, combine almonds, bread crumbs and sugar; set aside. Keeping remainder covered with damp towel to prevent drying out, lay 1 sheet of phyllo on greased 12-inch (30 cm) pizza pan, aligning 1 short end with inside edge of pan and letting other short end extend over opposite side. Brush entire sheet with some of the butter; sprinkle with 1 tbsp (15 mL) of the almond mixture. Lay second sheet at angle on top of first, overlapping by about 3 inches (8 cm); brush with butter and sprinkle with 1 tbsp (15 mL) more almond mixture. Repeat with remaining phyllo, overlapping and sprinkling with almond mixture between each and leaving equal overhang all around pan.

phyllo 1 phyllo 2 phyllo 3

Spoon filling onto centre of phyllo; sprinkle with strawberries.

rhubarb in phyllo strawberries in phyllo

Starting with last sheet, fold phyllo sheets over, 1 at a time, folding ends back to create 4-inch (10 cm) gap in centre. Crumple ends into loose cluster around gap, brushing tops of each lightly with butter and sprinkling with almond mixture.

phyllo wrapping phyllo wrapped phyllo wrapped - detail

Bake in centre of 375°F. oven until phyllo is crisp and golden, about 35 minutes. Let cool on rack. Cut into wedges with a serrated knife.

Baked crostata Baked crostata Baked crostata - detail

Rhubarb-Braised Chicken (serves 4) – adapted from The New York Times

  • 8 pieces of chicken, mixture of thighs and drumsticks
  • 5 sprigs thyme
  • 2 tablespoons olive oil
  • 1 bunch spring onions or scallions, white and light green stalks thinly sliced (slice and reserve greens for garnish)
  • 2 garlic cloves, minced
  • 1/2 cup dry white wine
  • 3/4 pound fresh rhubarb, diced (3 cups*)
  • 1 tablespoon honey
  • 2 tablespoons unsalted butter
  • salt and freshly ground pepper

*I tried a 2 cup rhubarb/1 cup celery ratio, which also works really well.

Chicken with rhubarb sauce

Directions:

1) Pat chicken dry and season with salt and pepper. Place in a bowl with the thyme sprigs and cover. Refrigerate at least 1 hour or overnight.

2) Heat olive oil in a large skillet (or Dutch oven) over medium-high heat. Remove thyme from bowl with chicken and reserve the thyme. Add chicken pieces to skillet and sear, turning occasionally, until golden brown all over (about 10 minutes). Transfer pieces to a platter.

3) Reduce heat to medium. Stir in onion (white and light green parts) and cook until softened, about 5 minutes. Add garlic and reserved thyme; cook 1 minute more. Stir in wine and bring to a simmer, scraping up any browned bits in the bottom of pan. Add rhubarb, honey, 1/2 teaspoon salt and a few grinds of pepper. Return chicken pieces to pot in a single layer. Cover and reduce heat to medium-low. Simmer until chicken is cooked through (about 25 minutes) transferring chicken pieces to a platter as they finish cooking (the juices should run clear to indicate cooked chicken).

4) Whisk butter into rhubarb sauce. Taste and adjust seasoning if necessary. Spoon sauce over chicken and garnish with sliced onion greens and thyme sprigs.

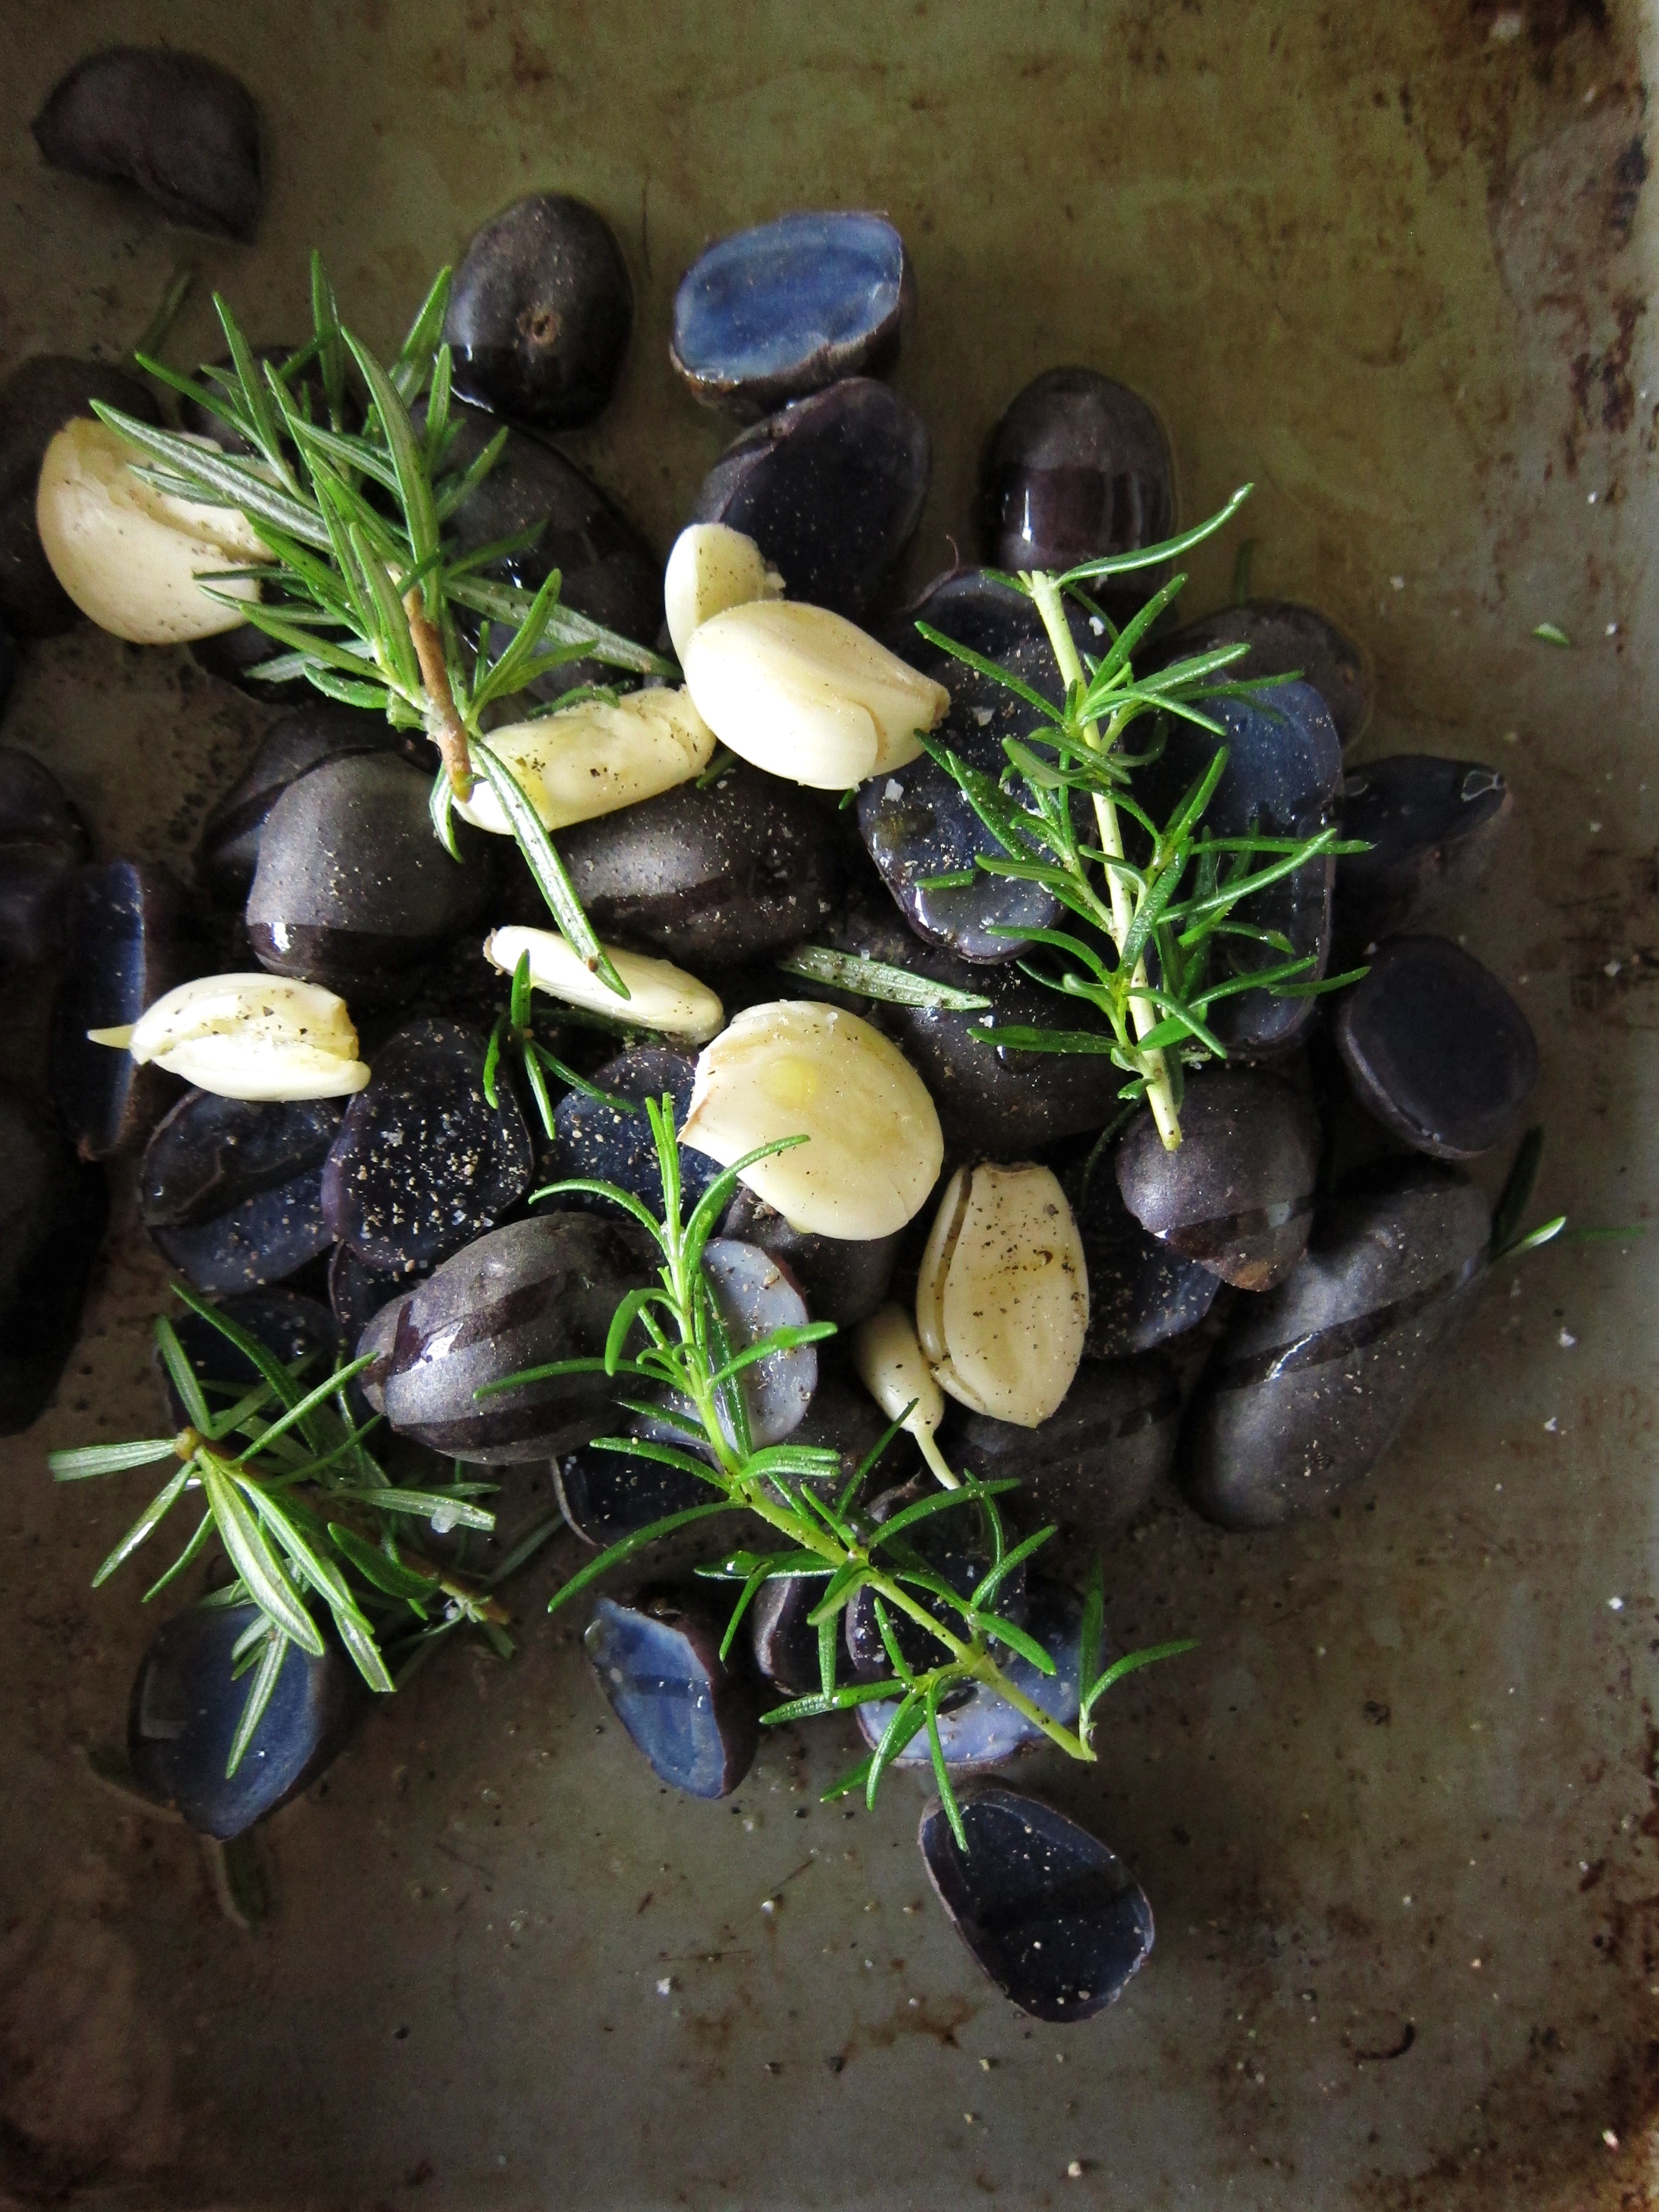
…and why not serve some roasted purple potatoes on the side!

  • 1/2 pound small, purple potatoes (skin on), washed and halved
  • 3 cloves garlic, crushed
  • a few sprigs of rosemary
  • olive oil
  • salt and freshly ground pepper

Preheat the oven to 400°F. Parboil the potatoes on the stove top unitl they’re almost cooked through. Drain and transfer to a baking tray. Add crushed garlic, rosemary and oil; toss until combined. Roast for about 10-15 minutes, or until the edges of the potatoes are crispy.

Purple potatoes uncooked Purple potatoes cooked

Share this:

  • Tweet
  • Share on Tumblr

Like this:

Like Loading...

Dream Waffles, Come Rescue Me

11 Wednesday Jun 2014

Posted by julia chews the fat in Breakfast & Brunch, Cooking For Your Peeps, Sweet Tooth, The Basics, Vegetarian

≈ Leave a comment

Of all the things I could have predicted about my young adult life, having recurring dreams about waffles would not have been one of the things on my radar. And yet, this is where I find myself, at 32, dreaming (literally, not figuratively) about breakfast food.

I guess things could be worse.

It all began about three months ago, when I had a dream I was making waffles on a beach. Then, a week later, there was another about waffles at my old high school; a few days after that, I dreamt I was eating them in Paris, curbside, with friends (because apparently I have Parisian friends now?). I woke up from that last one bleary-eyed, thinking why can’t dreams be real life??, then rolled over, closed my eyes and hoped that I could somehow lucid-dream myself into eating more waffles by the Seine.

According to the Interweb (where, of course, all accurate, reliable, trustworthy information resides) having recurring dreams about waffles is not exactly a good thing. But because I believe that dreams have a more visceral connection to what’s going on in our minds and bodies (because not only do I have imaginary Parisian friends, I’m also a hippie now?), I came to the conclusion that I probably just really wanted waffles – stacked high, with a generous slick of maple syrup across the top. So, the next available weekend, I made a point of honouring my demented breakfast dreams by scouring the neighbourhood for the perfect waffle.

After looking through the menus of a few places, I soon discovered that finding some standard, no frills waffles in this town is capital H Hard. Today’s brunch venues (complete with the requisite distressed-wood tables, exposed light bulbs and waiters with perfectly groomed handlebar moustaches) serve waffles that tend to be a bit too, er, hip…including varieties that are egg-less (oh boy this should be fun), Red Velvet-flavoured (ick), or lacquered in a weird, lavender-infused syrup (double ick).

It seems that the basic, trad waffle has been comically adulterated by the bourgeois bohemian crowd well-intentioned entrepreneurs of this city. All I wanted was a simple, straight-forward waffle. No fancy distractions. Just a really good, crispy, golden syrup-receptacle. After coming up empty, I spent the next couple of weeks asking myself – and anyone who would listen – where are all the freaking real-deal waffles at? 

All that whining turned out to be beneficial, because on my birthday – lo and behold – I was gifted a WAFFLE MAKER. Yes – a machine with which I can make waffles WHENEVER I WANT. It seems like an insane prospect. And I will, without a doubt, become a hazard to myself in the process. But HOLY MACKEREL. WAFFLES. SORRY, BUT I FEEL THAT CAPS LOCKS ARE THE ONLY WAY TO FULLY CONVEY MY EXCITEMENT. That, and exclamation marks. Because…WAFFLES !!!!!!

Without an ounce of shame, I willl proudly admit that I’ve had waffles every single weekend since. The novelty having not fully worn off, I still get stupid-excited about pouring the batter onto the iron, closing down the top and waiting for the indicator light to turn green. It’s totally magical, even if they’re super easy to make. It’s the kind of food that makes you want to wear a feathered boa to breakfast and sing this Mariah classic at the top of your lungs, replacing the lyric “lover” with “waffle”.

Or, that just might be me.

waffle - detail

A quick note: These are not to be mistaken for belgian-style gaufres. These are decidedly US of A-style waffles – reminiscent of the thin, crispy, golden waffles of your Eggo youth. Only better, because they didn’t come out of a sad box from the freezer.

Epic Buttermilk Waffles (makes 6) – recipe from the Aretha Frankensteins restaurant in Chattanooga, TN

3/4 cup all-purpose flour
1/4 cup cornstarch
1/2 teaspoon baking powder
1/4 teaspoon baking soda
1/2 teaspoon salt
1 cup buttermilk*
1/3 cup vegetable oil
1 egg
1 1/2 teaspoons sugar
3/4 teaspoon pure (natural) vanilla extract
Maple syrup, for serving

* genius trick for making quick buttermilk (courtesy of my mom): add about 1 tsp of white vinegar to nearly 1 cup of milk. Ta da!

Directions

In a medium bowl, combine the flour, cornstarch, baking powder, baking soda, and salt; mix well. Add the milk, vegetable oil, egg, sugar and vanilla and mix well. Let the batter sit for about 30 minutes.

Preheat a waffle iron. No need to grease it – the oil in the batter will allow the waffle to release easily. Follow the machine’s cooking directions. Serve immediately with syrup and any other accompaniments you see fit.

waffle - pure
waffle - berries

Share this:

  • Tweet
  • Share on Tumblr

Like this:

Like Loading...

Existentialist Salad (with Avocado)

29 Thursday May 2014

Posted by julia chews the fat in Cooking For Your Peeps, Lunch & Dinner, Vegetarian

≈ 6 Comments

This is officially my fifth attempt at writing this post. One of those included a few scribbles in a notepad on a shaky bus ride to work and another on a 7-hour train ride from Toronto. On my way to Toronto, I happened to be sitting next to stranger who took the opportunity to regale me with stories of her physical ailments and the personal details of her extended family, all while four babies (yes, I counted) under the age of one melted into a vortex of ear-splitting cries.

It was far from the ideal environment to write anything, save a desperate prayer or a haiku of swear words. But on the way back from Toronto, I had no excuse – there were no talkative strangers, or babies to contend with. Just me and a large train window from which to gaze at grassy fields, cows and a slow-burning sunset. You’d think this would’ve been the perfect setting to spill words onto a page. And yet. And yet.

I brought a pen and a notepad, with the specific intention of writing this post. But both sat undisturbed on my lap for the entire ride. Somehow the farm animals and dewy hillsides invited a stream of thoughts – BIG thoughts – about authenticity, purpose, love, change, the absurdity of things. The usual existential merry-go-round. At some point in time, I’m sure you’ve had (or will have!) the pleasure of whirling around on that ride too. As you can imagine, none of this led to me wanting to write about food. It did, somehow, make me want to eat an entire bag of Party Mix from the refreshment trolley somewhere between Brockville and Cornwall. Which I did. Because I’m not Gwyneth Paltrow.

Truthfully, there’s been a lot on my mind lately, and by 9pm on most nights, I feel like my skull is bathing in molasses. Before I turn off the computer and shuffle toward the bedroom door, there’s a little something I’d like to leave you with, involving some black rice and a technicolor dreamcoat of vegetables. There’s no particular story behind it. No rhyme or reason for why it was made or for whom. It was last-minute, unplanned and delicious. It may actually one of the best things I’ve made in the last little while, which is why I’m here sharing it with you. Times like these, it feels nice to put a little food-love out there. I hope you’ll catch it with both hands.

xx

(Existentialist) Black Rice Salad with Avocado and Spring Vegetables – adapted from Heartbeet Kitchen

Ingredients

Serves 5-6 as a side

1 cup dry black rice (about 3 cups of cooked rice)
3 1/2 cups of water
½ teaspoon kosher salt
1 heaping cup of asparagus, cup on the diagonal
1 cup thinly sliced purple cabbage
¾ cup radishes, thinly slices
1 large avocado, sliced

Dressing:
1 1/2 tablespoons white wine (or white balsamic) vinegar
1 tablespoon honey
1 teaspoon Dijon mustard
1 clove garlic, minced
a few chives, minced
1/2 teaspoon salt
1/3 cup extra virgin olive oil

Ingredients - detail

radishcabbage

chivesTo make the dressing: whisk together all of the ingredients in a small bowl (alternately, put all the ingredients in a jar and shake until emulsified). Set aside.

To make the rice: bring water to a boil in a medium sized pot. Rinse rice thoroughly, then empty into boiling water with ½ teaspoon of salt. Turn heat down to a simmer, cover pot, and cook for about 30 minutes, stirring occasionally until grains are al dente.

To prep the asparagus: prepare an ice bath – fill a medium-sized bowl with cold water and several ice cubes. Set aside. Fill a pan with a bit of water (about an inch). Bring to a boil and toss in the asparagus. Allow to blanch for about 1 minute, remove the asparagus from the water and place them to cool in the ice bath.

asparagus - detail

chilling asparagusPlace the rice, cabbage, radish and asparagus in a large bowl. Stir in the dressing to coat. Spoon out onto a serving platter and top with avocado slices and a sprinkle of salt flakes and freshly ground black pepper.

salad

salad - detail

Share this:

  • Tweet
  • Share on Tumblr

Like this:

Like Loading...

Revisiting fennel & citrus

06 Thursday Mar 2014

Posted by julia chews the fat in Breakfast & Brunch, Cooking For Your Peeps, Lunch & Dinner, Vegetarian

≈ Leave a comment

I know what you’re thinking. Really? A fennel-orange salad? Yawn. Next.

But I’m here to tell you that this one, this salad deserves acknowledgement. It’s the perfect example of how something we treated as ubiquitously blah can be re-invented, re-appropriated and newly appreciated. Like vintage fashion (no, not those high-waisted acid-wash jeans from grade eight, but more like that stunning large-brimmed sun hat your great aunt used to wear, poolside. Or your grandmother’s satin peep-toe slippers. In other words, the elegant retro fashion of a stone-cold fox).

This salad is like a great vintage piece you want to wear over and over again. There’s nothing ground-breaking or earth-shattering about it. Nothing hardcore. But it’s a good salad. A simple, and dare I say, classy salad. And one definitely worth your attention. Most of the fennel-citrus salads I’ve had in my life have been forgettable at best – in large part because either a) the whole thing wilts under the weight of a creamy dressing, or b) the fennel slices looks like they were hacked to pieces with a dull machete, or c) there is a disproportionate amount of fennel, leading you to ask, “Will this salad never END?”.

The recipe below, happily, avoids all these pitfalls. Equal parts crunchy, juicy and sweet, it’s got lemony tones from the sumac dressing, plus a peppery wink from the radish. This salad has got it going on. And if you needed another reason to make it, just look at how gosh-darn pretty it is! 

A stone-cold fox of a salad, if you ask me.

Fennel Orange Salad

Fennel-Citrus Salad with Sumac Dressing – serves 4 as a starter

3 tablespoons extra-virgin olive oil
1 tablespoon fresh lemon juice
2 teaspoons white balsamic vinegar
1 teaspoon sumac
1/2 teaspoon finely grated orange zest
Coarse salt
Freshly ground black pepper
2 medium fennel bulbs
4 radishes, trimmed
2 oranges

Important note: I fully endorse the use of a mandoline to get paper-thin fennel and radish slices. It might be masochistic of me (8 times out of 10 I will nick the end of my finger on the second-to-last slice), but I continue to use it for recipes like this, as it yields the best results.

Whisk together the olive oil, lemon juice, vinegar, and sumac, and orange zest and season with salt and pepper. Set aside.

Cut off and discard the stalks from the fennel bulbs, reserving some of the fronds for garnish. Halve the fennel bulbs lengthwise and cut out and discard the cores. Thinly slice the fennel bulbs using a mandoline (or sharp knife). Transfer to a large serving platter. Thinly slice the radishes using a mandoline (or sharp knife). Add to the fennel. Peel and cut the orange into slices, arrange on top of the fennel and radish (for an extra pretty salad, trim the orange into suprêmes. Nifty video here).

Whisk the dressing and drizzle it over the salad. Toss gently to coat.

Fennel Orange Salad - detail

Share this:

  • Tweet
  • Share on Tumblr

Like this:

Like Loading...
← Older posts
Newer posts →

Facebook

Facebook

Instagram

No Instagram images were found.

Recent Posts

  • Layers and Rows
  • Finding Buoyancy
  • February
  • Wednesday
  • Cross My Heart, Miso

Archives

  • May 2017
  • April 2017
  • February 2017
  • December 2016
  • November 2016
  • September 2016
  • August 2016
  • July 2016
  • June 2016
  • May 2016
  • April 2016
  • March 2016
  • February 2016
  • January 2016
  • December 2015
  • November 2015
  • October 2015
  • September 2015
  • August 2015
  • July 2015
  • June 2015
  • May 2015
  • April 2015
  • March 2015
  • February 2015
  • January 2015
  • December 2014
  • November 2014
  • October 2014
  • September 2014
  • August 2014
  • July 2014
  • June 2014
  • May 2014
  • April 2014
  • March 2014
  • February 2014
  • January 2014
  • December 2013
  • October 2013
  • September 2013
  • August 2013
  • July 2013
  • June 2013
  • May 2013
  • April 2013
  • March 2013
  • February 2013
  • January 2013
  • December 2012
  • November 2012
  • October 2012
  • September 2012
  • August 2012
  • July 2012
  • June 2012
  • May 2012
  • April 2012
  • March 2012
  • February 2012

Categories

  • Beverage
  • Breakfast & Brunch
  • Condiments
  • Cooking For Your Peeps
  • Cooking Solo
  • Cooking with Nonna
  • Food Away From Home
  • Food Writing
  • Holidays
  • Intro
  • Lunch & Dinner
  • Snacking
  • Soups
  • Sweet Tooth
  • The Basics
  • Vegetarian

Enter your email address to follow this blog and receive notifications of new posts by email.

Join 80 other followers

Blog at WordPress.com.

Cancel

 
Loading Comments...
Comment
    ×
    <span>%d</span> bloggers like this: