How to survive a tomato massacre

Nine hours of my day yesterday were spent hauling, sorting, washing, blanching, peeling, squeezing, cutting and stirring tomatoes, then ladling their hot flesh into Mason jars, all while giving and taking instructions in a bastardized mix of three languages within the confines of a steamy kitchen splattered with tomato juice.

I do this every year. And every year it feels like the trading floor of the New York Stock Exchange. I wouldn’t change it for the world, but sometimes it’s enough to make you want to scream into a well-feathered cushion.

So here we are, the morning after, and I’m still not running on all cylinders (one major clue being that I washed my face with hair conditioner). I’m hoping this cup of coffee will be the miracle cure, to avoid any other bleary-eyed mix ups and to help me regain some sense of focus. Fingers crossed – very tightly.

Since things are not making much sense this morning, I won’t attempt to write a poetically long piece here. I’d rather just get straight to the point – which is this:

CRISPY SALT AND PEPPER FRENCH TOAST

I bring it up here and now as a small ode to the hearty, carb-filled breakfast that got me through yesterday’s 9-hour tomato massacre. This is the humble food I am always grateful for. And I suspect that, no matter what your day has in store, you will be grateful for it too.

Savoury French Toast

CRISPY SALT & PEPPER FRENCH TOAST – serves 2 (adapted from Food 52)

– 2-3 eggs
– a splash of milk (or cream)
– 1/8 tsp salt
– 1/2 tsp freshly ground black pepper
– 1/2 green onion, finely chopped
– a few sprigs of cilantro, finely chopped
– butter
– 4 slices day-old bread

In a bowl, beat together eggs, salt, pepper, green onion, cilantro and a splash of milk (or cream).

Heat a frying pan over medium-high heat. Melt a knob of butter over the surface until it’s thoroughly covered.

Dip the bread into the egg batter, drain off any excess, and place straight into the hot pan. Fry for 2 to 3 minutes on each side, until golden-brown and crispy. Serve warm with a drizzle of maple syrup or something tangy/spicy like sriracha sauce.

Savoury French Toast

Relishing the peach days

Oh hello there. It’s been a while. How are you? How’s your summer been?

I’ve neglected this space lately, it having taken a back seat to some other things – namely, attending this beautiful tear-jerker in Roscommon, Ireland (that groom is my baby brother, looking swank in a white suit)…

M&C

…and soaking up this scenery:

…and visiting this rad place:

…and stuffing my face along the way:

And, well, it being summer, the idea of a picnic blanket and a book – or a beer on a patio – has been a lot more enticing than interacting with the Internet. So if I’m here, bathing in the glow of my computer screen, it’s because there’s something worth sharing.

The timing of this entry is also important, as the MVP of this recipe (the peach) is nearing the end of it’s season in Ontario, meaning that availability in Québec is becoming slimmer as we move through the month of August. If you live in the same climate zone as me, over the next few days you’ll likely be binging on the last of the berries and melons and stone-fruit before they’re all gone for another year. And if you haven’t had this impulse, remember: we’re talking A WHOLE YEAR here. Imagine how depressed you’ll feel in late November when you realize you never ate one fresh strawberry, one blueberry, one peach all summer, while you’re eating your fifth rutabaga of the week. You’ll want sort this one out before the summer’s over; you’ll need the memory of plump berries and orchard harvests fresh in your head to help get you through the icy, blustery months of November through March. The salad below will provide a nice memory you can look back to when you’re waiting for the bus in 20 inches of snow.

This recipe puts the peach up front and centre, without any frills or unnecessary distractions; its simplicity ends up being its strongest asset. The fruit is cut open and grilled, then tossed onto vinegary salad leaves with shreds of buffalo mozzarella. Bits of fresh chives and peppery onion slivers are mixed in, adding a nice hum to the whole thing.

Find a day to eat this lovely mess of a salad, sitting on a blanket in the grass. With your hands, if you prefer. Lick the bowl. Lick your fingers. But most importantly, relish the moment. Summer will appreciate the earnest send-off.

Grilled Peach Salad – serves two as a light main (adapted from Farmhouse Table)

Grilled Peach Salad

  • 3 peaches* (or 4 nectarines), cut in half and pitted
  • flaked salt (like Fleur de sel or Maldon salt)
  • 2 large handfuls of mixed greens, washed and dried
  • 1/2 small red onion (or one shallot), finely sliced
  • 2-3 oz. buffalo mozarella, torn into bite-size pieces

*Note: for the love of god, DON’T punish your peaches by putting them in the fridge. Doing so will make them hard and acidic. Leave them on the counter and consume over the next few days. If you’re worried about fruit flies, cover them with a plate or something like it.

For the dressing:

  • 2 Tbs. white balsamic vinegar (or cider vinegar)
  • 1 tsp. honey
  • 1 tsp. whole grain mustard
  • approx. 1 Tbs. minced chives
  • 1/4 cup (or 4 Tbsp) olive oil

Lightly salt the cut sides of the peaches, drizzle very lightly with olive oil and place cut side down on a hot grill*.  When the peaches are charred and have begun to soften, remove them to a platter and set aside.

To make the dressing, place vinegar, honey, mustard and chives in a small bowl. While whisking constantly, slowly drizzle in olive oil until emulsified. Toss salad leaves and onion with vinaigrette and place in a serving dish.  Spread peaches and mozzarella on top of the greens and drizzle with a little more dressing.  Serve straight away.

*If you (like me) don’t have a BBQ, you can toss the peaches into a preheated grill pan – not exactly the same result as putting it on an outdoor grill, but you still get those nifty charred marks.

Campari per la stronza

Bitter is a contentious flavour, dividing people into two camps – the lovers and the haters. To justify their aversion, the haters will point to anthropology, arguing that bitterness is the sensory cue for poison, and so humans are biologically hard-wired to avoid it. They will say that scrunching our noses and spitting out something that’s bitter is a normal, natural survival mechanism that helps us stay alive.

Sorry, haters, but by that logic, I (and most of my relatives) would’ve croaked a long time ago.

Bitter foodstuffs are my kryptonite. It comes part and parcel with being mezza italiana. I’d be hard-pressed to imagine a world without rapini, raddichio, dandelion greens, or chicory; grapefruit, lemon peel, licorice, or chinotto, espresso, and quinine. To me, and a lot of people out there, these things are just totally exquisite. Euphoric, even. The first sip of an IPA is enough to send me into a blissful trance. And don’t even get me started on marmalades, or we’ll be here all day.

Another one of my favourites in the world of bitter things – especially on a hot, blistering day like today – is that ruby-red elixir, CampariI happen to know a lot of people that think Campari is completely revolting – specifically, “supertasters“, anthropology nerds (see 1st paragraph) and those who have made the ill-fated decision to knock back several glasses at a party – straight, no chaser – only to suffer the consequences of Campari sans modération. If that did happen to you, I don’t expect you to fall in love with Campari. But I also suspect that there are a lot of you out there who don’t drink it basically because you don’t know what to do with it. If that’s the case, I’d like to introduce you to the cocktail below.

This drink strikes the balance between bitter and sweet and is enjoyed undiluted (i.e. without watery or fizzy things added). The name comes from a former paramour who, despite being initially confused by my obsession with bitter drinks, came to cultivate a fondness for them too. The cocktail was improvised on a day we wanted to make Negronis, but were out of gin. He baptised it “La Stronza” and, well, the name sort of stuck. It’s a cross between a traditional Negroni and an Americano, the difference being that you nix the club soda and you switch the gin for some dry vermouth. Served on ice, it’s one of the best ways to quench mid-summer heat AND get your bitterness fix.

Negroni

La Stronza – serves one

  • 1 oz Campari
  • 1 oz sweet (red) vermouth
  • 1 oz dry (white) vermouth
  • 1 orange peel twist
  • dash of orange bitters (optional)
  • ice cubes

Prep an Old-Fashioned (lowball) glass with ice cubes. In a chilled cocktail shaker or pint glass, stir together the sweet, dry vermouth and Campari until well combined. Pour over ice and garnish with orange twist.

Cookies with Nonna

On a few separate occasions, I’ve asked Nonna to teach me how to make cookies. Not just any cookies. The cookies – the ones from that tattered notebook she keeps tucked away in the top drawer of the china cabinet, next to the silverware and the birthday candles; the book that only comes out at Christmas, baby showers and weddings, when the recipes are tripled and quadrupled to suit the occasion.

It’s the kind of thing that is ubiquitous in the world of grandmas – the mythical recipe book that is beaten, bruised, smeared with grease-marks and filled with barely legible handwriting. The recipes are often a blend of tried-and-true methods and weirdly incongruous instructions. My grandmother’s notebook is no exception: in the recipe for “chichinotti”, tartlet-cookies made with chocolate and almonds, Nonna refers to “Crisco” shortening as “Grisco”, forgets to add the flour to the list of ingredients for the pastry, and does that annoying thing that cooking matriarchs often do, by mentioning “un po” (“a little bit”) as a baking quantity. Is that a pinch? A teaspoon? HOW MUCH IS “A LITTLE BIT”?!?

Oh and there are no assembly or baking directions, so good luck with that.

Despite all this, it’s still a disarming specimen of love and care and ancestry, which more than makes up for its shortcomings. The handwriting alone is a solid heart-melter…

The recipe

The recipe

Early on a Saturday morning, I get a phone call from Nonna, telling me that today is the day. Having only banked 4 hours of sleep prior to her calling, I didn’t exactly jump for joy at the prospect of shaping trayfuls of cookies. But I knew that this was a rare opportunity, so I rolled out of bed, grabbed a coffee, and with eyes at half-mast, hauled myself to the other end of town to her house.

When I got there, she was sitting at the kitchen table with all the ingredients laid out in front of her, ready to be measured and blended. The woman was clearly on a mission. First order of the day: she insisted that we take out her old mixing machine, the “Oster Kitchen Center”, a brutal-looking thing from the early 70s that weighed about as much as a toddler and was enrobed in a slick of greasy dust, thanks to a long hibernation in the kitchen cupboard. And yes, I would have the honour of restoring it to its original state.

In the midst of scrubbing it down with a soapy toothbrush, I began to have questions for Nonna. Are you sure we need to use this? Can’t we just use a whisk? Nonna shook her head. No, we would not be using a whisk. We would be using The Oster. Period.

Right around the time we were almost done cleaning it, I turned to my mom and joked, “Imagine after all this, we plug it in and it doesn’t work?”. Mom glared. “Julia, that isn’t funny.” At that moment, we both realised that testing it before spending so much time and energy cleaning it may have been the more intelligent way of doing things. I sheepishly plugged it in and prayed under my breath before pressing the button. Omigod, please please please – *click*.

Nothing.

No sound, no action.

Our hearts sank for a moment. Nonna shrugged her shoulders. Refusing to accept this state of affairs, I stubbornly disassembled and reassembled it – clicking all the bits into place – then took a deep breath and plugged it back in.

And lord have mercy, the thing came to life. It produced such an astonishing amount of noise and vigor, that we all took a step back. Nonna clapped and the rest of us laughed nervously as the monstrosity that monopolized half our counter space whirred and whizzed, deafening us with each turn of the beaters. It was like watching a robot come to life, or a horse giving birth – terrifying, yet oddly mesmerizing. We were so transfixed, you’d think we’d just discovered electricity.

Yes, my family is a cheap date.

—–

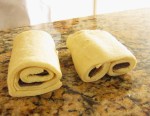
In the end, the machine felt like an integral part of the process, or at least of the experience. That said, you by no means need to use one. A handheld beater or whisk will do just fine (just don’t tell Nonna). The only special equipment you may need to purchase are the tin moulds, which should be available at most kitchen stores.

One last thing – promise me you’ll try one straight out of the oven. Well don’t, like, burn the roof of your mouth or anything….but once it’s had a minute to cool down, go for it. There are very few pleasures in life that will compare.

Chichinotti – makes about 3 dozen

For the filling:
• 14 oz skinless almonds (toasted, then ground)
• 10 egg whites (the yolks will be used later – see below)
• 4 oz cocoa powder
• 12 oz sugar
• 4 pieces of Baker’s bitter-sweet chocolate, finely ground
• finely grated rind of one lemon
• about 2 tsp cinnamon

For the pastry:
• 10 egg yolks
• 7 oz vegetable shortening* (such as Crisco), room temperature
• 10 oz sugar
• 16 oz all-purpose flour
• finely grated rind of one lemon

*shortening is not one of those products that I like to endorse, but to stay true to Nonna’s recipe, I use it here. You’ll probably be able to replace it with butter by tinkering with the quantities a little bit. If you try it, let me know how it works out!

Directions:

Preheat the oven to 350°F

1) Roast the almonds at 350°F for about 10-15 minutes until golden, turning once halfway through. Allow to cool, then grind them finely in a food processor. Set aside.

2) Prepare the filling: combine all the ingredients listed in the “filling” section above (except the ground almonds) in a medium-sized bowl. Use a stand mixer, hand mixer or whisk to combine the ingredients until uniform in colour and texture. Add the ground almonds, mixing with a wooden spoon to combine.

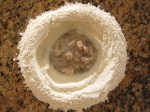
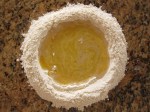
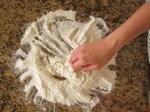
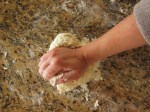
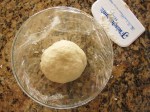
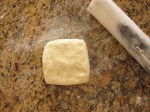
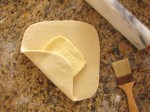
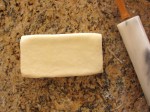
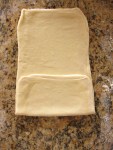
3) Prepare the pastry: combine all the ingredients listed in the “pastry” section (except the flour) in a medium-sized bowl. Begin to mix with a whisk, increasing speed as the mixture starts to come together. Once the mixture is smooth and creamy in colour, begin to slowly add the flour in batches, whisking between each addition. Once it reaches the consistency of a dough, knead it gently into a rough ball.

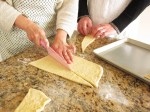
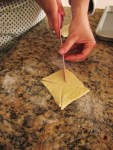
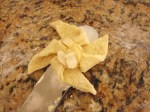
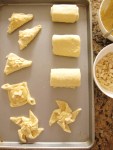
4) Prepare 2 baking sheets with parchment paper. With your hands, take a small quantity of pastry dough and press it into the mould, making sure that the bottom is completely covered and the sides as well. There are no exact measurements behind this, but you’re going for a medium-thickness – meaning that you don’t want it so thick that it would be un-enjoyable to eat, but not so thin that it burns and hardens. Try to reach a happy medium. Practice is key to getting this part right.

5) Fill each pastry shell with some of the chocolate mixture, nearly filling to the brim. Place filled tins on the prepared baking sheets.

6) Bake at 350°F for about 20 minutes, or until the filling is puffy and the pastry is golden.

7) Allow the tins to cool enough for you to handle; gently pry each cookie from the tins. Dust with powdered sugar once cooled and serve.

This slideshow requires JavaScript.

Learning to grin and bear it

“One of the secrets, and pleasures, of cooking is to learn to correct something if it goes awry; and one of the lessons is to grin and bear it if it cannot be fixed.” – Julia Child

A couple of weeks back, I took a short viennoiserie class with the lovely people at La Cuisine Paris, where pastry chef Guillemette guided half a dozen of us through the different techniques and steps required to make croissants, amandines and chocolatines. It was a bit of a surreal experience (pastry class, in Paris, in the springtime – pinch me), and despite not really being in my element, I ploughed away and left the class with a palpable sense of accomplishment. However minimal that accomplishment may actually be in grand scheme of things…still…I MADE CROISSANT. High five.

Arriving back in Montreal, I knew that if the information was left to hang out in the dusty recesses of my brain, I was sure to forget the details and subtleties that Guillemette had imparted to us. Not wanting to waste the potential of the experience, I stocked up on supplies and found the first available weekend to make a go of it. To my surprise, I also had volunteers willing to roll up their sleeves and do it with me – which was perfect, because not only would I have additional man-power, but I’d also have (other) inexperienced people to blame if it all went to hell.

Just kidding ♥

—–

The start was promising – I had my yeast from the baker, my electronic scale, my mise en place. The whole set-up was disturbingly perfect. Even the starter dough, the thing I was most worried about, seemed to look and feel like it should when I tucked it into the fridge to rest overnight. I began to feel a little like Maria in that scene from the Sound of Music.

But soon, I was brought back to the reality of my amateurism. And things got ugly. Fast.

On the second turn (folding) of my puff pastry dough, the underside was showing signs of tearing. At first, it was just one tear, which I quickly (sloppily) patched up. But then the more I rolled, the more the dough started to look like it was suffering from third degree burns. The butter began to ooze out from air pockets that had formed during rolling, resulting in a pot-marked dough that looked nothing like the one I had made in class. Family was in the room, so I restrained from swearing aloud, but in my head there was a foul-mouthed sailor blaspheming on repeat.

Distracted by my ugly, ugly dough, I forgot to add a slick of egg wash to the first batch of croissants, which may explain why they turned out more like overcooked dinner rolls. My guinea pigs taste-testers assured me they were good, but I’m pretty sure I heard someone compare them to the kind that come in the blue tube – you know, the one with that freakishly upbeat, miniature weirdo made of dough. With that as the barometer, I can’t say the croissants came close to the real deal. But while you wouldn’t pay good money for them, you’d probably eat them if they were hanging out on your aunt’s brunch table…and you were bored.

Then came the amandines, which looked promising before going into the oven, but then for some reason, decided to get their freak on: as they baked, the almond paste flowed liberally off the pastry, causing these pretty little “baskets” and “pinwheels” to morph into nondescript blobs, some of them binding together and making Siamese twins (I blame this not on the recipe, but rather my decision to make the almond flour from scratch. Bad move…).

The saving grace in this whole process were the chocolatines. They (miraculously) turned out flaky and delicious and even looked normal. Not perfect, not the best…but good. The taste-testers even took seconds, which is usually a good sign. Right at the moment when my faith in this experiment was sinking, the chocolatines bolstered my confidence and gave me hope that it is possible to make good croissant at home.

Phew.

—–

I suppose the bigger lesson in all this is that sometimes our expectations in the kitchen are shot down; sometimes the bread hasn’t risen or the cake has stuck to the tin or, in the words of Ms.Child, “the cat has fallen into the stew”. C’est la vie, mes amis. What would be more tragic is if these kinds of experiences turned us off from ever trying these things in the first place…

…ultimately causing us to miss out on moments like these:

Because, let’s be honest – an afternoon in the company of apron-clad men is time well spent.

On that note, I whole-heartedly encourage you to try making your own croissant. Here are a few things I learned (the hard way) and that you might want to keep in mind:

1) Give yourself plenty of time. No matter what recipe you end up using, all of them will require you to rest the starter dough (minimum 6 hours for mine) and the rolled dough between “turns” (folds).

2) If the dough seems warm or sticky or springs back a lot when rolling, put it back in the fridge. Along the lines of the point above, you’re better to err on the side of caution and rest your dough, even if it’s for a longer period of time than the recipe suggests.

3) When rolling the dough, be firm but gentle. The final result you’re aiming for is a light, flaky croissant that has several airy layers. It won’t reach it’s potential if you start getting rough with it – you’ll end up tearing the dough and making holes in the layers. NO BUENO.

4) Chill out. You are not a pastry chef, nor trying to be one. If things start to look scary, step away for a minute and take a deep breath. The Earth will not stop turning if your croissants aren’t perfect. Even if they’re inedible, you get a gajillion food-nerd points just for trying.

—-

One last thing: Guillemette has kindly allowed me to share her almond cream recipe with you (merci Guillemette!). It’s traditionally used as a filling for almond croissant (amandines), but it’s also wicked in coffee cake and probably most places you would normally use marzipan.

Almond Cream (makes about 2 cups) – from La Cuisine Paris

  • 55g sugar
  • 55g softened butter
  • 1 egg (also about 55g)
  • 55g almond flour
  • 15 g all-purpose flour
  • almond extract or rhum (to taste)

Combine butter and sugar in mixing bowl and mixwith a wooden spoon until creamy. Add egg and mix until completely combined. Add the almond flour and all-purpose flour and mix well. Add flavoring and stir to combine. Cover and place in fridge 10-15 minutes before adding to amandines (can be kept in the fridge for up to 4 days or frozen and defrosted in the fridge).

Finding warmth in the 3rd

Arriving in Paris on a Wednesday afternoon after a sleepless, overnight flight and a long bus ride from Charles-de-Gaulle, I haul my luggage half-way around town, up and down metro stairs and along narrow side-walks until finding the apartment I rented on a small street in the 20th. Once inside, it’s difficult not to be seduced by the comfort of the bed, an open invitation to a (frankly, well-earned) nap. But I quickly remember the brevity of my stay and instead opt for a quick shower and change of shoes so that I can step out and start exploring.

I walk a bit. Quite a bit, actually – along the street that runs parallel to the high walls of Père-Lachaise cemetery and down the long rue du Chemin Vert, both of which are nearly deserted. As I quickly discover, today is a holiday in France. Nearly everything is closed, save a couple of supermarkets and tabacs. Shops are armored in anti-theft grates. The sidewalks feel barren; a solitude sets in as the sky becomes grey and the wind picks up. It starts to drizzle and I cling to my street-map, hesitant to admit that, even with all the pretty around me, I feel adrift and a little lonesome.

Gambetta

At some point between the 11th and 3rd arrondissement, Chemin Vert meets boulevard Beaumarchais, a wide, four-lane drag peppered with shops and restaurants and bars. Regardless of the holiday, patrons spill out of cafés and onto the sidewalk – smoking, talking. They may not know it, but to me and my crumpled little street map, they are welcomed signs of life.

A short way up Beaumarchais, I come across a boxy structure with long, industrial windows sticking out from the base of a traditional 19th century apartment. Despite it’s unassuming silhouette – sleek, monochrome, rectilinear – it’s an eye-catching extension of the building, crowned with a clean string of marquee bulbs. As I get closer, I recognize the furnishings of a restaurant. It’s packed with the hum of a dozen conversations that can be heard through the glass.

I step in and ask for a seat at the bar. In an instant, I’m led to the the far end, right next to the kitchen and its large stone pizza oven. Unlike the weather outside, the whole place bathes in a warm glow – a mixture of candlelight, soft incandescent and the phosphorescent embers of the oven. I order the house Negroni, which comes in an old-fashioned champagne coupe and is infused with walnut. This is my introduction to Grazie. And it’s a lovely one.

The place bustles like mad. A little bit of Italian hollering bounces between kitchen and waitstaff, but none of it feels frazzled. The back-and-forth is harmonious and focused. There’s also enough playful banter in the mix to remind you that they are still camarades, joshing eachother until the first one cracks a smile.

Ethiopian jazz plays; the bartenders swing from one end of the bar to the other. Everything seems to work with effortless synergy. The bottles of booze on display sit on an arrangement of wooden crates, back-lit with a few twinkle lights. A regal-looking stuffed peacock is perched at the very top, surveying the patrons below.

It’s easy to get woozy fast at Grazie – a combination of the Campari and the heat off the oven’s stones. There’s more yelling from the kitchen. The energy is intoxicating. You sweat. You sip your Negroni. You feel a warmth head to toe. Life is good.

The pizza arrives, splendid and bubbling – anchovy, escarole, grape tomato and a few shavings of parmesan on a beautifully blistered crust. The crunch of the escarole with the smoky anchovy and sweet tomato is an impeccable mix, all of it anchored by the crispy chew of the crust. It’s not complicated food, or fancy food. But it’s the kind that makes you happy to be alive.

The pizzaiolo stretches new pieces of dough and glides them into the rotating belly of the oven. They refresh your drink and chit chat with you between rushes. It’s only 8pm on a Wednesday, but you get the feeling it’s going to be a late night.

Ristorante Grazie
91 Boulevard Beaumarchais, 75003 Paris, France
+33 1 42 78 11 96
http://graziegrazie.fr/

—–

Pizza Grazie

Short-shorts, BBQs and kefta

Five days into May and we’ve already been graced with a solid string of beautiful, hot, sunny days. I can barely remember how much of a long slog this past winter was. Now that everything’s in bloom and people have begun crawling out from their apartments, a major shift is underway in the city. Short-shorts have returned. So have post-work picnics, balcony beers and frequent visits to the ice-cream man. In the late afternoon, plumes of smoke begin billowing off of back porches and the the air takes on the deep perfume of charcoal. By 7pm, the whole city starts to smell like a Portuguese grill house.

And you know what that means.

BBQ

IS

BACK.

To celebrate the return of outdoor grilling and backyard socialising, I’d like to share the a recipe that I discovered a few weeks back, and that I suspect will be on heavy rotation during BBQ season. It’s a version of kefta where the lamb is spiced with a mixture of cumin, sumac and thyme, and studded with bright green pistachio nuts. There’s a really nice, tangy fast-pickled onion that you lay on top, along with some fresh mint and Greek yogurt, the whole thing is craddled in a warmed flatbread. It’s one of my new favourite things, especially when it’s accompanied by a cold beer.

While I don’t actually have a barbecue (details, details), I’ve made them in a cast-iron pan on the stove-top and they were delicious. If you happen to be one of those lucky bastards with a BBQ, I’m begging you to make good use of it and grill these suckers, kebab-style, on your beautiful, smoky, hunk of machinery.

No matter what heat source you’re using to make them, the important thing is to make sure your cooking surface is nicely preheated, so be patient in that regard. Also, I think these are best pink (medium) on the inside; some people will prefer them medium-rare. This should be fine as long as you’re using good quality meat and you know your butcher. Whatever you do, please please please don’t overcook them. They will get hard and weird and gross and then you’ll blame me for the crummy recipe, and then I’ll be like, “No! You cooked them too long!” and it’ll be awful because we’ll both know that I’m right.

Enjoy, friendlies. x

Grilled lamb kefta with pistachios and pickled red onion (adapted from Jamie Oliver) – serves 3-4

Kefta

  • 250g good-quality minced lamb
  • 1 Tbsp fresh thyme leaves
  • ½ Tbsp ground chilli
  • ½ Tbsp ground cumin
  • 1 Tbsp sumac
  • sea salt
  • freshly ground black pepper
  • ½ cup shelled pistachio nuts
  • ½ cucumber, sliced
  • a handful of fresh mint, leaves picked
  • a handful of flat-leaf parsley, leaves picked
  • ½ red onion, peeled and very finely sliced
  • ½ lemon (or 2 Tbsp red wine vinegar)
  • 4 large flatbreads or tortilla wraps
  • about 4 Tbsp natural yogurt

Directions

In a food processor, combine the thyme, chilli, cumin and sumac, a little salt and pepper and all the pistachios. Put the lid on and pulse until the mixture the pistachios are broken up into small pieces (but NOT ground). Add the lamb and pulse a few times until everything is combined (you may need to move the mixture around a little between each set of pulses to make sure everything mixes well).

Divide the meat into small patties (if cooking stove-top), or (if using a BBQ) separate into pieces that you will wrap and shape onto 4 metal skewers. Press little indents in the meat with your fingers as you go – the end result will have better texture.

In a small bowl, combine the sliced onion with a good pinch of salt and pepper and a squeeze of lemon juice (or a bit of red wine vinegar). Scrunch the onion in its “marinade” with your hands. Set aside.

Grill the patties (or kebabs) until nicely golden brown on all sides. When the meat is almost done, warm your flatbreads for 30 seconds on your griddle pan or under the grill, then divide between plates and top each with the and onion. When your patties (or kebabs) are cooked, slip them onto the flatbreads.

Add a few dollops of yogurt on the lamb and top with the cucumber slices, mint and parsley before rolling up and serving*.

(*in the original recipe, Jamie Oliver dresses some salad greens with some olive oil and lemon and adds it to the wrap in lieu of the cucumber. I pretty much just used what turned up in the fridge, but the addition of mixed salad would be really lovely too.)

Kefta detail

Lone wolf-ing it

I will admit that eating alone, and actually enjoying it, is somewhat of an acquired taste. Cooking just for yourself can be severely unmotivating because a) you know that you don’t need to impress/take care of anyone else; b) no one will reproach you for eating crackers for dinner or plucking something directly out of the jar with the fridge door wide open; and c) after a day of working, commuting, running errands, and overall hustling, it’s hard to muster the courage to dive head first into the kitchen to construct a meal. Once you get home after navigating through bursts of people and cars and buses and potholes, that popcorn and half-empty bottle of Perrier start to look like the best thing you’ve seen all day. In other words, when we’re tired and we know we’ll be dining solo, we usually gravitate towards things that are easy to grab and immediately gratifying (helloooo pickles), ultimately leading us to spoil our appetite for anything more substantial.

But I’m here to tell you that there’s is a better way. Even if you’re feeling capital “L” LAAAZY. Put down the box of Triscuits and allow me to introduce me to your new best friend: Cacio e pepe.

This is one of my go-to meals when I’m feeling completely bagged and uninspired. It takes under 10 minutes to make, it’s warm and comforting and home-made and a gentle reminder of how lone wolfing-it can be, well…nice.

Cacio e pepe (serves 1)

Cacio e pepe

¼ lb good-quality* dried spaghetti, linguini or bucatini
¼ cup (plus 1 Tbsp) very finely grated good-quality parmesan**
freshly ground black pepper
sea salt

*given the simplicity of this recipe, the quality of the ingredients is paramount. Don’t cheap out. You’ll regret it.

**for dishes like this, grating cheese on a microplane or the smallest holes of your box grater works best – that way the cheese melts as soon as it hits the hot pasta, resulting in a oozy, luscious plate of goodness.

Directions:

Cook the spaghetti in a large pot of boiling salted water until al dente.

Put a medium pot of fresh water to boil; once the water has reached a rolling boil, season with salt and add the pasta.

While the pasta is cooking, fill a deep glass or ceramic dish with hot water and submerge your favourite pasta bowl or plate in the water to warm it up before serving.

Once the pasta is cooked al dente, reserve ¼ cup of the cooking water, and then drain the pasta in a colander. Do not shake off the excess water. Transfer back to the pot, off the heat, and sprinkle with ¼ cup of the cheese and about 1 Tbsp of the cooking water. Mix to combine. Add a little more cooking water if you think the pasta looks dry.

Remove the pasta bowl from the warm water (without drying it) and place the pasta into it. Finish with some freshly ground black pepper and a sprinkling of the remaining cheese. Serve straight away with simple steamed greens or a salad (if desired).

Croissant speed-dating

As I sit here and write these words, the scent of butter is emanating from by being. This is not a metaphor, or a poetic musing. I just straight up smell like butter. It might seem like an odd thing to confess, but these days, smelling like butter makes me feel like I’m doing something right.

Here’s why.

In 2 weeks and 2 days I’ll be heading to Paris (!) for the first time (!!). While I’ve already mapped out the standard Paris virgin’s itinerary (one that includes that little tower and little museum), I’ve also made room for a few other things, including a viennoiserie class in the 4th arrondissement where I’ll be learning how to make croissants, amandines and chocolatines. With a French pastry chef. BY THE SEINE.

Pinch me.

By total coincidence, April 20th happened to be “La Fête du croissant” in Montreal, which means that over a dozen bakeries in the city were showcasing their version of the iconic French crescent and offering them at reduced prices. Under the guise of “research” for my upcoming class, I thought this was the perfect opportunity to eat an obscene amount of pastry take some notes. I enlisted a few friends to do some bakery-hopping with me to help determine what made a good croissant, and what made a not-so-good croissant, assessments based on the holy Parisian tenets of:

  • appearance
  • layers/texture
  • sound/smell
  • taste

4 friends, 4 bakeries, all within a 4-block radius of my apartment. Voici les observations:

9:25am – with Julie at Monsieur Pinchot’s

M.PinchotOverall look: flat; floppy; not really crescent-shaped; the way someone’s eyes look after a long cry
Layers/texture: layers? what layers?; cakey interior; greasy
Sound/smell: no crunch (thus no sound); sweet, buttery smell
Taste: surprisingly nice taste…if it wasn’t pretending to be a croissant (Julie says, “Oueh…pas les meilleurs.”)

—–

9:50am – with Simon at Co’Pains d’abord

(*Note: due to large demand, they were out of regular croissant, hence the chocolatine)

Co'pains d'abordOverall look: pleasantly plump; toasty-coloured exterior
Layers/texture: visible layers; airy; rises back up after you bite into it
Sound/smell: crispy shell that crackles nicely; scent of butter
Taste: pleasantly buttery; lightly yeasty (in a good way) (N.B I discovered that Simon likes to eat the crispy exterior in its entirety before the soft interior. He gets points for adorability.)

—–

10:30am – with Marko & Marie-Lou, breakfast with croissants from Le Grain de blé

Grain de bléOverall look: perfect crescent shape (Marie-Lou says, “It looks like a crab.”)
Layers/texture: uniformly toasted exterior; heavier than they appear; dense; overcooked ends
Sound/smell: slight crunch when squeezed; no memorable scent
Taste: underwhelming; we ended up making ham & cheese sandwiches with them (Marko says, “Yeah, these suck.”)

—–

11:55am – Fous Desserts, with yours truly

Fous Desserts 1

Overall look: relaxed crescent shape; golden exterior; lightly glossy; sexy
Layers/texture: visible, delicate layers; easy to pull apart; crispy exterior; airy, soft interior
Sound/smell: exterior had a satisfying crunch; scent of wheat and butter
Taste: rich butter taste that hits the tongue and melts; very lightly yeasty; nicely balanced in sugar and salt

Look...at...those...ayers (!)

—-

Of the four, Fous Desserts knocked it out of the park. Their croissant is epic. From now on, there is no need for me to go anywhere else in my neighborhood. This is croissant that slays all others.

If you live in Montreal, or are visiting, here’s where you can find them:

Fous Desserts
809 Av. Laurier Est
Montréal H2J 1J2 [Qc] Canada
Tel: +1.514.273.9335
http://www.fousdesserts.com/acceuil.html

Thanks again to Julie, Simon, Marko & Marie-Lou  xx

A riot of pink

If per chance, you plan on spending time with a group of 6-year-old girls (and, like me, do not have the experience of being a parent) know this:

1) Despite seeming level-headed and charming, they are complete maniacs. I don’t even feel bad about saying that. They’re mental. Especially when grouped together for an afternoon birthday party, with sustained access to sugar and chocolate. In their presence, you will bear witness to a level of shrieking that will be equal parts astounding and frightening. You will stand around with the only other adult in the room, wide-eyed and helpless, while drawing air circles with your index finger around your temple, silently mouthing the words “THIS IS FUCKING CRAZY”. Right from the start, your body will switch on to full alert, your heart will start racing and you will develop a slow, but sharp headache right between the eyes. You will seriously contemplate your ability to make it through the next three hours, possibly even the next three minutes.

…also, little girls:

2) Wear a TON of pink. They love it. They covet it. They want everything in it. They might’ve gone through a phase where they liked blue or yellow, and as they grow up, they’ll likely come to appreciate the whole spectrum of colours. But right now, their brain only acknowledges one colour: PINK. It’s a force to be reckoned with. Observe the evidence:

pink pink pink

Coincidently, these two observations found their way into the recipe below. Beets help lower your blood-pressure (to recover from little-girl-freak-outs) AND they have the magical property of turning bright magenta when blended with liquids. Ultimately, this soup will make everyone happy – the adults get to restablize, and the miniature raving lunatics get their pink soup. Win-win.

Warm beet and fennel soup (serves 4) – adapted from Bon Appétit

  • 2 Tbsp olive oil
  • 1 cup chopped onion
  • 1 cup chopped fennel bulb
  • 1 1/2 tsp fennel seeds
  • 2 large beets, peeled, cut into 1/2-inch cubes
  • 2 cups chicken broth (or vegetable stock)
  • 1 cup soup cream
  • additional sour cream for decorating (optional)
  • fennel fronds, for garnish (optional)

Beet and fennel soup

Directions:

Heat olive oil in large saucepan over medium heat. Add chopped onion, chopped fennel, and fennel seeds. Sauté until vegetables soften, about 5 minutes.

Add cubed beets and stir to coat. Add chicken broth and bring to boil. Cover; reduce heat to medium-low. Cook until beets are tender, 18 to 20 minutes.

Purée soup in batches in a blender (or with a hand blender). Return to the same saucepan season soup with salt and freshly ground black pepper. Add the sour cream* to the soup in the saucepan and rewarm gently. Ladle soup into bowls. Drizzle with additional sour cream and garnish with fennel fronds, if desired.

*If your sour cream is straight out of the fridge: place 1 cup sour cream in a bowl, then add one small ladleful of soup, stirring to combine. Repeat twice more until the sour cream is tempered – this will help avoid the curdling that can happen when cold dairy hits hot soup.